You can use the EXTRUDE tool for a variety of tasks. The main two are duplicating and extending objects. It's accessed via the 'E' key or in the menu. The menu gives you more options when you need more than a straight-forward extrusion. To get it 'out of the way', let's cover duplication. Remember, this is EDIT mode and you're editing a single object (as far as the file, in general, is concerned). Anything you add here is going to be part of that object. This means that the duplication of something here doesn't result in a new, individually editable object (color, texture...). It just gives you more of the same object.
-
Note:
-
You can extrude any part of the object, vertices, edges and faces.
-
If 'all' is selected, you will make a duplicate if you hit E on the keyboard and move your mouse. The newly created part will be part of the same object that you're editing. If less than all is selected (one face, the parts visible when selecting in SOLID mode...), the selected components of the object will move.
-
If you click the letter of one of the axes (twice for Z, for some reason) after you hit the E key, the selected components will be constrained to move along only that axis.
-
If you extrude a face down without insetting ('I' key) the walls, you will create infinitely thin walls that you'll have to delete or modify. Inset first before extruding. Insetting 0.01 units (enough) can be done by selecting the face, clicking I0.01 and ENTER. Then extrude.
-
Of EDIT and OBJECT modes, the EXTRUDE tool of available in EDIT mode only.
-
When you extrude, you make new vertices and edges on the faces that are extended. To make a 'clean' face, delete the edges. The faces will go away. select two opposing edges and click F to make a clean face.
-
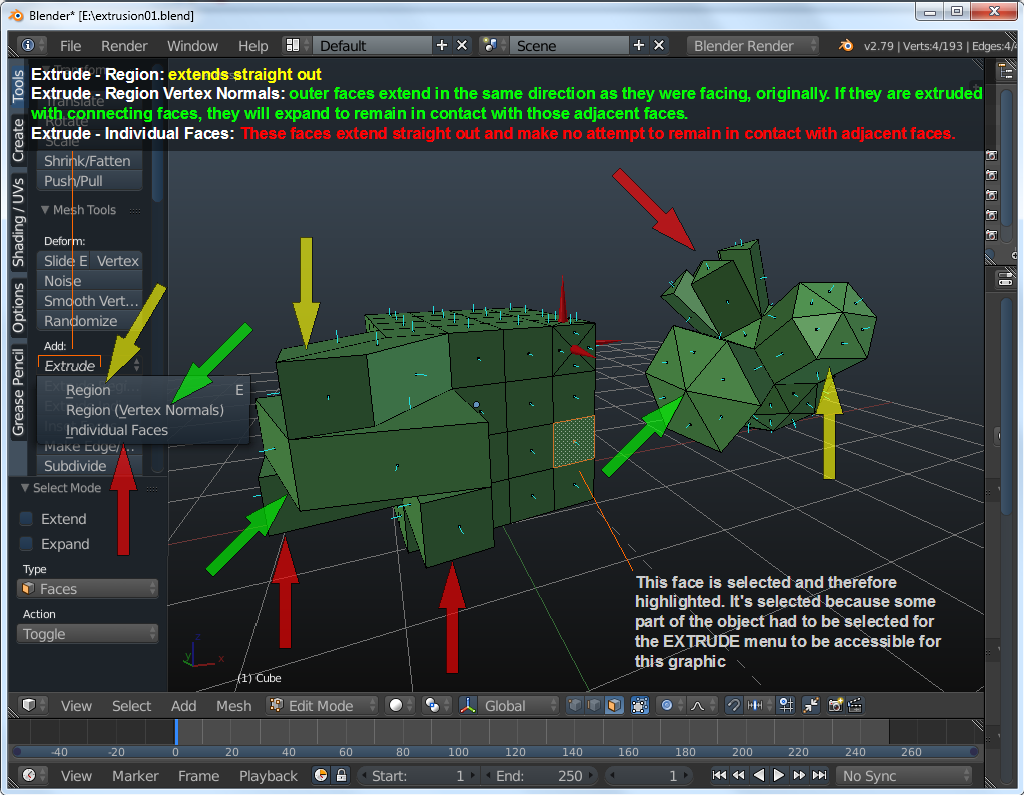
You'll see the 'term' NORMALS in this software. The 'normal' is a ray that extends from and is perpendicular to the face of the object. The IcoSphere in Blender has normals facing in many directions. The cube has normals facing in only 6 directions. In the image you'll see below, the short cyan protrusions represent the normals. The red cones were placed on and indication the directions of 3 of the normals (one for a side that you can't see unless you open the Blender file).
If you access the EXTRUDE tool from the T-panel, you generally have 3 options. Each one can produce significantly different results, particularly on objects with adjacent (touching) faces that are at different angles. If you had two adjacent faces that were at the same angle, all 3 options would have the same results. The following image gives you an idea of what you can expect on two different objects. THIS is the file that was used to create the image. You can open it to look at the object(s) from other angles.

Back to the Top


