|
Introduction to Firearms - The AR-15
This page is for those who have heard the term AR-15 and know it's a rifle but want to know more about it. This page will greatly help those who are thinking about buying an AR-15 type rifle because they're afraid they will be banned.
There are several extremely popular rifles for those interested in shooting targets and/or self defense. If you like to make modifications to things you own, the AR-15 (and variants) or the Ruger 10/22 will likely interest you. If you simply want a good quality, ultra-reliable rifle for self defense, the Ruger Mini-14 Ranch Rifle may interest you. This page will mainly cover the AR-15 and its various components. The information is a quick guide for those new to the AR-15. The information is available elsewhere but it's often time consuming to find the most basic information. The information on this page will allow you to understand the discussions elsewhere. As a reference, before we get started with the AR-15 we'll cover a couple of other common rifles (mentioned above) so you can compare them to the AR-15.
A quick note:
This page is written with the expectation that you've already read and fully understand the information on the Introduction to Firearms page. If you haven't read it yet, do so now. It's the page directly above this one in the directory to the right (17a). If there is no directory to the right of this page, please click HERE to properly load the site. Then scroll down in the directory to find the Introduction to Firearms page.
Ruger 10/22
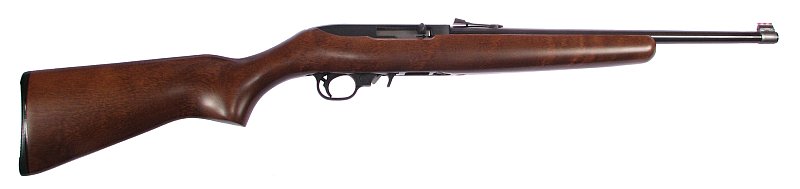
Overview:
The Ruger 10/22 may well be the most popular and most modified rifle ever produced for the US civilian market. You can get virtually anything that you could possibly want for it. The barrels are easily replaced and readily available. If you want to replace a thinner barrel with a heavy target barrel, you can. Of course, since the stock is inletted for a thin barrel, you have to replace the stock as well (unless you're capable of inletting it yourself). If you're going to use it as a target rifle, you can buy drop-in competition/match trigger assemblies/components. If you intend to take it with you on hikes, you can buy folding stocks to reduce weight and length. Again, this rifle is nearly infinitely customizable.
Action:
The 10/22 is a .22 caliber semi-automatic rifle that uses a simple blowback design. It comes with a 10 round rotary magazine that clips into the bottom of the receiver and fits flush with the stock. It's named for these features (10 round, .22 caliber). You can buy larger magazines like the Ruger BX-25 25 round magazine.
Use:
The 10/22 rifles are popular for target shooting and small game hunting/control. They are accurate (out to about 75 yards) and very reliable as long as they are well maintained. The .22 caliber rim-fire ammunition tends to make a bit more of a mess inside the action of a semi-automatic rifle (compared to a single shot bolt-action rifle) so it will need to be cleaned regularly. Fortunately, the disassembly of the rifle is simple and so is basic cleaning.
Sight Options:
The 10/22 comes with open/iron sights (which may or may not have fiber optic inserts -- used to make it easier to see the sights in low-light conditions). The top of the receiver is drilled and tapped to allow the installation of a mounting rail. The rail will allow the installation of scope or red-dot type sight.
Criticisms:
There aren't many valid criticisms. Some complain about the accuracy at 100 yards but this isn't the type of rifle you buy if you're expecting sub 1MOA (1 minute of angle - just over 1" at 100 yards) groups.
The Ammunition:
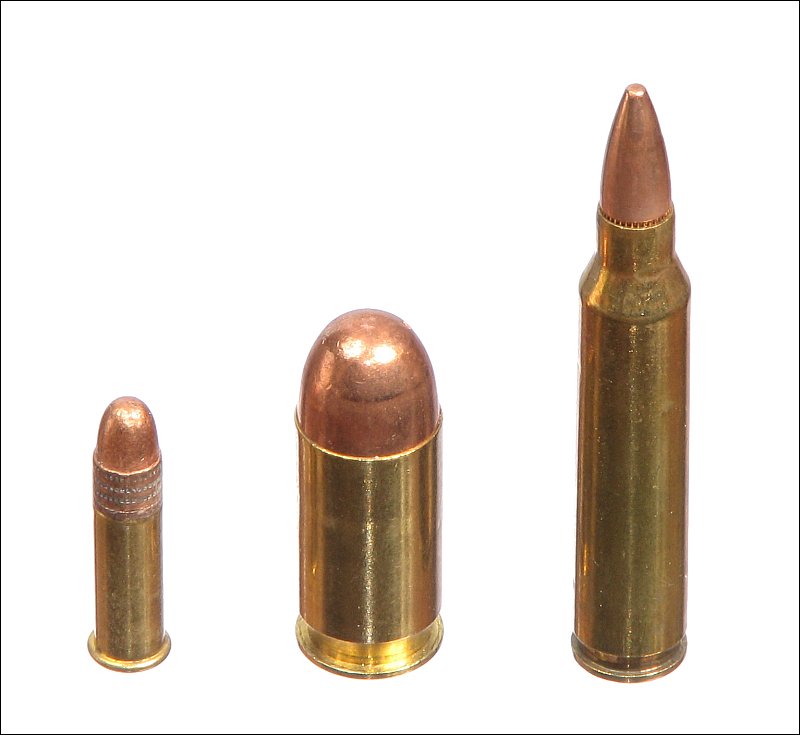
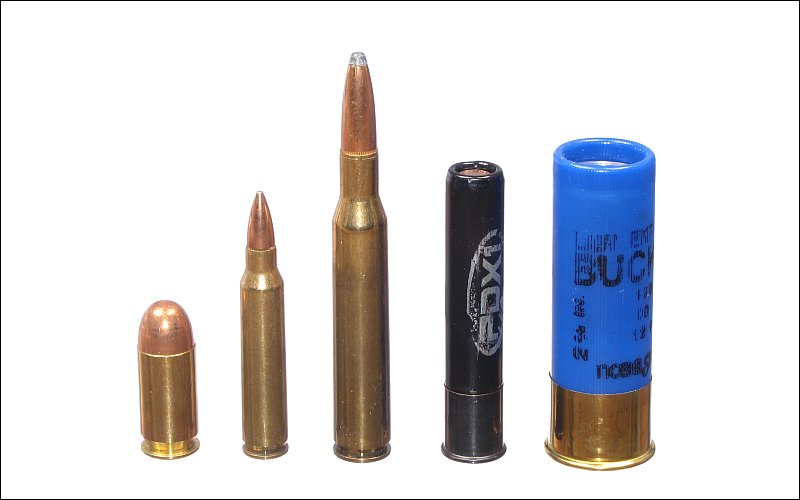
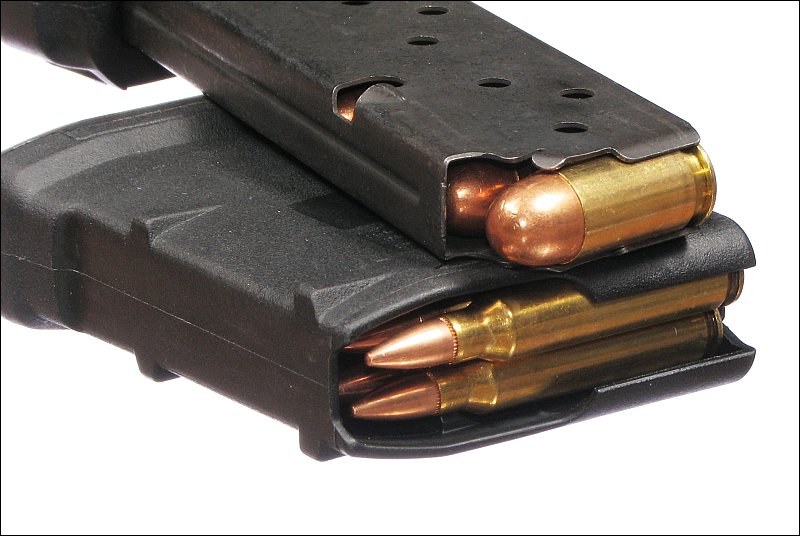
The .22 caliber ammunition is relatively inexpensive (except for times when people are buying up ammo out of fear that it will no longer be readily available). For this and other semi-automatic rifles to cycle properly, you need to use .22LR (long rifle) ammunition. If you use .22 shorts or other ammunition with lower power or lighter projectiles (like .22 shotshells), there may not be enough force to push the bolt back far enough to eject the empty casing and pick up another round. In the next photo, the cartridges (left to right) are a .22LR, a .45ACP (semi-automatic handgun ammunition) and a .223 Remington (the ammunition used by the next two rifles).
Note:
The .223 caliber is essentially the same as the 5.56mm x 45mm NATO round. The 5.56mm is the diameter of the bullet. The 45mm is the length of the casing from the back of the cartridge to the opening in the neck. This doesn't include the bullet.
Ruger Mini-14
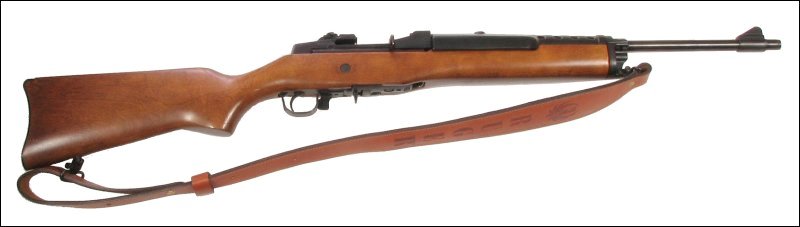
Overview:
The Mini-14 is a scaled down version of the M14 rifle (military rifle). The Mini-14 is generally chambered for .223/5.56 NATO. The exception is the target version which uses a tighter tolerance chamber and is only to be used with .223. The .223/5.56 rifles can fire either .223 caliber or 5.56mm NATO ammunition. These are very nearly identical cartridges. The Mini-14 with a blued barrel, a wooden stock and a 5-round magazine (which fits flush with the stock) is much less intimidating than an AR-15 but for self defense, the two are comparable.
The Mini-14 and the AR-15 can fire at approximately the same rate (as fast as you can pull the trigger). They fire the same ammunition and they can both accept standard capacity (30 round) magazines. The Mini-14, however doesn't look as scary so it's preferred by some for that reason (it doesn't look any "scarier" than the Ruger 10/22). The Mini-14, however, is incredibly reliable. The AR-15 is reliable but it's much more complex than the Mini-14. There is virtually nothing that can cause the Mini-14 to malfunction (unless you let it get really rusty or fill it full of dirt). One drawback (for those so inclined) is that there are very few mods available for this rifle. One perceived drawback is accuracy (or lack thereof).
Action:
The Mini-14 uses a gas operated action (it uses gas produced by the propellant to cycle the action). There is a port in the barrel. The gas-block transfers the gas from that port to a piston and rod. The rod pushes the bolt back. The bolt ejects the spent casing. A recoil spring pushes the bolt forward, stripping a new round from the magazine. As the bolt reaches the end of its travel, it's rotated to lock the lugs into the receiver. This is different from simple blowback designs which don't use a locking bolt. One advantage of the system used in the Mini-14 (which varies significantly from the AR-15 system) is that the propellant and associated byproducts (carbon, unburned powder...) don't foul the operating mechanism. This significantly increases the reliability of the rifle.
Use:
The Mini-14 rifles are popular for small game hunting and small to medium pest control. The (.223/)5.56mm round is used by the military in their combat rifles so it's definitely capable of killing something larger than small to medium game but for large game animals, a larger caliber is typically used.
Sight Options:
The base rifle comes with iron sights.
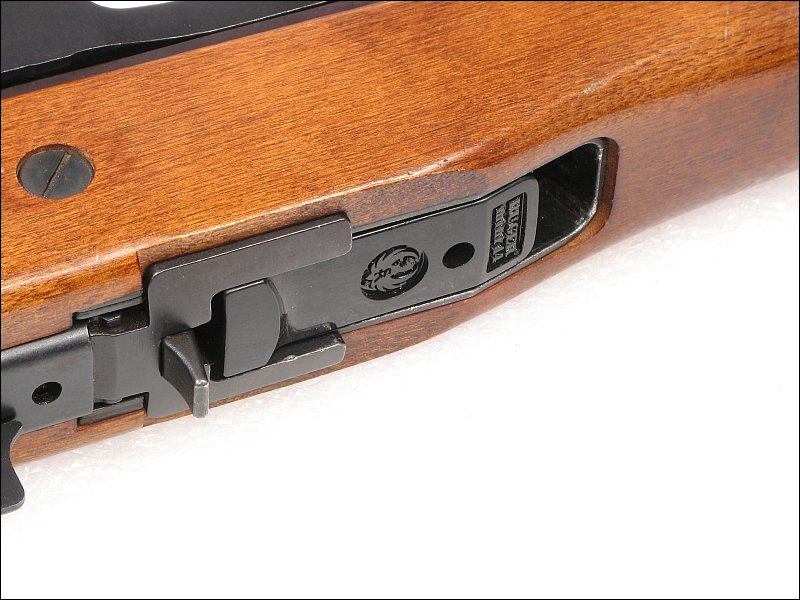
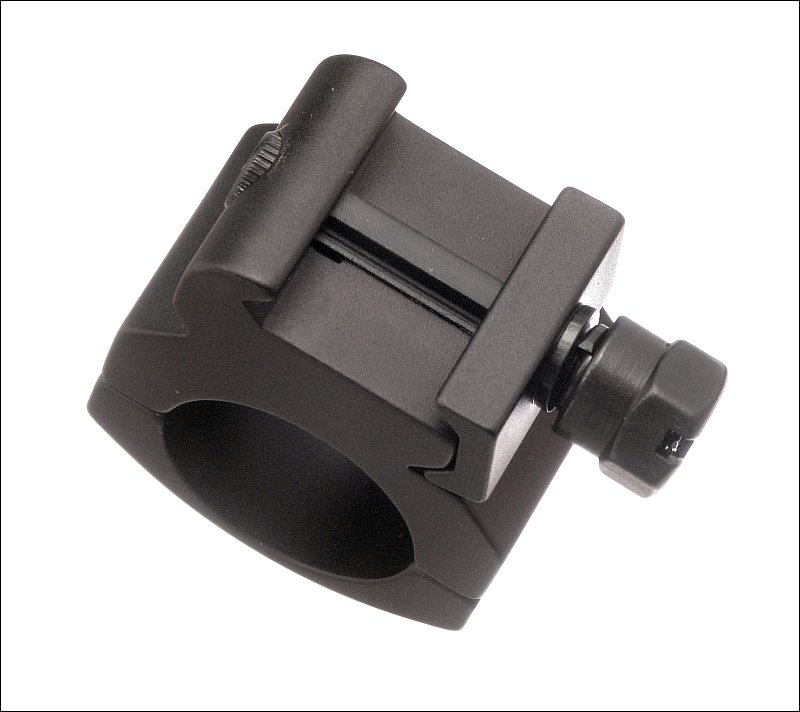
On the earliest versions of the Mini-14, it was somewhat difficult to use a scope because the rifle ejected the spent casings straight up (which would hit the scope or scope rail). To use a scope rail with the early versions, you have to use a mount that's relatively high and mounts onto the side of the rifle. The later versions were changed to eject more to the side. They also had mounting points for a scope mount. A Picatinny rail is typically mounted to the mounting points which allows great flexibility in mounting optics or other accessories. The Picatinny rail below is for a Mini-14 and replaces the handguard.
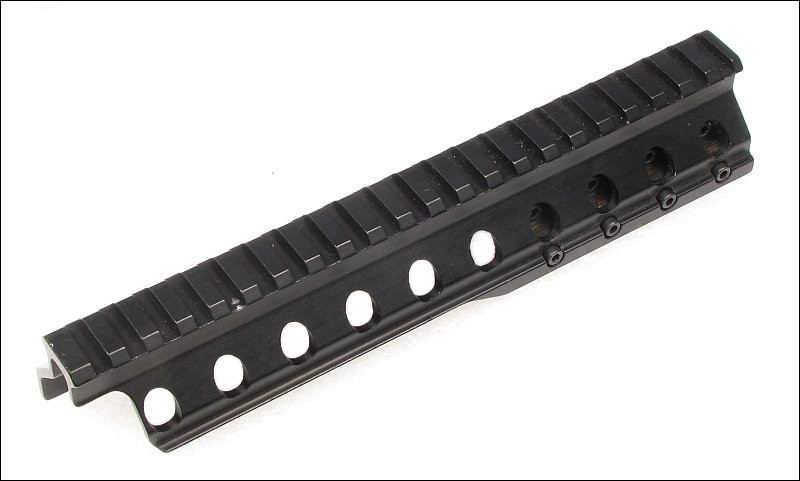
Note:
This handguard is mounted to the barrel. If you dump several large magazines in quick succession, the barrel will heat up. This will also cause this type of handguard to heat up as well.
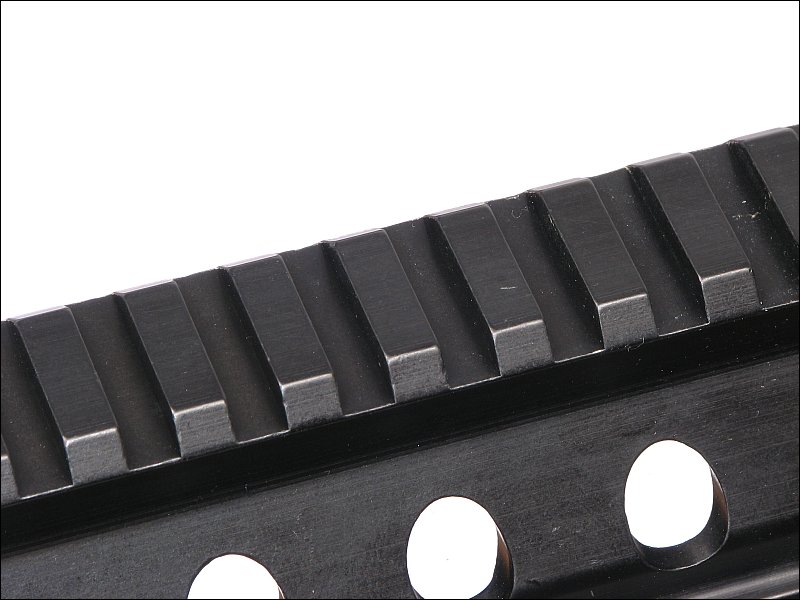
In the following photo, you can see the bottom of a scope mounting ring. The grooves in the Picatinny rail prevent the accessories mounted to it from slipping. Standard scope rings don't have the crossbar where they clamp to the Weaver rail or dovetail of a firearm.
Criticisms:
The long-range accuracy of the Mini-14 has been it's biggest (perceived) problem. Don't expect the Mini-14 to compete with the best bolt-action and AR-15 target rifles. The older Mini-14s had a thin barrel that tended to cause the vertical point of impact to drift if the barrel heated up from a high rate of fire. The newer, heavier barrels have remedied that. The lack of accuracy for thin-barreled rifles is/was absolutely insignificant for most users. Not many people use the Mini-14 for long range target shooting or long range hunting. For long range target shooters, the AR-15 is more commonly the firearm of choice. Out to about 75 yards, any missed shots for reasonable size targets are more likely due to the shooter than the rifle (for average shooters). For self defense or taking out pests on your property, the Mini-14 is easily accurate enough.
The Ammunition:
Many would have you believe that the AR-15 is a high-powered rifle that no one should own. The fact is that the AR-15 fires a relatively small diameter bullet and falls near the center of the range in regards to power. In the following image you can see five cartridges. The far left is for a .45 auto. This is a common pistol caliber and those who own firearms nearly always have either a pistol or a rifle chambered for this caliber ammunition. Of the next two, most people would guess that the larger one would be the AR-15 (or Mini-14) cartridge. Of the two, the smaller is the cartridge that the AR-15 (and Mini-14) uses. The large center cartridge is a .270 Winchester. This is a cartridge that's commonly used for hunting deer or other relatively large animals. If you know anyone who hunts deer, they likely have a rifle that fires a similar round. The last two are shotshells (L-R .410 and 12 gauge) and are included for reference.
AR-15
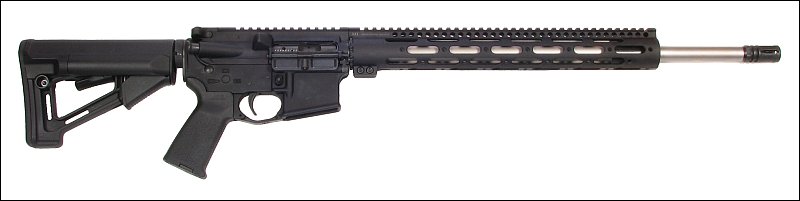
Overview:
The AR-15 is the rifle that many would have you believe is evil incarnate. Of course, it's not. It's an inanimate object. There are millions of them in the hands of normal, ordinary people and they are rarely ever used in crimes. For those who know virtually nothing about firearms, they believe that it's more dangerous than a more conventional rifle because it's a "military-style" rifle. In the Mini-14 section, it was stated that that rifle was capable of the same rate of fire and had the same magazine capacity as the AR-15 but, just looking at it, it doesn't instill as much fear because it has a nice wood stock, no pistol grip and generally doesn't have a magazine hanging under the rifle.
The things that make the military variants of the AR-15 good quality firearms make them desirable for those who like to shoot. To be good for the military, it needs to be rugged, reliable and accurate. Those are all desirable traits. What makes the civilian version (the AR-15) different is that the civilian version has no full auto fire mode. You get one round fired for each time you pull the trigger. The older M16 rifles had a full auto mode where you could empty the magazine with one trigger pull (pull and hold). The newer M16s and M4s have semi-auto (one round per trigger pull like the AR-15) and a select fire mode where they fire 3 rounds per trigger pull.
Action:
This is the basic operation of the AR-15 and its variants. In the next section, you'll see the internal components in detail. The AR-15 and variants (rifles built on the same platform) use direct gas impingement to operate the bolt. Like the Mini-14, gas that's propelling the bullet down the barrel is siphoned off through a port in the barrel. This gas is transferred back to the bolt carrier through the gas tube. The tube fits into the gas key on the bolt carrier. When the gas enters the carrier, it pushes back on the bolt. There is a slot in the bolt carrier that causes the bolt to rotate as the bolt moves rearward. From there, it functions like most other semi-automatic rifles. The bolt pulls the spent casing from the chamber with the extraction lug on the bolt. The ejector pin throws the casing through the ejection port when the open end of the cartridge clears the loading port. When the bolt and bolt carrier reach the end of their rearward travel, the recoil spring pushes them forward, stripping a round from the magazine. As the bolt reaches the end of its forward travel, the ejector lug grabs the rim of the cartridge and the bolt is rotated closed. At this point, it's ready to fire again. There is a lot happening but it only takes a fraction of a second from the time the trigger is pulled to the time it's ready to fire again.
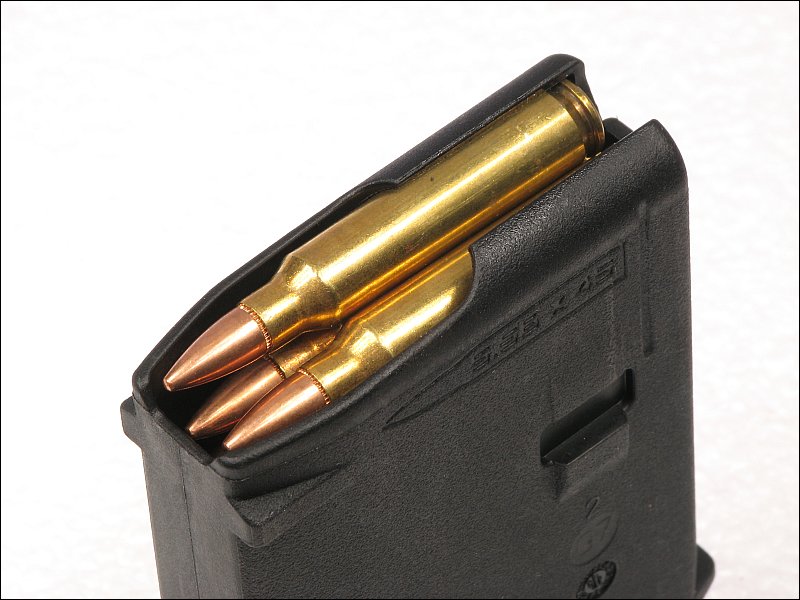
The AR-15 is fed from a box-type magazine (not a clip). The magazine is inserted into the magazine well and firmly seated with a sharp tap on the bottom of the magazine. This is done to ensure that the magazine is securely locked into the rifle.
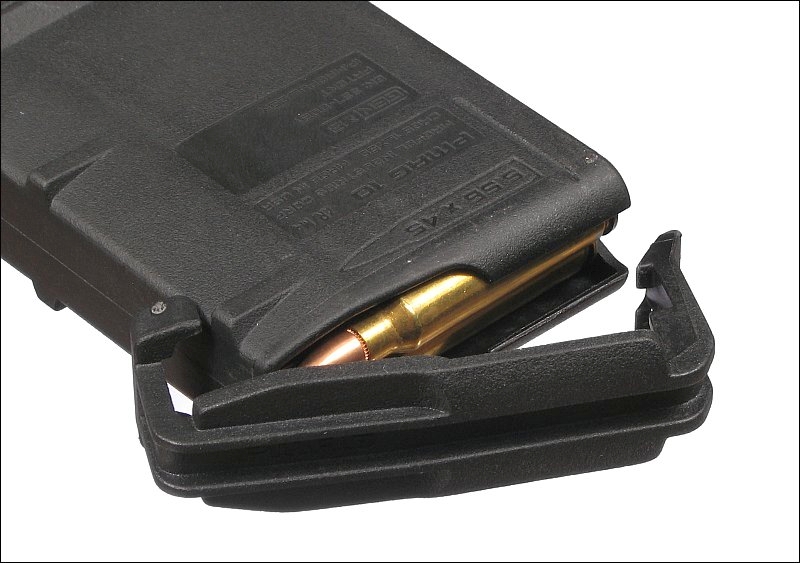
The following image shows a loaded magazine.
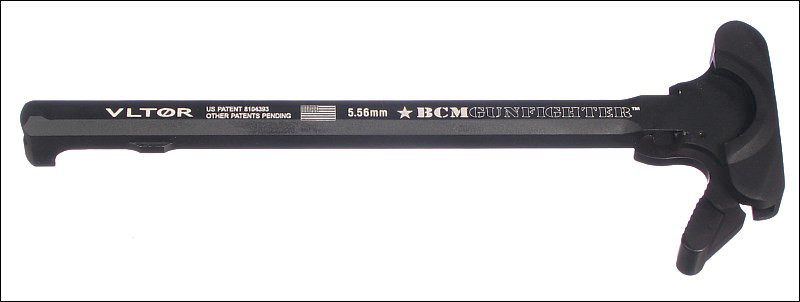
To load the rifle (to move a new round/cartridge from the magazine into the rifle's chamber) for an AR-15 type rifle, the charging handle is pulled back. In the image below, the charging handle is the T-shaped component with the lever attached to the top-left side of it. The lever releases the charging handle latch when it's pulled back.

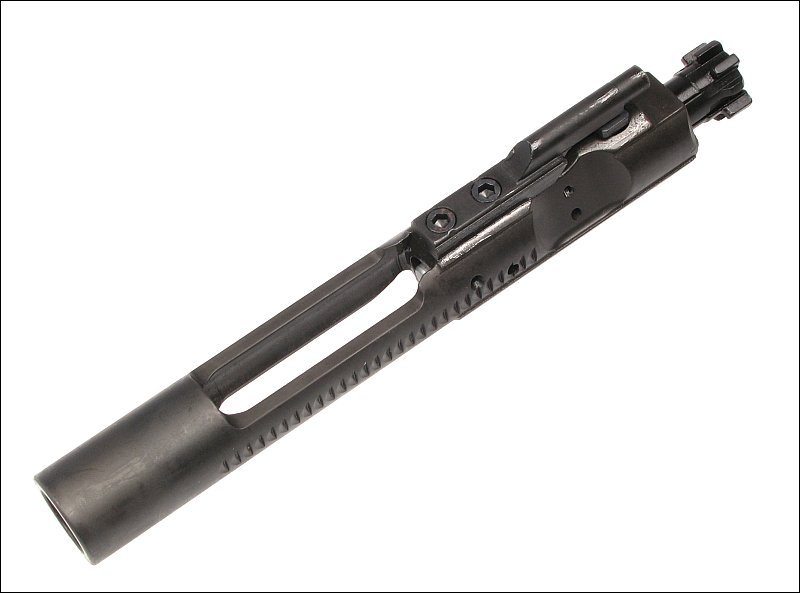
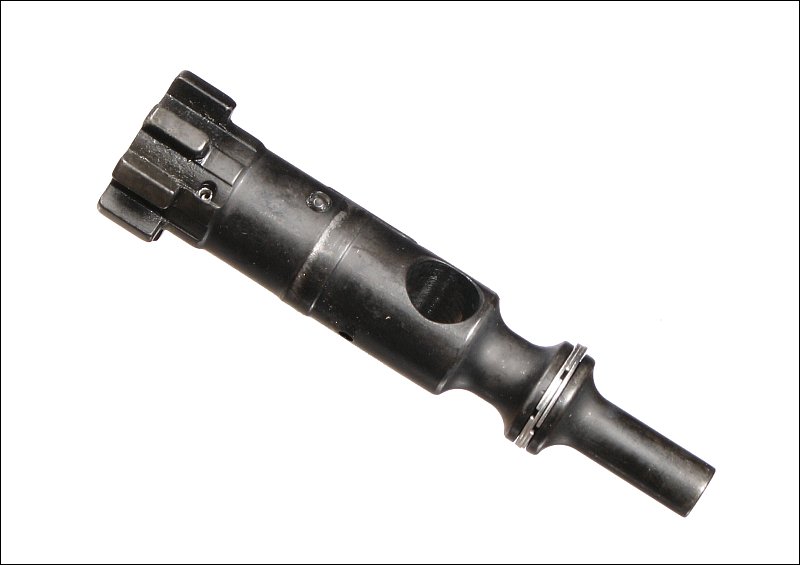
To better understand the next step, you need to know what the bolt and bolt carrier are. The next image is the entire bolt carrier group (also referred to as the bolt carrier assembly by some manufacturers and dealers). The second photo shows the head of the bolt. The bolt carrier group will be covered in more detail later.
The charging handle pulls the bolt carrier group back to a point where the front edge of the bolt is behind the back rim of the cartridge. Below, the bolt is locked back. Normally, when there is a loaded magazine in the rifle and the charging handle is released, the bolt carrier group is driven forward by the recoil spring. As was previously stated, when the bolt and bolt carrier group move forward, a new round is stripped off of the top of the magazine and driven into the chamber.
Dummy Rounds:
The cartridges in the image above are not 'live'. They are dummy rounds used to test the function of a firearm (loading, ejecting, dry firing for firearms that shouldn't be dry fired without a striking surface for the firing pin...). These are part number 12222 and can be found under the names Pachmayr, Lyman or A-Zoom when searching the net for them. Although it's rare, a rifle will sometimes malfunction and fire a round when the bolt slams shut (referred to as slam-firing). This can be due to the firing pin having enough mass to drive itself into the primer when the bolt suddenly stops. It can also be due to having a firing pin that has seized in the bolt (from being dirty/contaminated/rusty). This is why it's important to use dummy rounds when testing firearms.
The next two images show the hammer that strikes the firing pin. In the first photo, the rifle is cocked and ready to fire. The second image shows the hammer position after the trigger has been pulled. When the rifle has actually been fired, the hammer stays in the position shown in the second image for only a fraction of a second.
The head of the firing pin is visible in the slot in the bolt carrier. The cotter key is the firing pin retainer pin. It's not bent to keep it in place like you would with most cotter keys. When the bolt carrier is out of the rifle, the firing pin retainer is held in place by the friction of the legs of the pin in the carrier (the legs of the pin are spread slightly so they touch the sides of the hole in the carrier). When the carrier is in place in the rifle, the pin is held in place by the upper receiver (there's simply not enough clearance for it to fall out). The cotter key retaining pin was (supposedly) designed to be able to be removed with the tip of a bullet. If you can't pull it out and don't have any other tools available, try using the tip of a bullet to pull it out.
This is the firing pin. Most are made of steel but many shooters buy titanium replacements. The most common reason a titanium firing pin is chosen is to reduce the likelihood of a slam-fire. In the AR, some shooters that choose the titanium firing pins because the titanium pin has less mass and therefore less momentum. When the bolt slams shut, the firing pin will make light contact with the primer in the cartridge. It's sometimes possible to see a small indentation in the primer of a cartridge that has been chambered but not fired. The reduced momentum means that the impact will be less severe and therefore less likely to set off the round. This is why it's important that you not use live rounds when testing your rifle anywhere that it's not safe to fire a round. If you decide to use a titanium firing pin, keep your original one on hand as a backup. Many people get good service from titanium firing pins and some break after a relatively short time.
Important!
If you decide that you have to test your rifle's action with live rounds in a location where it would be dangerous to fire off a round, there are two things that you can do to make it safer. First, remove the firing pin and install a shortened firing pin. You cannot cycle the action without a firing pin because the firing pin prevents the cam pin from getting out of place. If it gets out of place, you could have a serious jam that you'll have to work to clear with a live round in the chamber. Firing pins cost about $10. Buy one and cut enough off it so that it cannot possibly protrude from the bolt and then smooth the tip so it slides into place freely.
The second thing that you need to do is look at the back end of the ammunition. The primer MUST NOT stick out beyond the back of the casing. If it does, it's possible that the bolt face could set off the round. If you can't tell for sure that the primer is properly installed, stand the cartridge on a hard, flat, smooth surface. The rim of the cartridge should contact the surface around the entire perimeter of the cartridge and the cartridge shouldn't wobble on the surface.
Use:
For those who use the AR-15, the most common use is likely shooting targets. Some are used for hunting and many do nothing more than take up space in a gun safe or a closet. The threat of banning the sale of these rifles has likely done more for rifle sales than all of the gun salesmen in the country. The AR-15 can be built to suit a number of uses. For those in law enforcement, a short/compact version would be desirable. For those who mainly shoot targets, a version with a longer barrel may be desirable.
Sight Options:
There are many site options. For those who want to be able to get on target quickly, open sites or a red-dot type site may be a good choice. For those who shoot at medium range, a red-dot or a low power scope may be used. For those who shoot at longer range, a high power scope may be the optic of choice.
When mounting a site, you have to consider the type of rifle you have. Handle-top rifles require different mounts than a flat-top rifle. A flat-top rifle generally gives you more options for mounting optics. For those who want to use their rifle for self-defense, a red-dot is often desirable but you don't want to rely on an optic that becomes useless when the battery is dead. If you want to use a red-dot in addition to the iron/open sites, you have to choose sights that are at the same level so that you can see the mechanical sights through the red-dot optic. This is called 'co-witnessing'. Standard co-witnessing has the red dot at the same point in the field of view as the top of the iron sites. 1/3 co-witnessing has the red dot well above the iron sight line of sight. The iron sights are viewed through the red dot window, below the red dot.
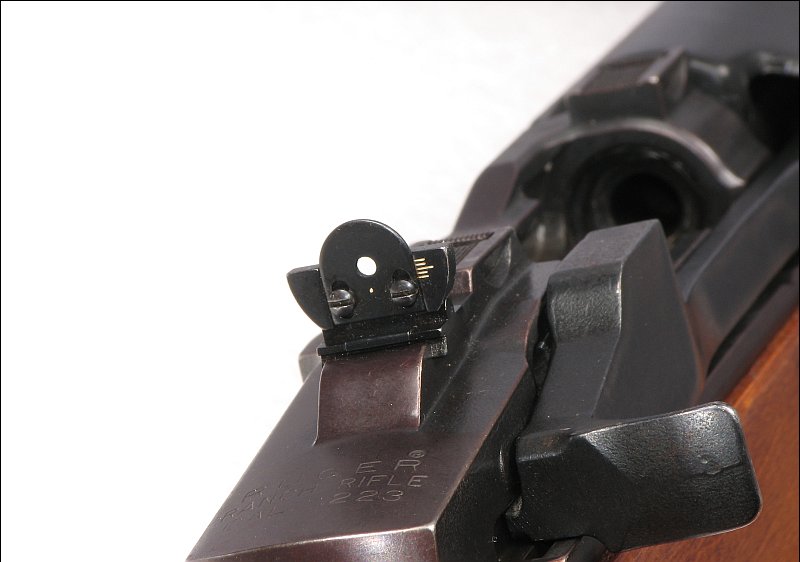
For most AR-15s, the rear is an 'aperture' or 'ghost ring' sight and the front is a standard post sight. For most sights, the rear sight is adjusted when the point of impact is too high or too low. The G.I. (government issue) sights are a bit different than standard rifle sights. The military sight for a standard G.I. rifle has a rear sight that is calibrated for various distances. You set the rear sight to one of the marked settings (300 yards, for example) and adjust the front sight to zero the sights at that distance (25 and 300 yards commonly use the same setting so you can zero it at 25 yards). From that point on, you rotate the elevation adjustment on the rear sight to the range to the target.
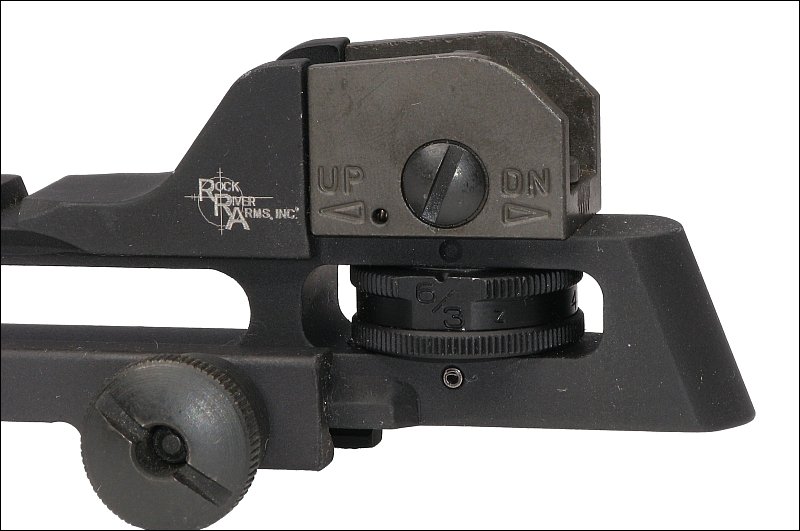
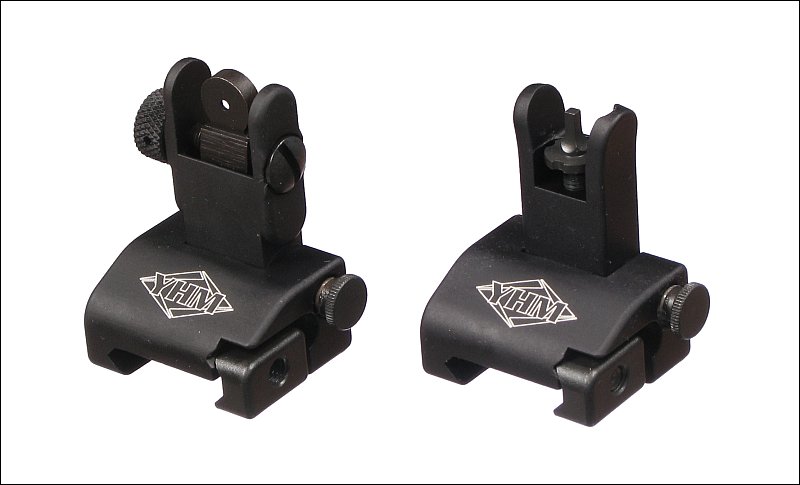
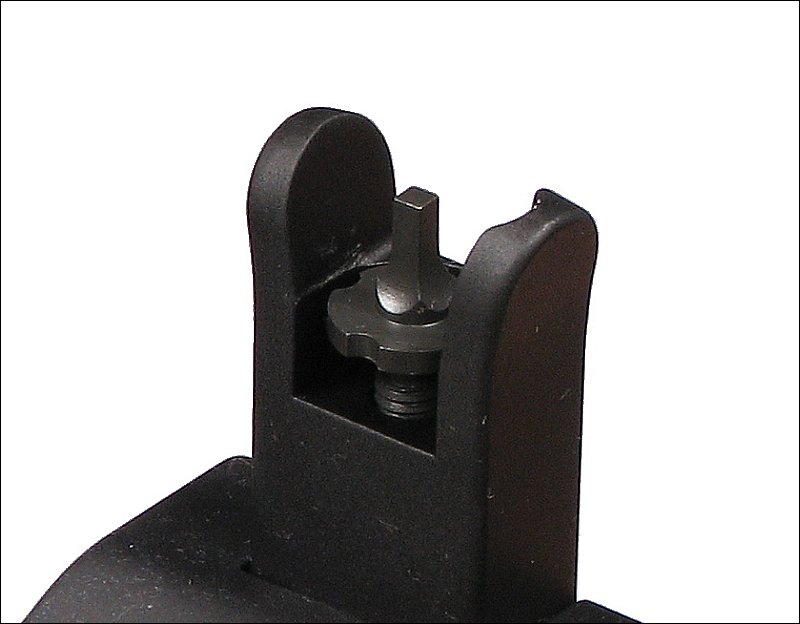
The sights below are aftermarket sights. Iron sights on a rifle are sometimes known as 'backup' sights. They are used in case the primary optic (often a red-dot type sight -- that relies on electronics to function) fails. It's common for backup sights to fold down so they're not in the line of sight under normal conditions. The two below are similar to G.I. sights but there is no elevation adjustment on the rear sight. As with the G.I. sight, the front sight can be adjusted up or down. You can adjust it without the tool but using a front sight tool makes it much easier. The tool has 4 or 5 posts that drop down into the slots on the post. These posts prevent the detent in the sight from coming up into the notches in the sight, allowing it to turn freely.
Criticisms:
The greatest criticism of the AR-15 platform is reliability. The direct-impingement system causes hot-gases, carbon and unburned powder to be passed through the bolt carrier. If the firearm isn't well maintained, this alone can cause the rifle to malfunction. In dirty environments, dirt/dust/sand can cause problems. If the firearm is well maintained, it's very reliable.
Terms
Now that we've covered a bit about the rifle and its function, let's cover a few terms.
Tactical:
The term tactical is commonly used. It's generally for items that are to be used in a confrontational situation where you will have to defend yourself. Not all AR-15s are designed to be 'tactical'. The one in the photo (wherever it is), is black but it doesn't have all of the 'tactical' accessories (flashlights, laser sights, etc...). This one will have a rifle scope mounted on it and not much else. It was designed to be a target rifle, not a defensive weapon.
Furniture:
The term 'furniture' as it relates to firearms refers to the components that make the firearm more comfortable to handle/use. This includes the various grips (pistol grip, forend grip...) the buttstock, a bipod, a detachable carry handle or various other accessories. These are typically pieces that are selected to best fit the shooter and the shooting type (target, tactical, hunting...).
Floating Hand Guard:
The hand guard is the part of the rifle that's used to protect your hands from the heat produced by rapid fire (which causes the barrel to heat up). Government Issue (G.I.) hand guards (like the one below) are very simple. In the rear, the spring loaded 'delta ring' keeps it locked in place. The front of the hand guard locks into the standard front sight. This works well enough for most users but it can cause problems with accuracy. When you put pressure on the hand guard (using it with a sling, using a bi-pod, resting it on something to steady it...), the hand guard puts pressure on the barrel and causes it to deflect slightly. This will change the point of impact. The change in the point of impact will increase with a change in the force applied and/or the distance to the target.

Note:
The handguard in the photo appears to be huge compared to the floated handguard. The actual length is only about 8". The length of the floated handguard on the rifle below is about 15".
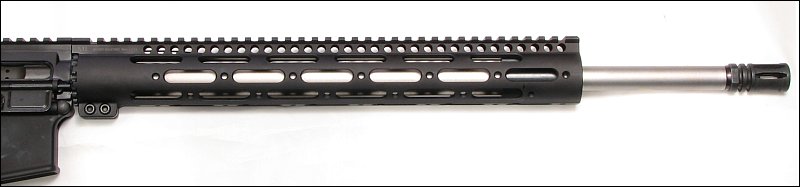
A 'floated' hand guard (below) eliminates problems with barrel deflection. It's only point of contact with the rifle is at the point where the barrel connects to the upper receiver. You would have to put excessive force on a floated hand guard to cause a change in the point of impact.
Upper Receiver:
The upper receiver is the top part of an AR15. The barrel is fixed into the upper receiver by a large nut. The upper receiver also houses the bolt carrier group, the forward assist button/plunger and the charging handle.
Lower Receiver:
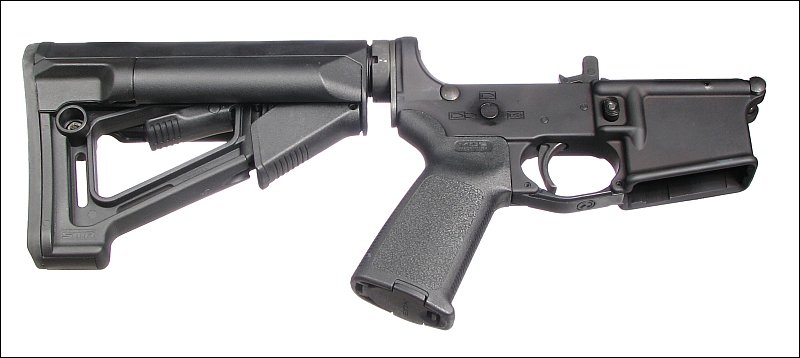
The lower receiver is the part of an AR-15 that's considered to be the 'gun' (as far as the federal government is concerned). The serial number is on the lower receiver housing. This part of the rifle has to be purchased from a licensed firearms dealer (FFL - federal firearms licensed dealer) and you have to pass a background check to buy it. You can buy the receiver online but it has to be shipped to an FFL dealer so that they can perform a background check on you before they transfer it to you. This is the only part of the rifle (for most states in the United States) that requires a background check. This applies to the lower receiver housing. All parts that are assembled into or onto the lower receiver can be purchased from anyone who has the parts for sale. Most of the parts can be purchased on eBay.
Complete/Stripped Upper/Lower Receivers:
The terms complete and stripped tell you if the receiver has all of the parts required to function. For example, if you buy a complete upper (including the bolt carrier group and the charging handle) and a complete lower, all you have to do is pin them together and you will have a fully functioning firearm. Stripped uppers and lowers have only the base components that all of the other components fit into. Many times, people prefer to build their own rifles from the lowest possible point. This takes more work but allows customization. The image below shows a complete lower receiver.
80% Lowers:
Above, it was stated that you have to buy the lower receiver from a licensed firearms dealer. This only applies to lower receivers that are ready to be assembled with no other work required on the lower receiver. There are lower receiver manufacturers that sell receivers that need a bit more work to function as a firearm. In general, these require that you machine out areas to allow the trigger group and other components to fit into place. These can be sold because it's not considered a firearm until it's completed (by removing excess material). These come in polymer (plastic) and aluminum. There are jig and bit kits that you can buy to help in the milling of the receiver. The jigs generally bolt up to the receiver and give you a guide as to where to remove the material. The aluminum 80% lowers require a bit better tools to do a good job compared to the polymer lowers.
When you buy an 80% lower, it will not have any serial number. Although they weren't intended for resale, they can be re-sold. A serial number isn't required but it's recommended that you engrave some sort of serial number on it so that it can be identified if stolen.
If you're looking for more information on 80% lowers, try the 80percents.com site.
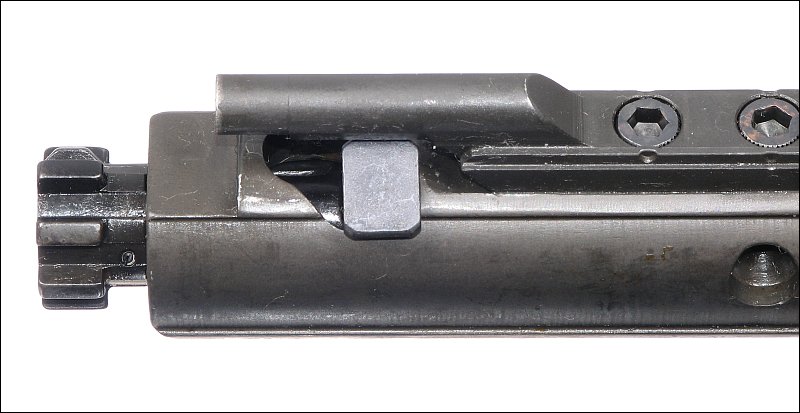
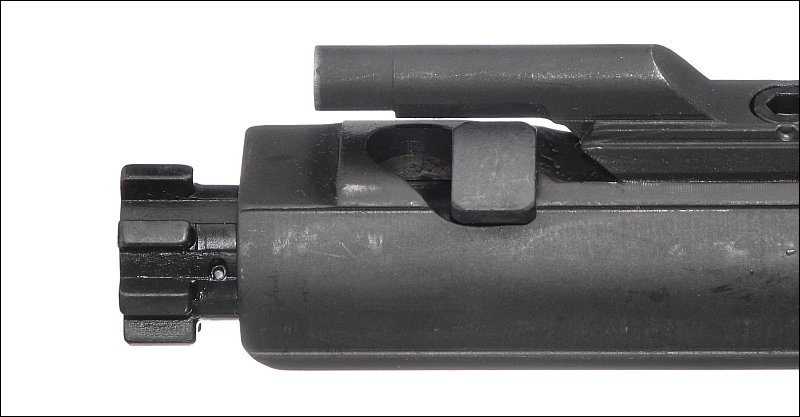
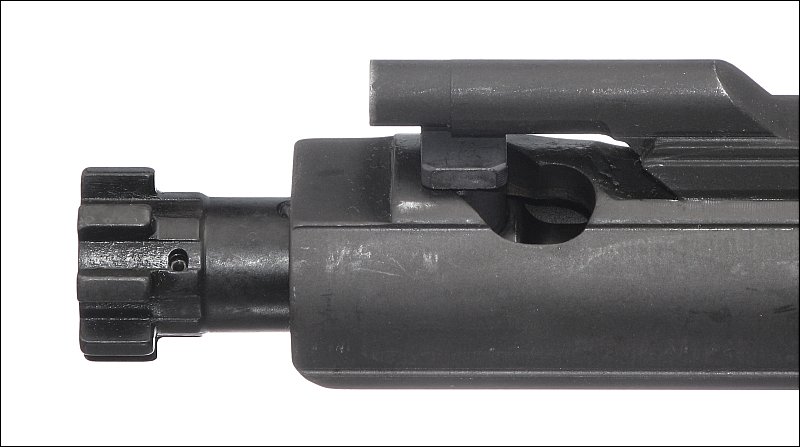
Bolt Carrier Group:
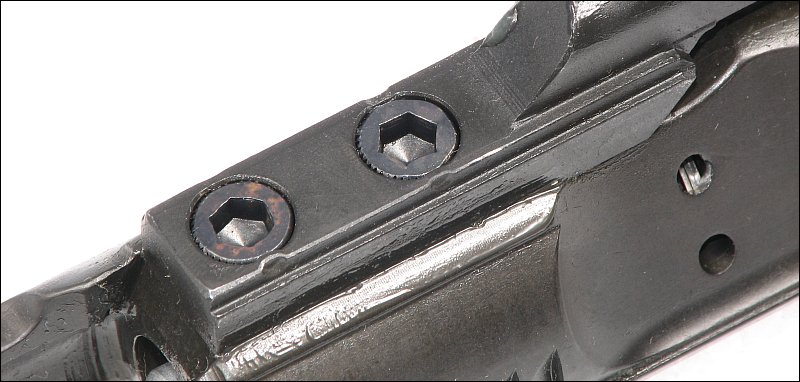
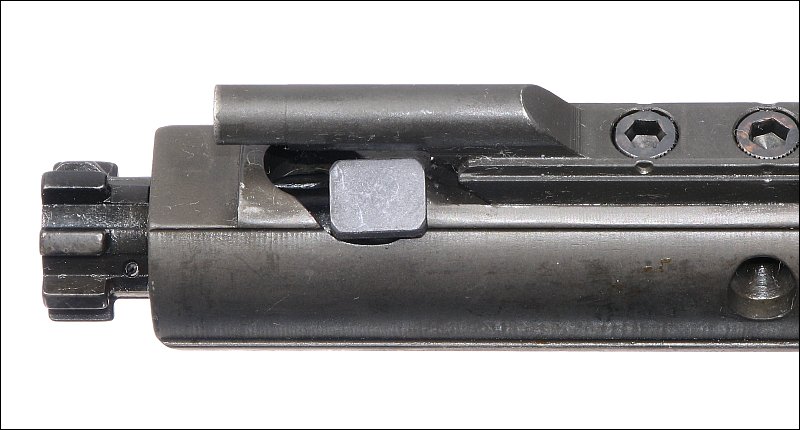
The BCG consists of about 18-20 parts. The main part of the group is the bolt carrier. This is the part that most of the larger components mount into. This is the entire bolt carrier group.
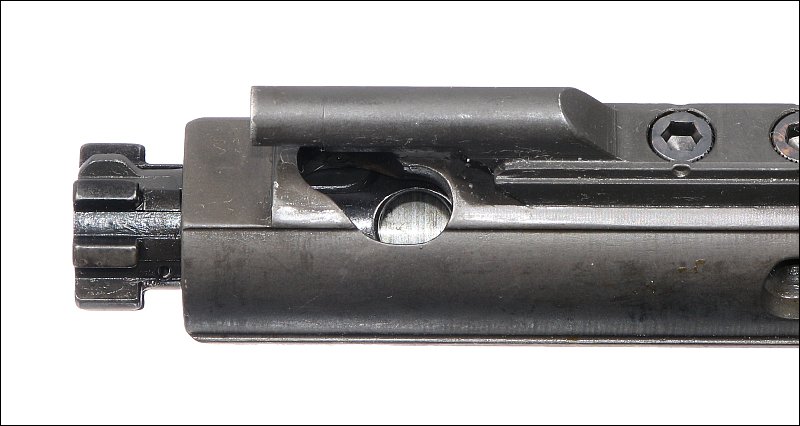
The gas key is mounted to the to top the bolt carrier with two screws. This is virtually never removed from the bolt carrier so the screws are staked into place. In the one below, you can see that one of the stakings was weak for the rear bolt.
The next two photos are of the gas key. The gas from the barrel enters into the cylindrical part of the key and exits from the bottom of the key (elliptical hole in the bottom of the key).

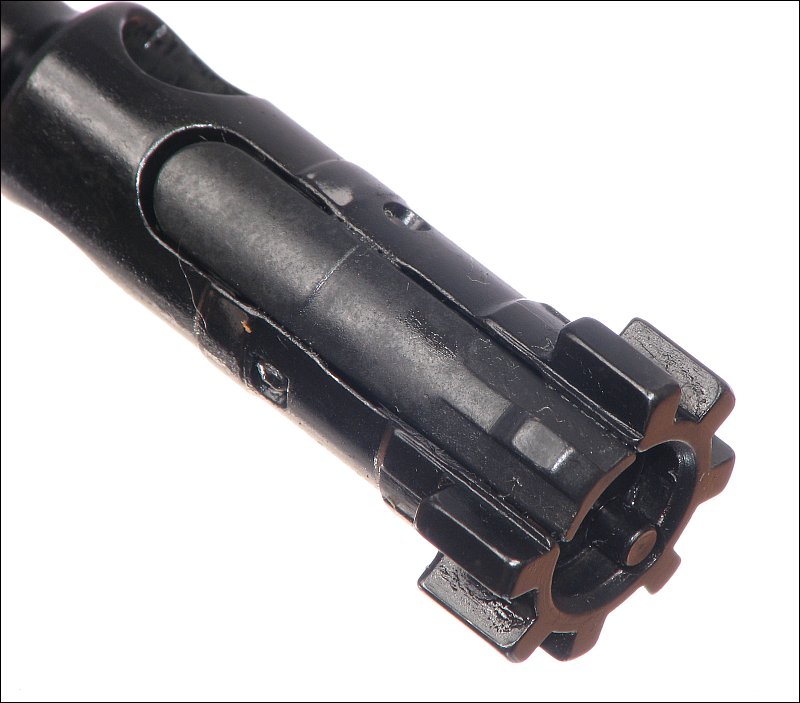
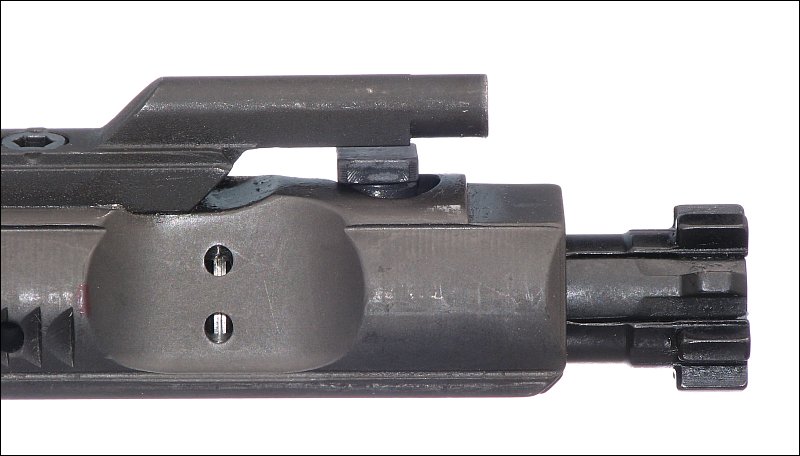
The bolt is inserted into the front of the bolt carrier. The bolt itself holds several other components. The extractor lug is spring loaded and has a roll pin holding it in place. The spring is an upgrade for many AR-15 owners. A 4-coil spring is replaced with a 5-coil spring to give the extractor a bit stronger bite on the rim of the cartridge. Across from the extraction lug, you can see the ejector. There is a spring behind this pin and there is a roll pin holding the ejector in place. Below, you can see the ejector lug on the side of the bolt. The spring can't be seen here but you can see the end of the roll pin that holds it in place.
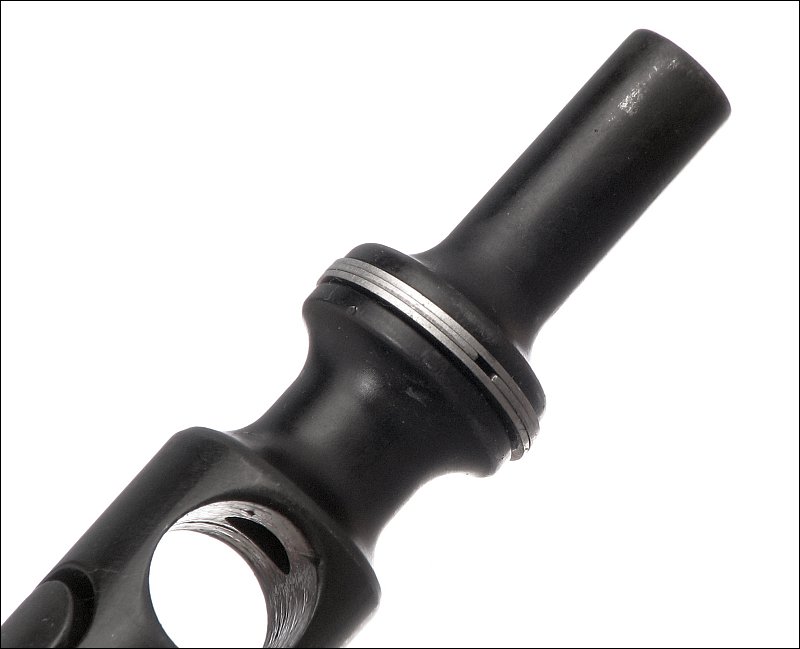
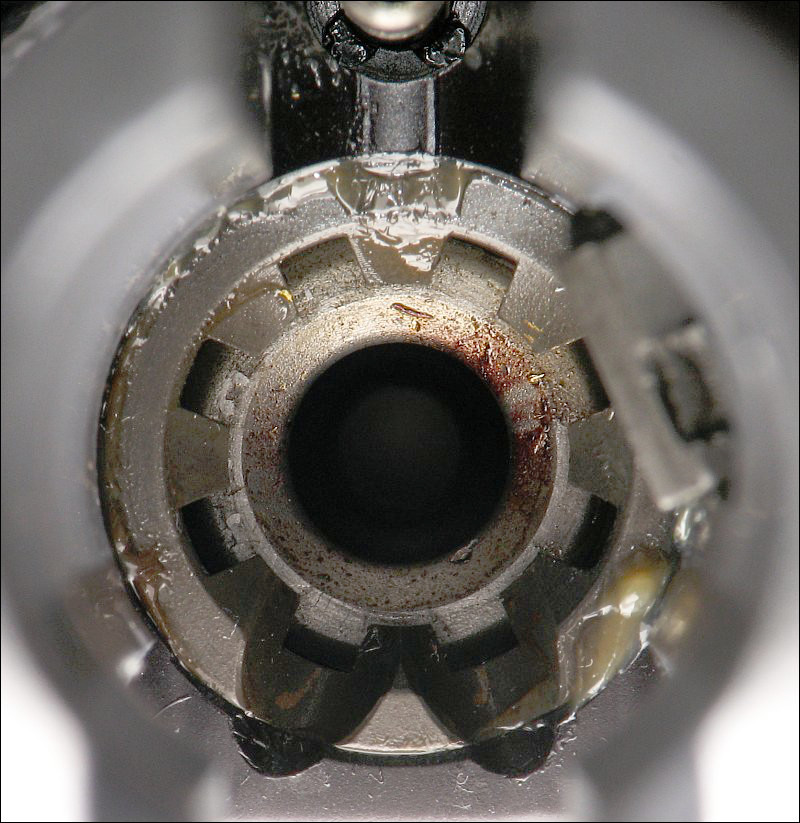
On the rear of the bolt, you can see three gas rings. These form a seal between the bolt carrier housing and the bolt. When gas from the barrel's port is forced into the chamber in the bolt carrier, these gas rings ensure that the gas is contained until the bolt has moved far enough to the rear. If they are weak or leaky, the rifle may not cycle correctly.
Disassembly of the Bolt Carrier Group:
To disassemble the BCG, you first have to remove the firing pin. This was shown previously and is as simple as removing the cotter pin and tapping the back of the bolt carrier on a hard surface (if the firing pin doesn't fall out freely). In the next photo, you can see the rectangular head of the cam pin. The cam pin is oriented as it would be normally.
To remove the cam pin, you have to rotate it 90°. It's easier to rotate the cam pin if you have the bolt fully extended so that the cam pin is centered under the gas key. The firing pin passes through the cam pin, that's why it has to be removed. The cam pin has to be rotated because it won't clear the gas key tube as it's normally oriented.
After turning the cam pin, you can pull it out.
After the cam pin has been removed, the bolt can be pulled out of the carrier housing. This is about as far as you need to go when doing routine maintenance/cleaning/lubrication on the bolt and carrier. To reassemble, follow these directions in reverse order.
When reassembling the group, you may be confused as to the way the bolt will be inserted (it may appear that it could be installed one way or rotated 180°) but it can generally be installed only one way. If you try to insert the cam pin into the wrong side of the hole in the bolt, you'll likely find that it cannot be inserted from one side because the entrance to the hole is too small. If the cam pin can be installed from either side of the bolt, you can look at the front of the bolt. You know that the ejection lug has to be visible from the ejection port on the rifle.

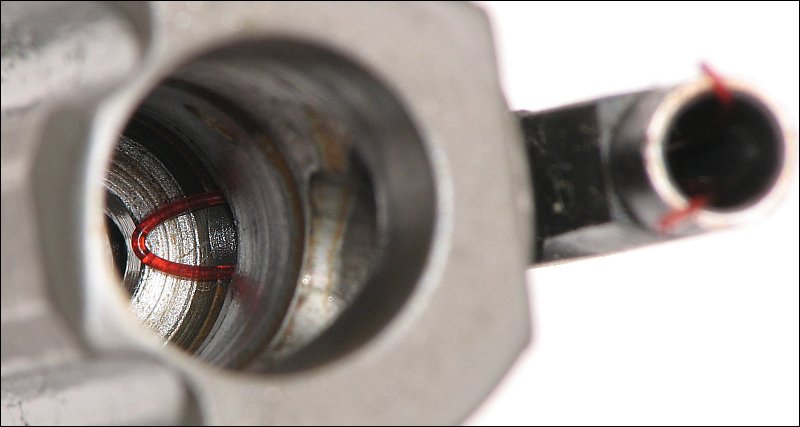
More Detailed Explanation of the Operation of the Bolt and Carrier:
Earlier, there was a brief explanation of the operation of the action in the AR-15. Here, we'll go into a bit more detail. Earlier, you were shown the gas key. It serves to channel the high-pressure gasses of the propellant (that drives the bullet down the barrel) from the gas tube into the bolt carrier. In the next photo, you can see a piece of monofilament line that passes through the key and into the carrier. This port opens behind the gas rings on the bolt.
The next two images show the bolt at both ends of travel. The first is how it looks when the bolt is closed and locked into the lugs in the barrel or barrel extension. The second shows the bolt fully extended. If you look closely, you can see that the cam pin has moved in the slot and that's what has caused the bolt to rotate.
Most of the AR type rifles use 'direct gas impingement' to operate. Loosely defined, impingement means to strike or deliver a blow. With these rifles, the gases produce a very strong pulse into the chamber between the back of the chamber in the bolt carrier and the gas rings on the bolt. Since the bolt is up against the chamber in the barrel (where the cartridge is located), it cannot move forward. This means that the force is delivered to the bolt carrier. The bolt carrier is driven back into the buffer in the buttstock of the rifle. To allow the compressed gas to escape, there are two holes in the carrier. In the next photo, you can see the rings through the holes. As soon as the rings reach this point, the gas is vented which allows the bolt to move freely back into the carrier when the carrier is again driven forward by the recoil spring that pushed the buffer forward.
As a side note...
When watching slow-motion video of the action of the AR-15 (or variants), you can see small blasts of burned propellant exit the holes in the bolt carrier.
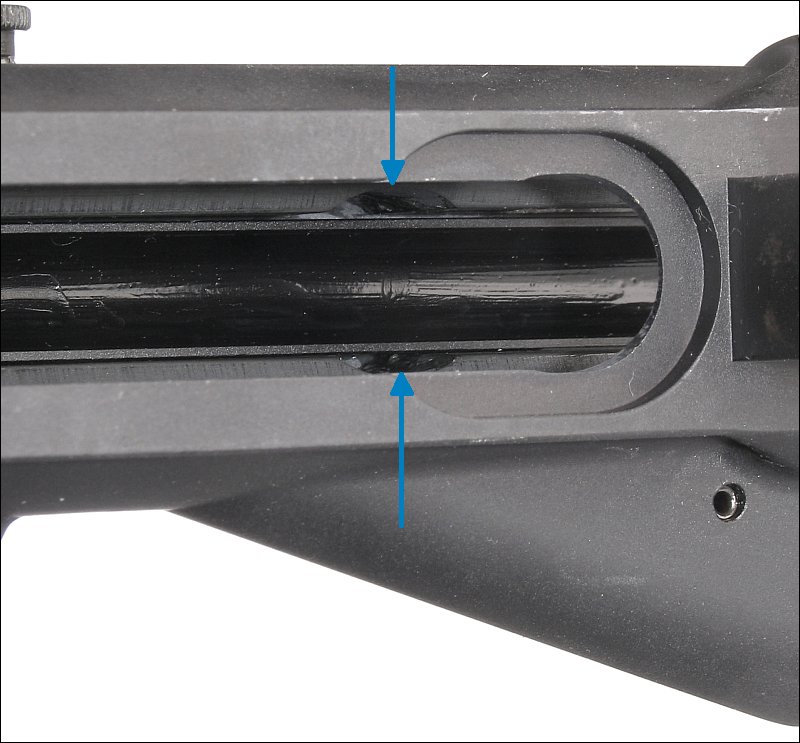
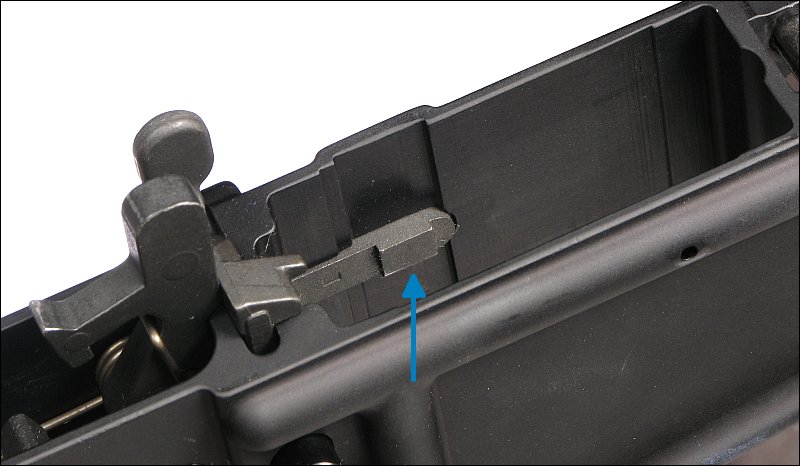
Reinstalling the Bolt Carrier:
When reinstalling the bolt carrier, it's generally easier to do it with the upper receiver upside down. The charging handle goes in first. The handle has two index points on its shaft. Those have to drop into the notches inside the upper receiver (indicated by the blue arrows). After the handle is in place, slide it in a few inches and then place the bolt carrier gas key into the slot on the bottom (what would be the bottom if the rifle weren't upside down) of the charging handle. When you do this, make sure that the bolt is fully extended. If it is not, it won't be able to engage the locking lugs in the barrel/extension. At this point, you can push both the charging handle and the bolt all of the way into the receiver. When the bolt makes contact with the barrel, you will feel a bit of resistance. A gentle push should make the bolt rotate into place. The back of the bolt carrier and the back of the upper receiver should be in alignment. If it isn't, you'll know it when you try to close the upper receiver onto the lower receiver.
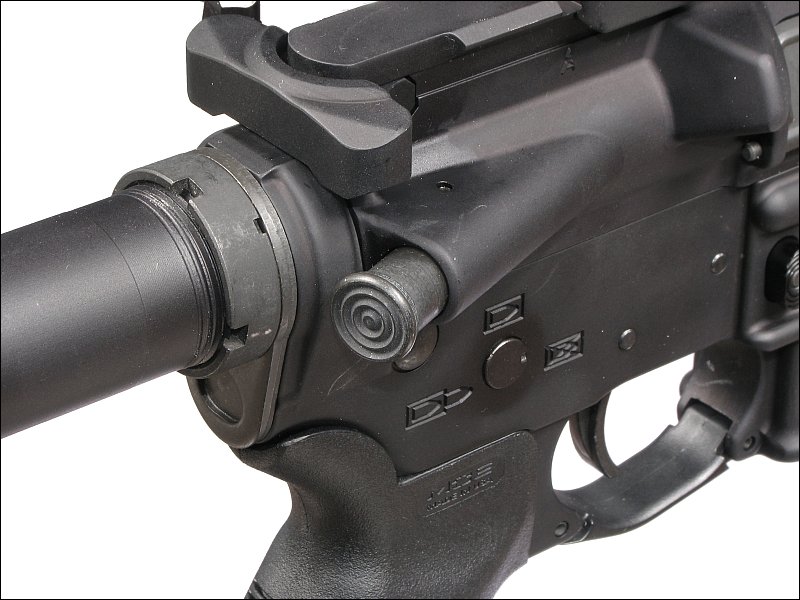
Buffer Tube (Receiver Extension):
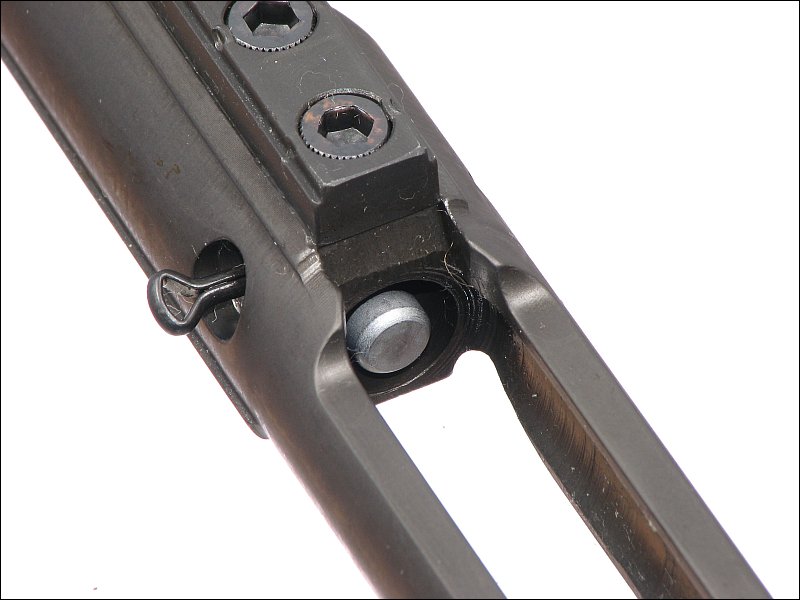
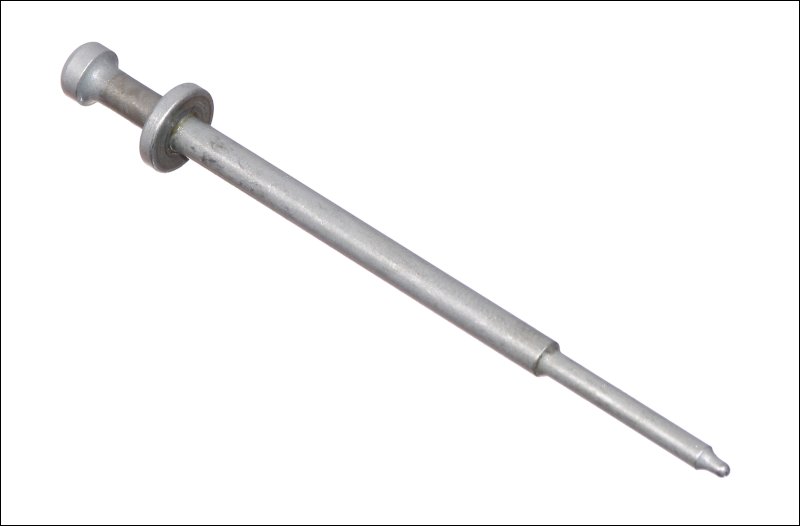
The buffer tube was mentioned above. The lower receiver is too short to allow significant rearward movement of the bolt without some sort of extension. The buffer tube screws into the back of the lower receiver and holds the buffer and buffer/recoil spring. The image below shows the tube and spring. The tubes vary according to the stock being used. This one is for a collapsible stock. The tubes for the older, fixed M16 stocks and for AR-15 pistols are significantly different.
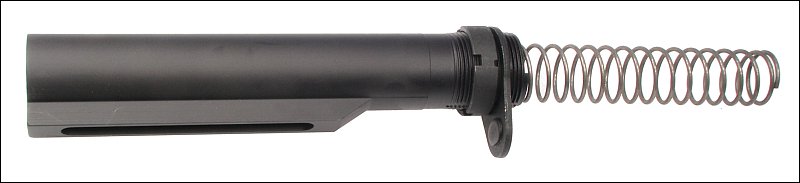
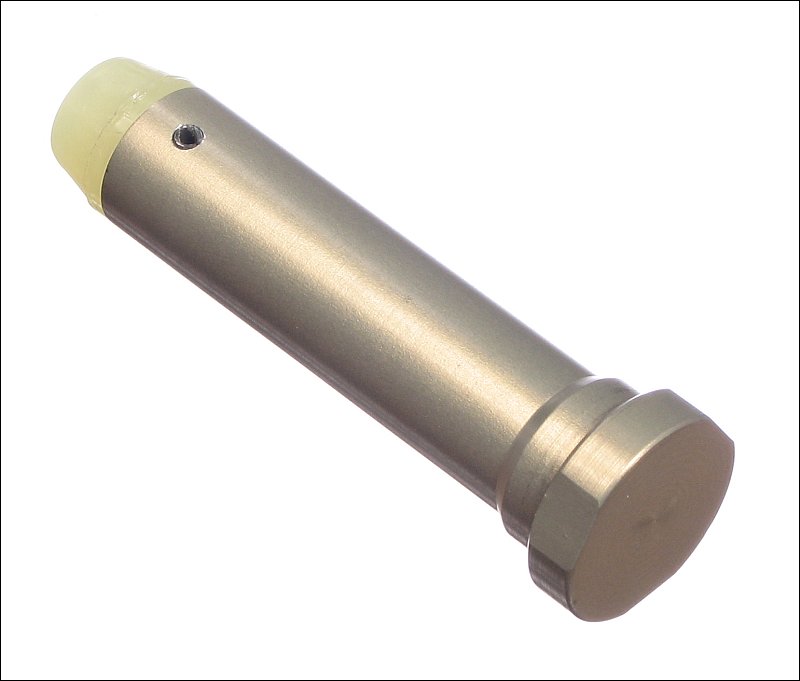
The back of the bolt has to have a solid surface to push against. The buffer assembly (AKA the buffer) fits into the spring. The spring loaded buffer retainer keeps the buffer in place and prevents it from moving too far into the receiver (it's always under significant spring tension).
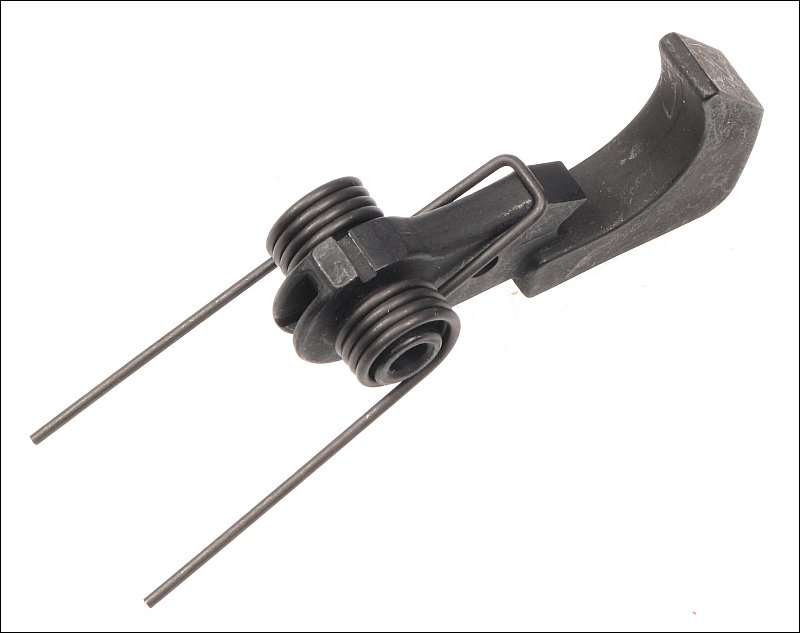
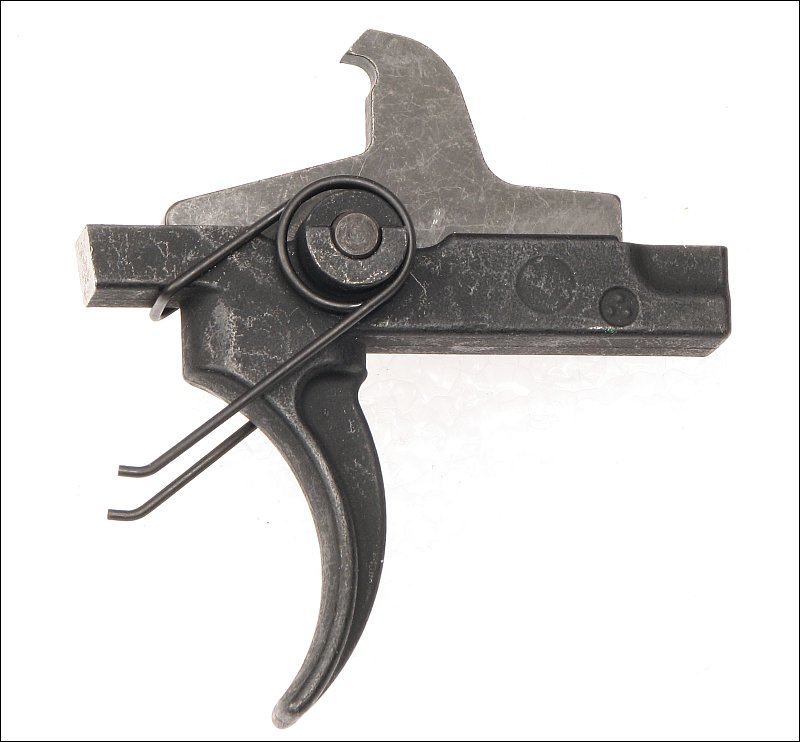
Trigger Group
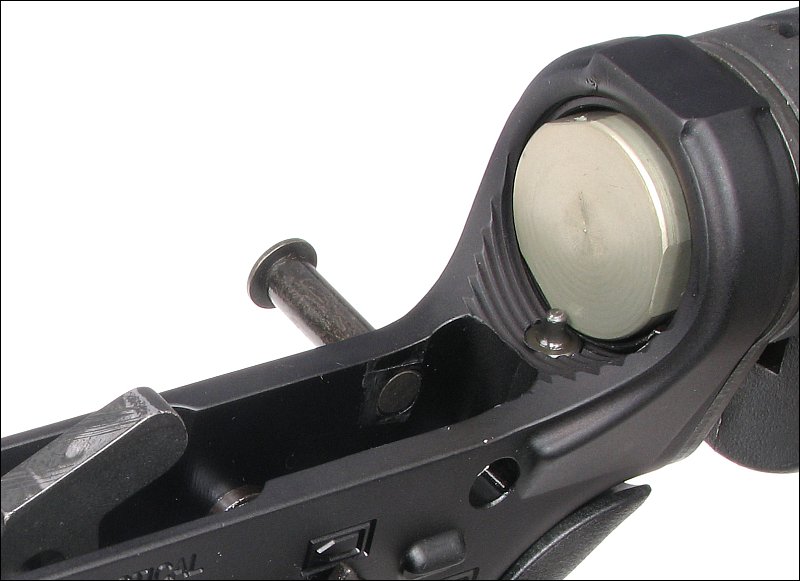
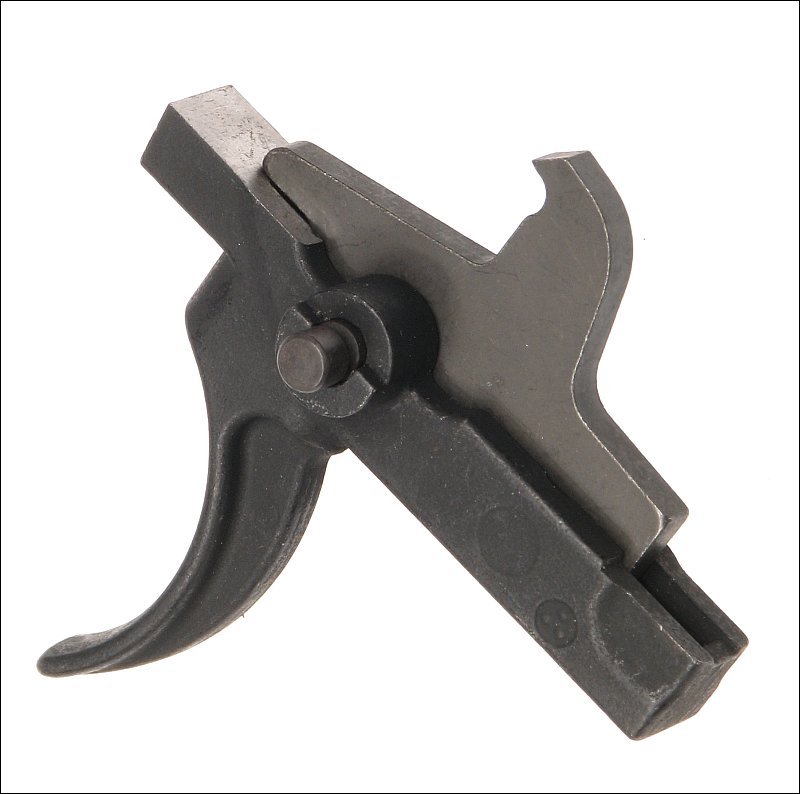
The trigger group for a common trigger is made up of about 8 components. The hammer assembly is comprised of the hammer, a spring and a pin. The trigger assembly is comprised of the trigger blade, a spring (keeping the trigger forward), a pin, a disconnector and a disconnector spring.

The next two photos show the hammer with the spring installed properly. Several videos on the net get this wrong. When installed, the long arms on the hammer spring lay on top of the trigger pivot pin. Some people install the arms so that they contact the bottom of the trigger well. That's wrong and will cause them to dig into the bottom of the receiver.
If you have to install a spring like this (like the ones used for the trigger and hammer in this rifle) and are unsure how it's supposed to be installed, this should help. When coiled torsion springs are used, they are generally always used so that working against the spring causes it to be more tightly wound. For the hammer, it's as unwound as possible when the hammer is straight up. When the hammer is cocked, the coil is twisted so that it's more tightly wound.
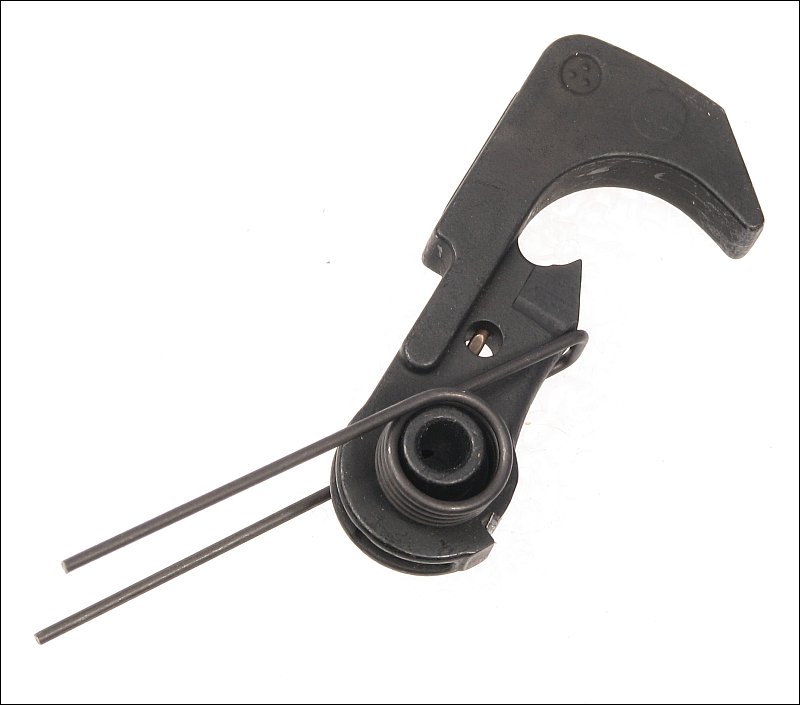
The next images are of the trigger assembly. The first shows only the trigger and the disconnector spring. The spring (green) has one end coil larger than the other. The larger coil goes into the slot in the trigger and holds the spring in place.
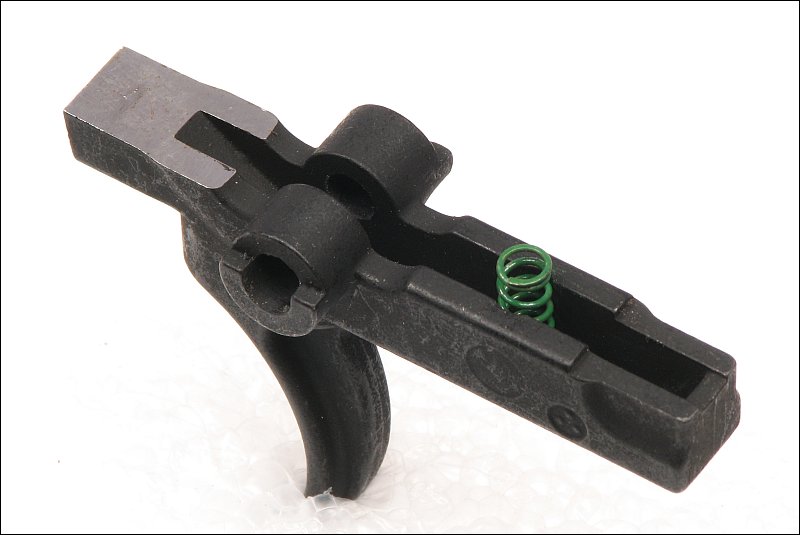
Here you can see the trigger with the disconnector in place. You will have to insert the pin into the side of the receiver, place the trigger into the receiver and push the pin into the trigger about 1/8". You'll then have to insert the disconnector and push the pin through the disconnector and then through to the other side of the receiver. Assembling them outside of the receiver makes it a bit easier because you'll be able to see how it looks when everything is properly aligned.
This is how the spring will look when properly installed. As you can see, the ends of the spring have a radius bent into them. This prevents the spring from digging into the bottom of the well in the receiver.
The Magazines
All of the rifles on this page accept detachable box type magazines. Magazines are very important to the reliable operation of a firearm. Some magazines are better built than others (which makes them more reliable) but you can have hangups and failure to feed problems with any magazine. It's important that you test all magazines that could possibly be used in self defense situations. Even the best made magazines can have defects that can prevent them from working properly.
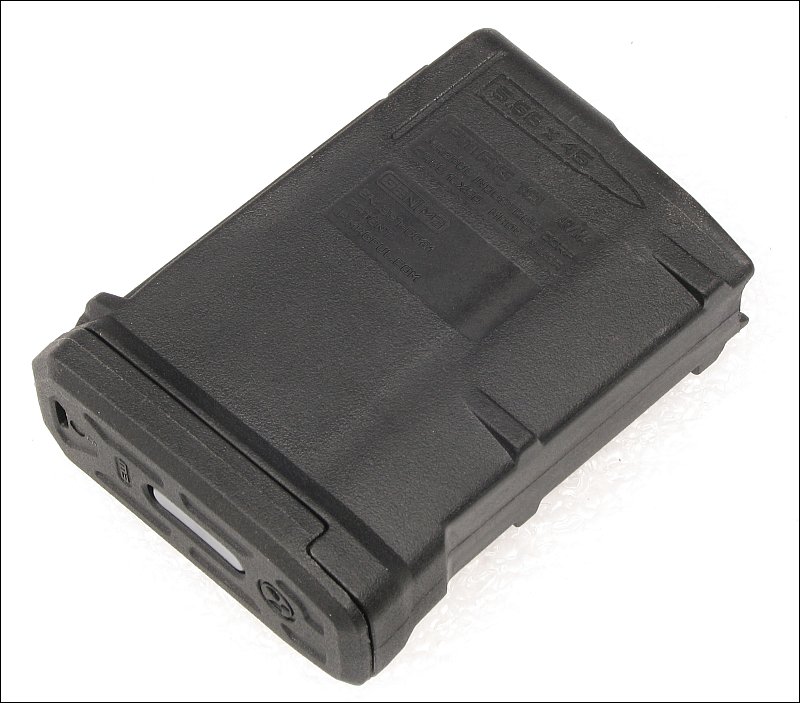
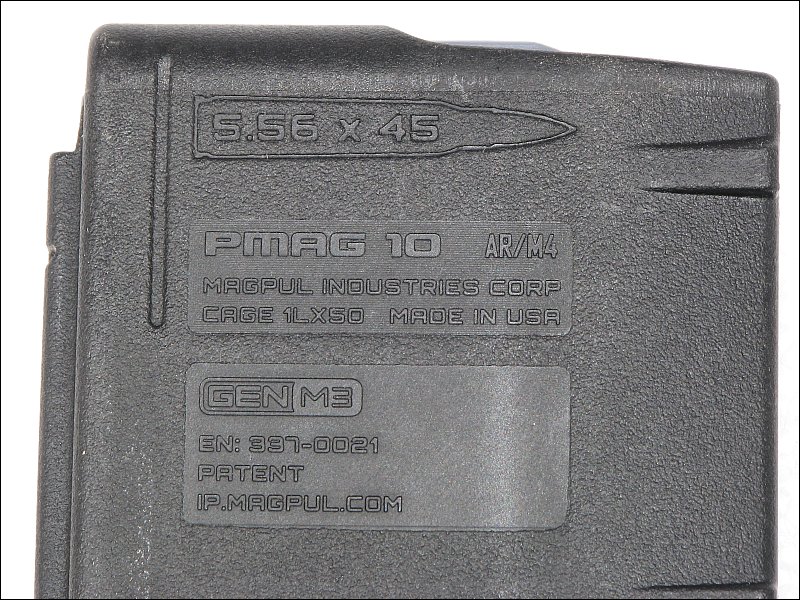
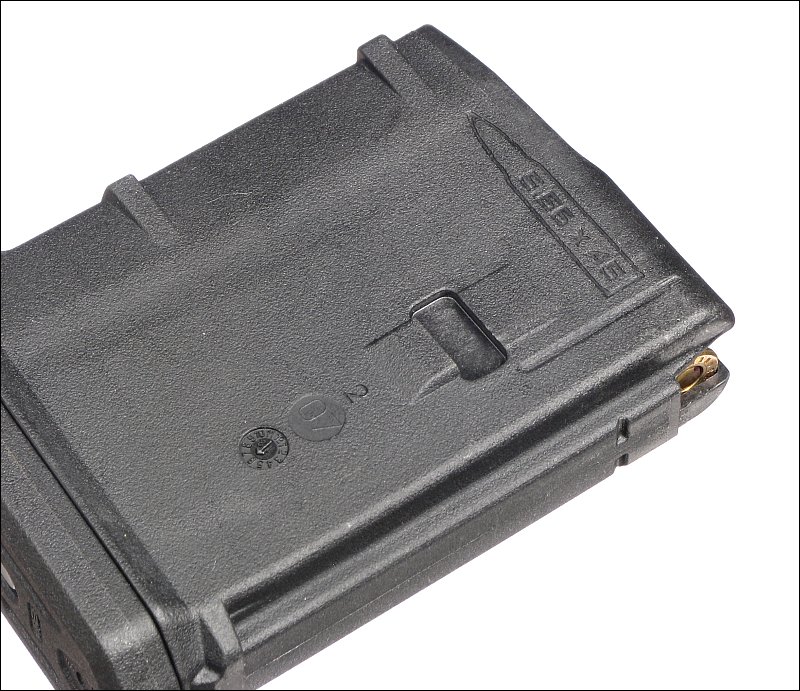
In the past, magazines were generally made of steel or aluminum but other materials were used (bakelite, for example). Now, polymer (fancy name for an engineered plastic) magazines are very popular. The magazine below is a PMAG and is manufactured by Magpul Industries. Most magazines have markings to tell you what they're used for. The one below provides a bit more information than you'll find on most metallic magazines.
As you can see, it's made for .223/5.56mm ammunition. It's a 10 round magazine and it's designed for the AR and M4 variants (AR-15, M16, M4 rifles and pistols). Other markings may be important as well, especially if there were problems with some versions of a magazine. These are the third generation of the PMAG for these rifles. Sometimes a manufacturer will not thoroughly test a product and revisions will be necessary to make it reliable. I don't know that there were problems with the earlier versions of these magazines but if you knew that there were, you could avoid problems by buying a different magazine (later version or from a different manufacturer).
Note:
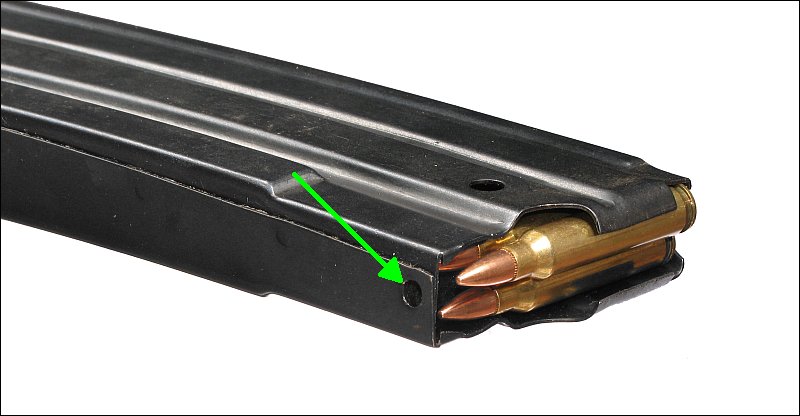
When going into any new hobby (like firearms), internet search engines can be your best friend and can help you avoid all types of mistakes. As an example, there was a run of polymer magazines designed for the Mini-14 that wore out relatively quickly. The Mini-14 uses a pin to locate the front of the magazine (hole location shown below in the metal magazine). The hole in the early versions of the polymer magazines (not PMAG brand) were not reinforced. After they were used for a while, they wouldn't stay in the correct position and the rifles would not function properly. In later versions, a metal band was added to make the magazine reliable. If you didn't know that there was a problem and saw a stack of magazines for sale cheap, you might buy the defective magazines. When searching for information on a product that you intend to buy, include the name of the product and either reviews or problems. Those searches should help prevent buying defective or poor quality products.
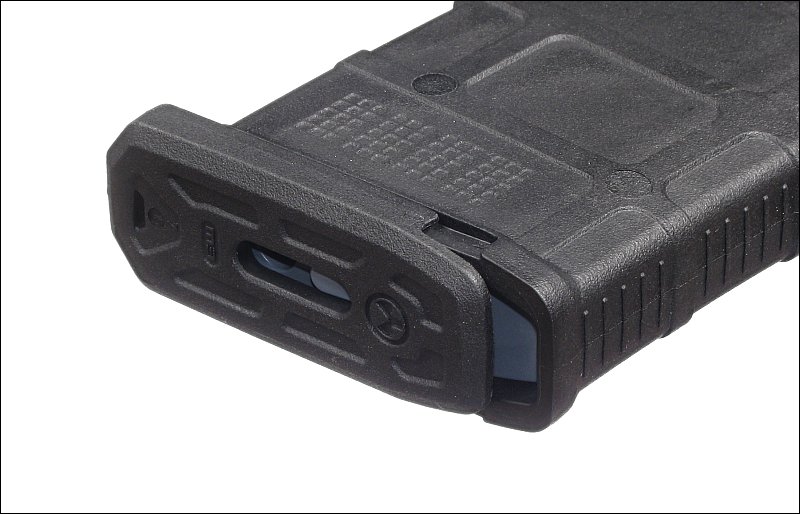
A box type magazine is basically an enclosure with a spring-loaded plate in it. The plate that pushes the ammunition up against the feed lips is called the follower. Many magazines use 'anti-tilt' followers. These have an extended base (beneath the follower) that help keep the follower properly oriented. Most magazines are designed so that they can be disassembled and cleaned. In most cases, the floorplate slides off for disassembly. In the next two images, you can see the floorplate installed as it normally is and after it has been pushed off slightly (as you do when removing the floorplate). For this magazine, you push the gray plastic catch upward and push the floorplate off of the magazine. Be careful when doing this. There is a spring under significant stress that will try to jump out at you if you aren't careful.

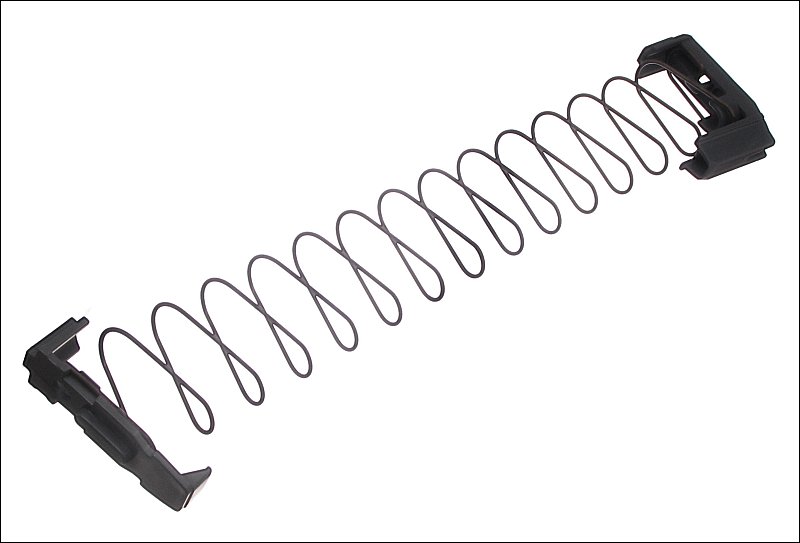
The next image is of the follower (top-right), the spring and the plate with the catch for the floorplate. The second image is a close-up of the following and spring.
The 'feedlips' are the two lips that roll over from vertical to hold the ammunition in place. These can cause problems, especially if they're not metallic. In the following magazine, you can see that the feed lips are not metal. To help prevent them from fatiguing and changing shape (straightening), the manufacturer provides a cover that snaps onto the top of the magazine. The cover applies pressure to the top of the stack of cartridges and removes the pressure from the feed lips.
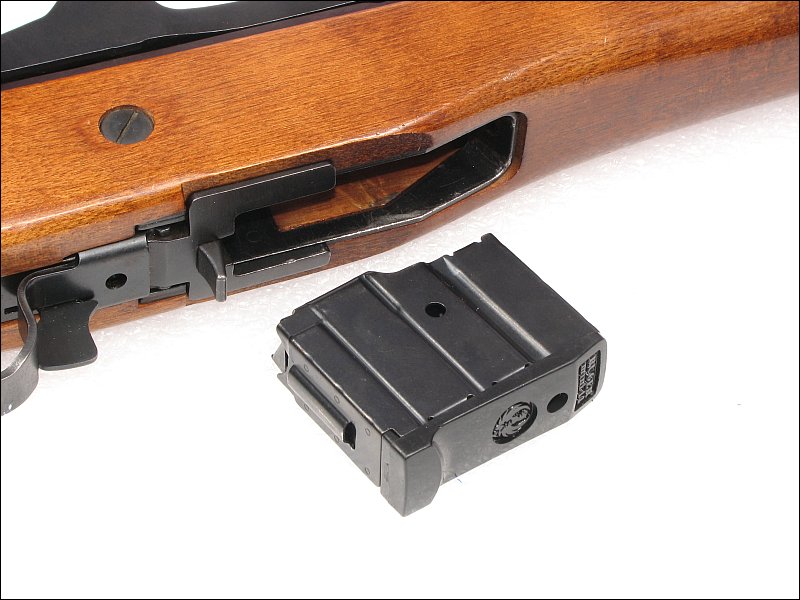
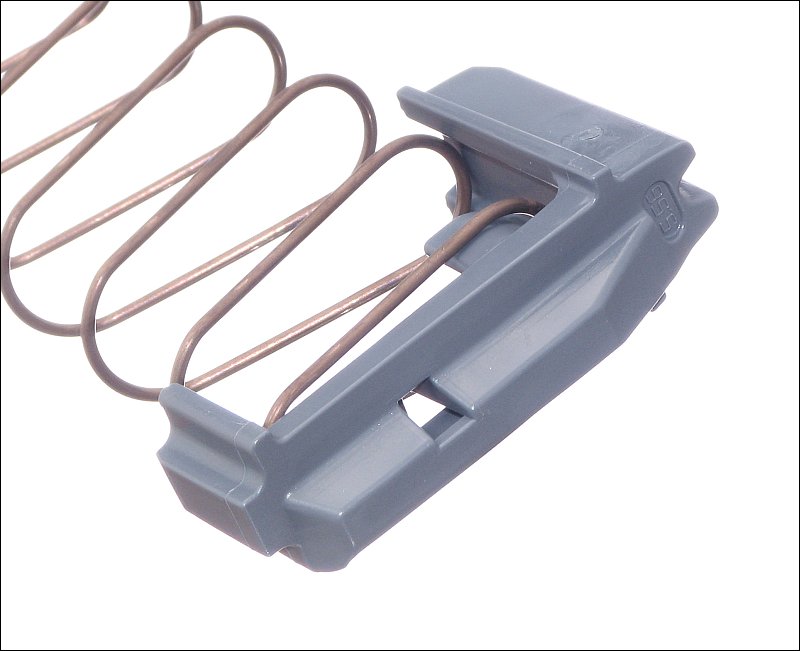
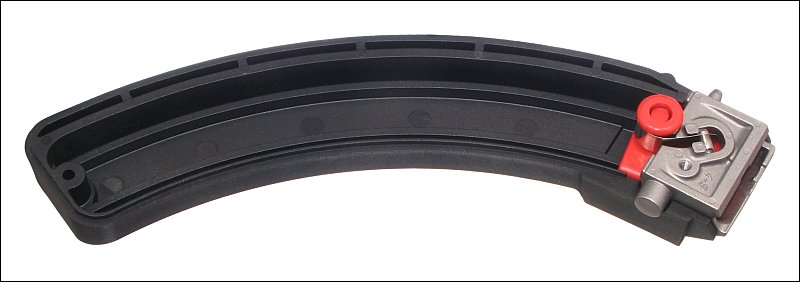
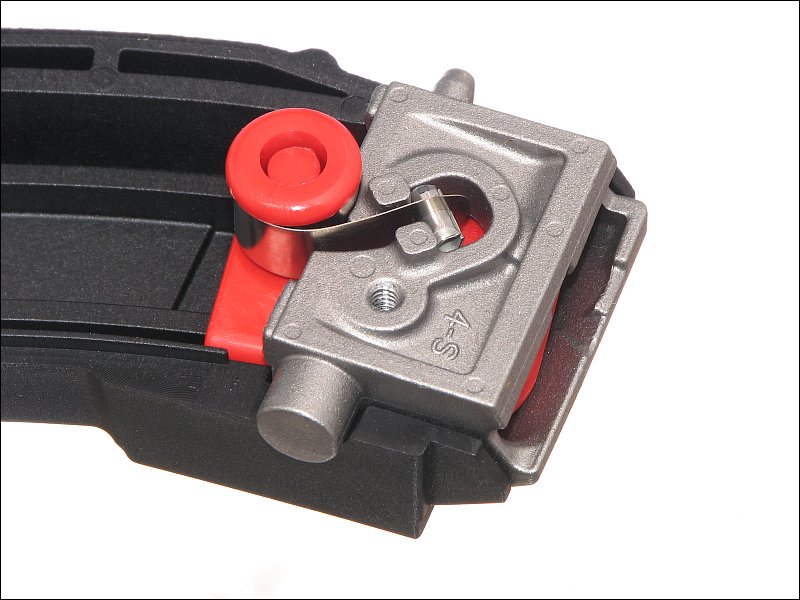
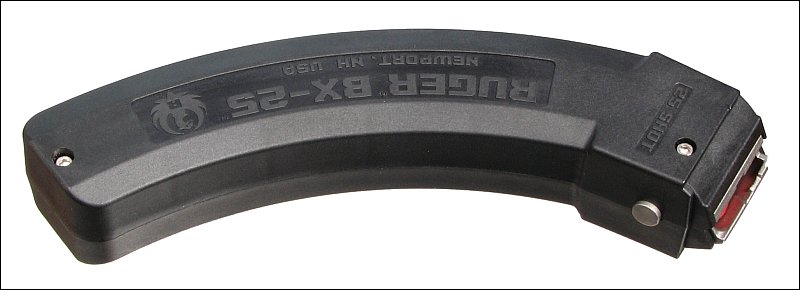
Note that not all magazines use this type of spring. They are most common in magazines for longer cartridges. The following magazine is a Ruger BX-25. This magazine is different than the previous magazine in several ways. To disassemble it, you remove two screws and separate the halves of the magazine. The spring is a coil spring that's wound like a measuring tape. It wraps around a peg on the orange follower. As ammunition is loaded into the magazine, the coil unwinds. As the ammunition is removed (either by firing or by hand), the spring pulls the follower up.
Magazine Release:
The magazine release for an AR-15 is on the side of the rifle, within reach of the index finger. Pushing the button inward forces the magazine catch outward and allows the magazine to drop from the magazine well. In California (and possibly other states), the standard release button has to be replaced with a 'bullet' button. The bullet button looks similar to the standard button but the perimeter of the bullet button is rigidly mounted to the lower receiver. To release a magazine, you have to use a small diameter probe (the tip of a bullet will work) to depress the inner button. This is supposed to slow down magazine changes but there are probes that mount onto your magazines which, in effect, defeat the button's purpose.
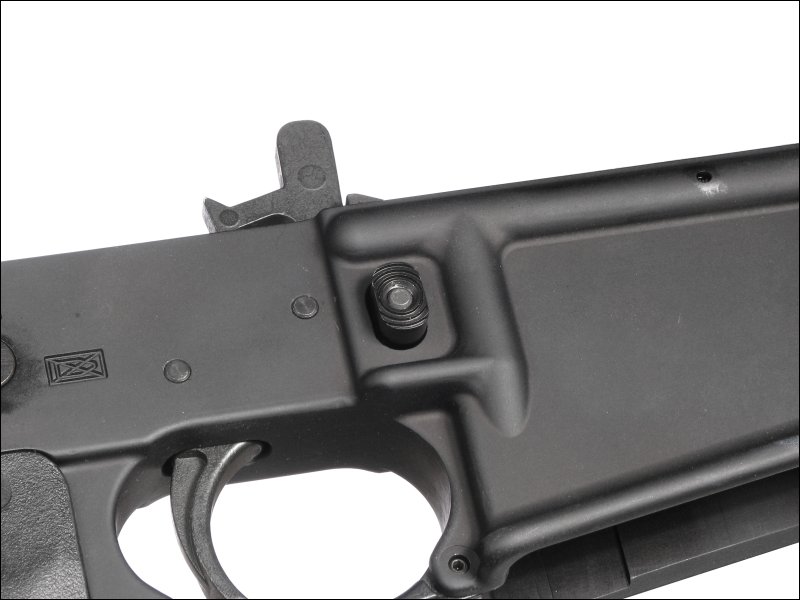
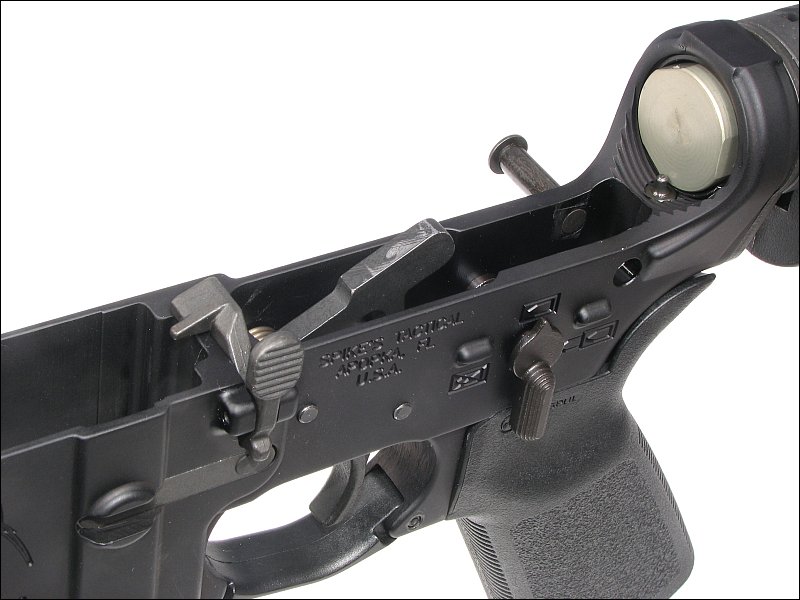
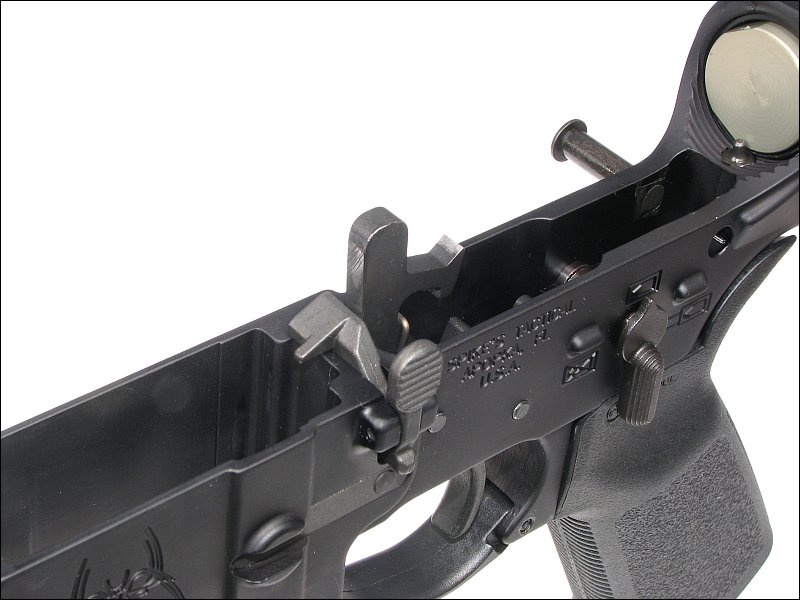
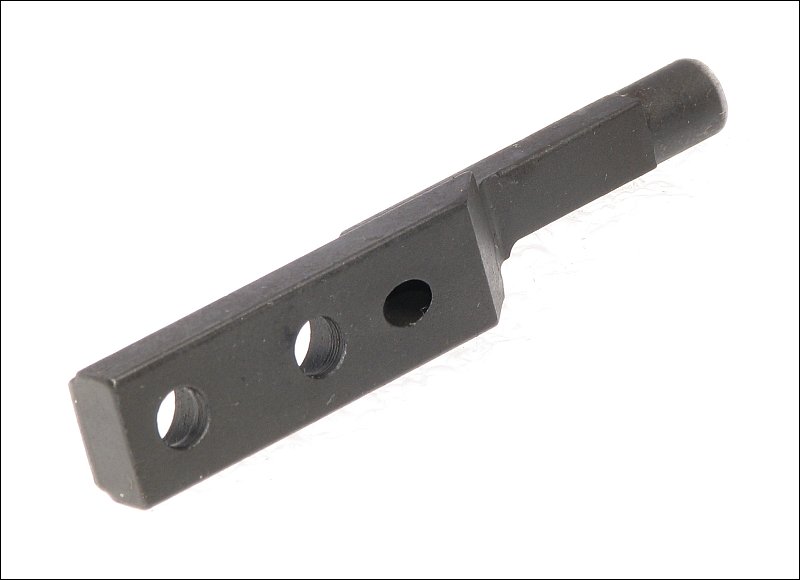
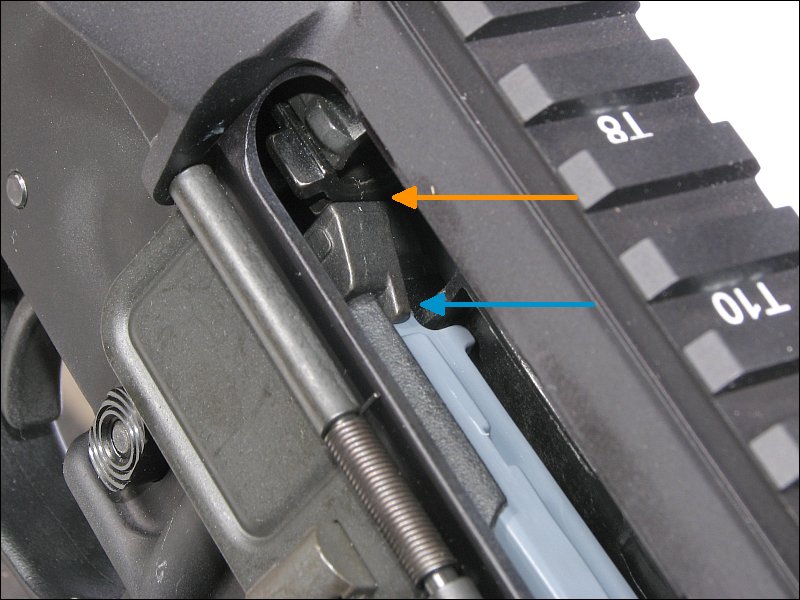
Bolt Catch:
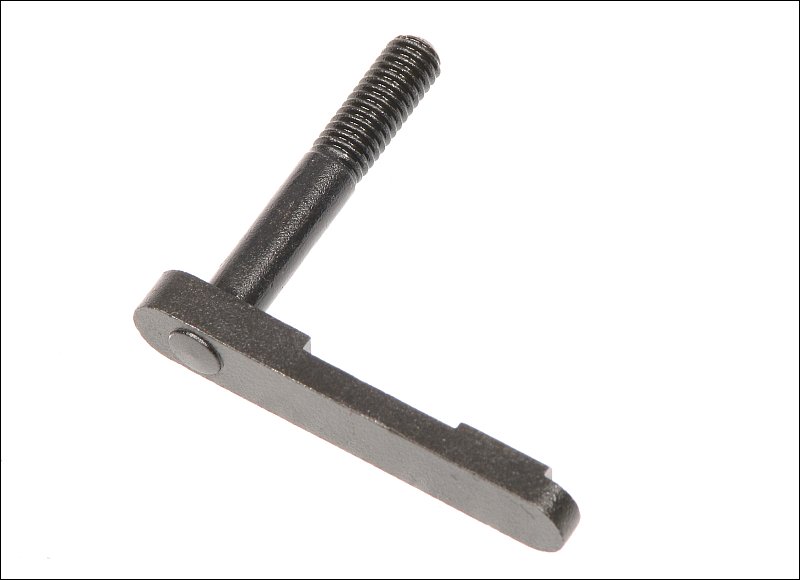
The bolt catch can be engaged in two ways. If you pull the bolt carrier back with the charging handle and push the end of the bolt catch indicated by the orange arrow, it will hold the bolt back.
If you're shooting and empty the magazine or pull the bolt carrier back with an empty magazine, the follower in the magazine will engage the bolt catch.
Optional Features
The AR-15 type rifle has several features that aren't absolutely necessary for the rifle to function. They are sometimes omitted on upper receivers marketed as 'competition' receivers (not designed for use in tactical situations) or on rifles designed for a buyer on a tight budget.
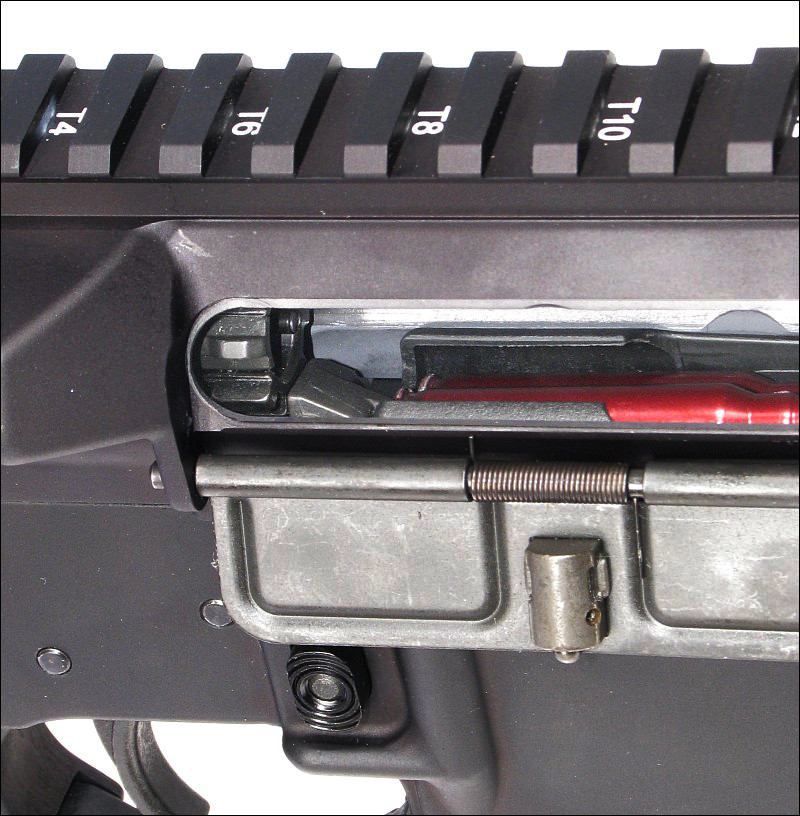
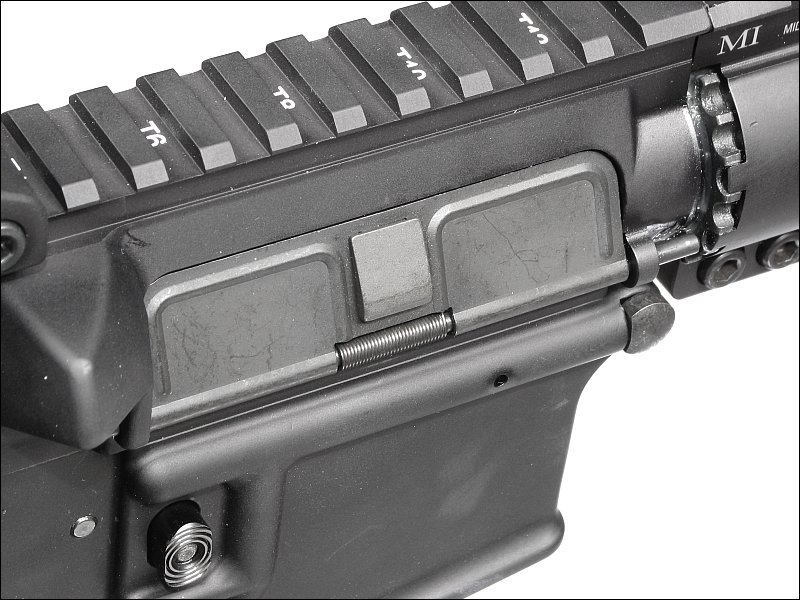
Dust Cover:
The dust cover is the door that closes over the ejection port. If you're moving through or shooting in an environment where dust/dirt/mud/sand/debris could get into the area where the bolt is located, closing the door when the rifle isn't being fired will help keep the rifle clean. The door is designed to open when the rifle is charged (round loaded into the chamber) or when the rifle is fired.
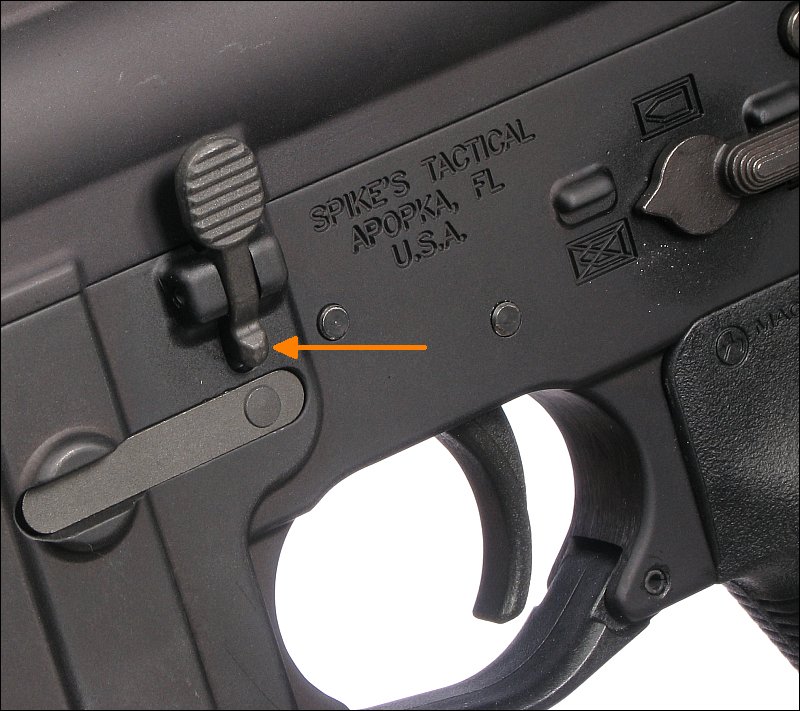
Forward Assist:
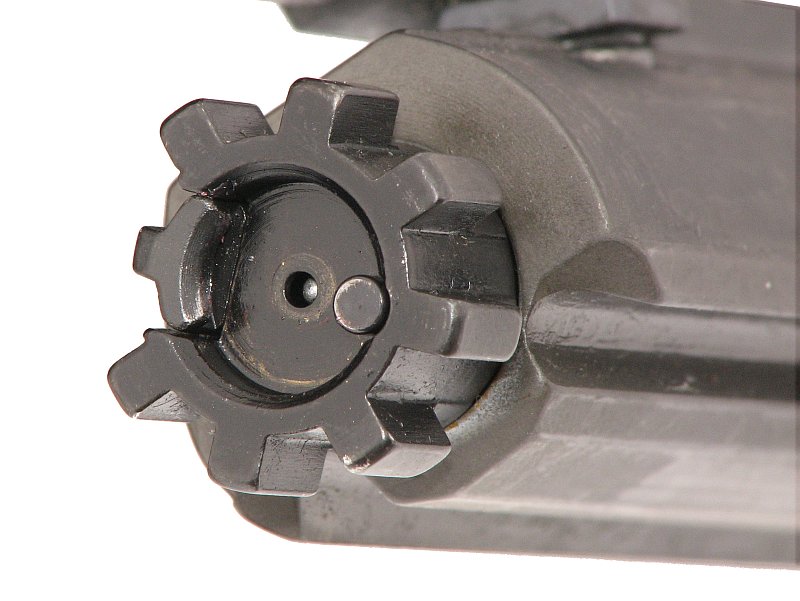
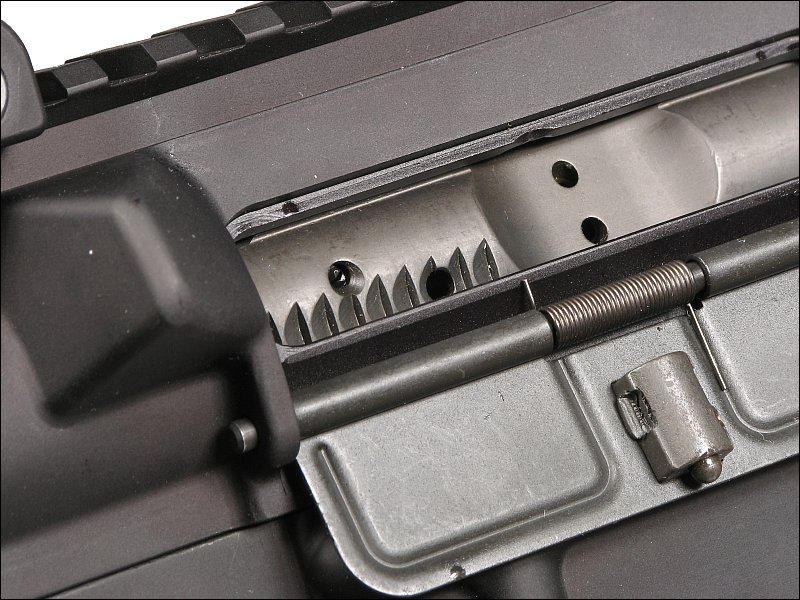
The forward assist plunger is used to get a round to go into the chamber and fully lock the bolt. Failure to go into battery when the charging handle is released or when the bolt is released with the bolt catch button is generally due to improper maintenance (it's not always convenient to clean your rifle when you're fighting for your life -- this feature originated on the military versions). The forward assist can also be used to force the bolt closed if you don't want to release the bolt normally (slamming it shut -- which is quite loud). If you want to slowly release the bolt (if you're hunting or if you don't want to give away your position), you will need to use the forward assist to push the bolt fully forward so that the lugs will fully engage the barrel. Repeatedly pushing the plunger forces the bolt carrier forward. The row of teeth on the side of the bolt carrier are there for the plunger to push on. If you're going to try to close the bolt slowly using the forward assist, you need to try it with your rifle. It may be difficult to do on some rifles and may not work at all on others. A lack of lubrication on the ejection lug or a heavy ejection spring (often used to ensure that the lug solidly engages the rim of the cartridge) can make closing the bolt with the forward assist more difficult.
Casing Deflector:
The casing/shell deflector (triangular protrusion just behind the ejection port -- can be seen in both of the images above) is used to prevent the ejected casings from hitting left-handed shooters in the face. Left-handed upper receivers are available but cost a bit more than standard right-handed receivers.
M4 Feed Ramps:
Feed ramps are used to help guide the tips of the cartridges into the chamber. All AR-15 type rifles have them but some of the newer ones have modified feed ramps. The M4 is the newer version of the military M16. The M4 has larger ramps that are supposed to make the loading of rounds a bit more reliable (but that's up for debate). In the older rifles, like the M16, the feed ramps extended only to the edge of the barrel extension (the part of the barrel with the locking lugs). The M4 ramp cutouts extend into the upper receiver. The image below shows a rifle with M4-type feed ramps. If you're building a rifle, it's important that you match the barrel and upper receiver feed ramp styles. While it may be possible to use an M4 barrel in a standard upper, you cannot use a standard barrel in an M4 upper. The mismatch would create a ledge that would tend to cause a failure to load.
If you look at the two feed ramps, you can see where copper from the tip of the bullet has rubbed off onto the ramp. There are two ramps in this barrel because the magazine is a double-stack type magazine. Below, you can see a single stack (top) and a double-stack (bottom). Single stack magazines feed from the center-line of the magazine. Their feed ramp is centered on the chamber. Double-stack magazines feed from slightly off center and therefore need a ramp for each side of the stack. Single-stack magazines are generally used in firearms that need to be narrow (sometimes important for those who carry concealed firearms). Double stacking increases the number of rounds that the magazine can hold (for a given length of magazine).
Miscellaneous Notes
Alternate Calibers:
As was previously stated, the AR-15 is most commonly chambered in .223 or 5.56mm NATO. There are other options. The AR-15 is somewhat limited in the calibers that it can chamber due to the length of the magazine well. Some options are the .450 Bushmaster, the 6.5mm Grendel, the .50 Beowulf and the .300 AAC Blackout. Some calibers can be used with the standard bolt/carrier and upper receiver. Others require dedicated components.
The .300 AAC (Advanced Armament Corporation) Blackout is becoming more popular, especially with shooters who reload their own cartridges. The .300 Blackout ammunition is relatively expensive compared to the .223 but is much less expensive if you reload your old .223 casings. The .223 casings have to be cut down to where the neck transitions to the straight part of the casing. The casing is then necked down to fit the .308 bullets.
You can use the .223 magazines, bolt/carrier and upper with the .300 Blackout so you can convert from .223 to .300 relatively easily. It is, however, time consuming to have to change the barrel so most shooters simply buy a dedicated .300 Blackout upper. Then, to go from .223 to the .300, you simply have to swap uppers (takes only a minute or so to do).
The .300 Blackout is often chosen because subsonic ammunition is available for it. Much of the noise associated with firing a firearm is simply the report from the expanding propellant escaping from the barrel as the bullet exits the barrel. For firearms and ammunition that cause the bullet to exceed the speed of sound, there is a second noise generated. That's the bullet breaking the sound barrier. This is the same as the sonic boom that you hear when aircraft exceed the speed of sound. If you use a suppressor with ammunition that creates the loud crack as it exceeds the speed of sound, the suppressor will only suppress the noise from the propellant. It will be quieter but not silent. If you use subsonic ammunition, the suppressor will reduce the noise to a very low level (the actual level would depend on the quality of the suppressor).
Owning Suppressors/Silencers:
It is not illegal to own a suppressor for a firearm but to do so, you must get a tax stamp from the ATF. To get the stamp, you have to fill out 'form 4' and send it to the ATF for approval with a check or money order for $200. You may also be required to fill out fingerprint cards and other forms for state or local regulations. This is much the same as if you want to own short barreled rifles or fully automatic (machine) guns. Expect the process to take 6-8 months.
Shot Peening:
When metal is worked, tensile stresses build in the metal. When there are significant stresses near the surface, there is a risk of cracking/failure of the component. The dangerous type of stress is tensile stress. When a part is shot peened, the surface is bombarded with tiny spheres. When the spheres hit the surface, they create tiny dimples. These dimples induce compressive stress to the surface. When the surface is under compressive stress, it's much less likely to allow a crack to start (most cracks start at the surface). Shot peening tends to make metal stronger and more reliable. The components that take the most severe stress in a an AR-15 like the bolt and carrier are often shot peened.
High Pressure Testing:
High pressure testing is used to intentionally abuse parts that will normally be under stress. For a firearm, a cartridge is fired from the rifle (or from a test jig with the part being tested). The load that's fired is significantly greater than anything that the part should see in normal use. After stressing the part, it's tested/inspected to see if it survived. The test generally involves magnetic particle inspection.
Magnetic Particle Inspection (MPI):
Magnetic particle inspection is used to test parts for stress cracks. When a magnetic field is applied to or current is passed through a ferrous metal (a metal containing iron), the metal becomes magnetized. If the surface is consistent.regular/unbroken, the magnetic field will be evenly distributed. If the surface is damaged (particularly if it's cracked), magnetic flux will leak at that point and the magnetic field strength at that point will be much stronger. During a magnetic particle inspection, the component being tested is magnetized and a magnetic powder is applied to the surface. If there is a crack in the part being tested, the magnetic particles will concentrate at that point. Many people who deal with (car) engines have heard the term Magnaflux. It's the same basic process.
Chrome Barrel/Chamber Lining:
Barrels are subjected to extreme stress and no barrel (that's used regularly) will last forever. To help increase the service life of rifle barrels, some are chrome lined. This is done to reduce wear (especially for rifles fired at a very high rate on a regular basis -- repeated large magazine dumps) but can also make the barrel easier to clean. There has been some discussion that chrome lined barrels are not as accurate as barrels made of stainless steel but I haven't found anything definitive either way. If you're going to buy a barrel for a rifle that will need to shoot sub MOA groups, ask various sources for recommendations. I recommend that you use various sources because some people are biased and some people simply don't know what they're talking about. The sources could be a forum like AR15.com, a gunsmith, a competitive shooter or someone who works in a real gun store.
Barrel Twist Rate:
Modern gun barrels that are designed to fire solid projectiles (not shotguns) use rifled barrels. Rifling in a barrel is a series of spiral grooves. These bite into the bullet and make it rotate as it travels down the barrel. As it exits the barrel, it continues to rotate. The rotation stabilizes the bullet and prevents it from tumbling. You've seen the same basic principle applied to throwing a football. If it's thrown without a spin, it's wobbly in flight. If it's spun when thrown, it flies straighter and follows a more predictable path. The twist rate is given as 1 twist in a length of barrel. For example, a twist rate of 1 in 7 means that it will rotate the bullet completely in only 7" of barrel length. A 1 in 12 twist rate would be a slower twist rate and it would take 12" of barrel length to rotate the bullet one revolution. The optimal twist rate is generally higher (1 in 7) for longer/heavier bullets. A slower twist rate can be used for shorter/lighter bullets. There is a formula for calculating the optimal twist rate and includes velocity, bullet diameter and bullet length.
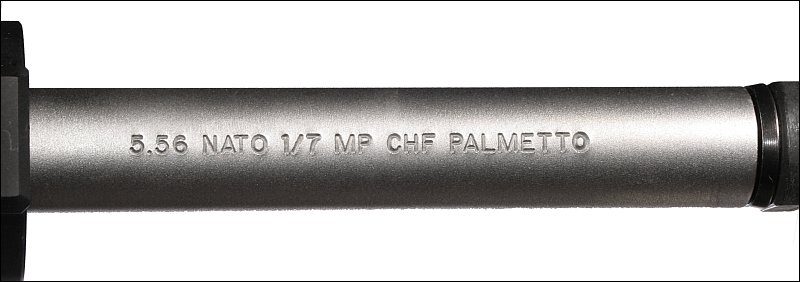
Barrel Markings:
Below, you can see one example of the markings on a barrel. This barrel is chambered in 5.56 NATO (able to fire either .223 caliber or 5.56mm ammunition). The barrel has a 1 in 7 twist rate. It has been metal particle tested. It was produced using cold hammer forging and it was produced by Palmetto State Armory.
VERY Basic AR-15 History
The AR-15 was originally a product of ArmaLite (a small arms manufacturer). The designer was Eugene Stoner. The AR-15 was only one of his designs. The rifle of the same basic design that proceeded the AR-15 was the AR-10. The AR-10 was a larger, heavier rifle chambered in 7.62mmx51mm (vs the 5.56x45 of the AR-15).
Before the AR-15 and M16 (the fully automatic, military version of the AR-15) the military was using the M14. This rifle was heavy and so was its ammunition. To make it easier to carry more ammunition (and a lighter-weight rifle), the M16 was adopted. The use of the 5.56x45 round allowed each soldier to carry twice as much ammunition (pound for pound, compared to the M14).
When the rifles were first issued, they were not popular. The fighting was done in areas where the rifles would need frequent cleaning to prevent them from jamming. Supposedly, the tolerances were a bit too tight and there was a change in the propellant (gun powder) used in the ammunition that was issued (the propellant used for field tests was different from the propellant used in the ammunition sent to the troops). These problems were later addressed but gave the M16 a bad reputation.
Many people think that the AR in AR-15 stands for assault rifle but it doesn't. It was used because ArmaLite designed the first rifle of this type. The AR-15 is not an assault rifle, no matter what the mainstream media says. For a rifle to be an assault rifle, it has to be able to fire in a fully automatic mode (either in 3-round bursts, like the later military rifles or in fully automatic mode). The AR-15 cannot do either. It's strictly a semi-automatic rifle (one round fired for one trigger pull).
As advertised, this is a VERY basic history. For those who want to know more specifics, visit the AR-15 page on Wikipedia.
Modifications to Firearms
When making modifications to firearms, it's important that you know the law (both federal and for your state). Making a single mistake can lead to a 10 year federal prison sentence, especially if the judge wants to make an example out of your case. The laws vary greatly but here are a few modifications that you may want to make but can get you into trouble. Bear in mind that the information here is incomplete and may not be the same as the laws where you are. Consult a lawyer or someone who knows the laws in your area for definitive information. If you're convicted of a gun crime, it's likely to be a felony and you may lose your rights to ever own or shoot a firearm again.
Legal Mods:
For the most part, you can make modifications to firearms like changing the 'furniture' without risk of legal problems but even here, you have to be careful. If you're buying from a legitimate firearms dealer, they will know what's legal. If you're buying accessories from an internet dealer, they can sometimes tell you what's illegal but some items that are legal when used one way are not legal when used in other ways. If in doubt, find a firearms forum for your state and ask there if anyone knows if the accessories you want to buy and use are legal when used that way.
As a side note...
If you're not going to ask a question on a forum directly and are going to rely on google searches, pay very close attention to the date that the information was posted. Laws change and old posts aren't likely to be reliable.
Trigger Modifications:
Trigger modifications are often best left to those who fully understand the way the trigger mechanism works and know how to test the modified trigger to confirm that it's safe. Some triggers work on very tight clearances. Simply polishing the wrong surface or grinding a surface to change the angle on it could make the sear too easy to trip (resulting in unintended discharges). It could also lead to a situation where the rifle would fire more than one round for a single trigger pull. For example, the trigger on the AR-15 has a component called a disconnector. When the hammer is cocked, the hammer is held in place by the sear. When the rifle is fired, the hammer strikes the firing pin and is almost immediately forced back down by the bolt carrier. This occurs too quickly to allow the shooter to release the trigger (which would allow the sear to lock the hammer back). The disconnector catches the hammer and holds it off of the firing pin until the trigger can be released so the sear can hold the hammer back. If the disconnector is sanded down, it may not hold the hammer and could cause the rifle to fire more than 1 round before the trigger can be released. If you are not satisfied with the trigger on your rifle and lubrication won't get it to feel the way you want it to feel (when you pull the trigger), have a gunsmith do a 'trigger job' or buy a competition trigger.
Some shooters want to reduce the 'trigger pull weight' to make it a bit easier to shoot accurately. Many times, the manufacturers design the stock triggers to have a fairly heavy trigger pull. Some take 6-8 pounds of effort to discharge the rifle. A lighter pull reduces the chance that you'll pull the rifle off of the target when you pull the trigger. Most people never shoot a high-end air rifle but those who do have likely found some with a trigger pull in the sub 2oz range. This isn't safe on firearms because the risk of an unintended discharge is too great if the rifle is bumped or dropped on the buttstock. Most shooters try to get the trigger pull in the 2-3 pound range. This can sometimes be accomplished by changing the trigger spring or by adjusting the trigger (some triggers have set screws to allow the customization of various properties -- trigger pull weight, trigger angle, length of pull for first and second stage...). Again, this should be done by someone who can test the trigger to make sure that it's safe.
Barrel Length:
Federal law states that the minimum barrel length is 16" for a rifle and 18" for a shotgun. Anything shorter requires that you apply for a short barrel rifle (SBR) or short barrel shotgun (SBS) tax stamp from the federal government. The cost is $200 and the wait is generally 6 months or more. Many buyers of the AR-15 style rifle are buying/building clones of the M4 military rifle. They are generally the same overall as an AR-15 but the M4 has a 14.5" barrel. If you want an M4 clone (also known as an M4gery or an M-forgery) and want the 14.5" barrel (and don't want to apply for the tax stamp), you have to install some sort of muzzle device to make the overall length 16". Generally, a flash suppressor or muzzle brake is installed. The device has to be permanently installed (welded) or semi-permanently installed (pinned) to be legal. You can't simply have it screwed onto the barrel.
Overall length:
The overall length is determined by measuring the length from the end of the buttstock to the tip of the barrel. This can be a bit confusing for rifles with folding or collapsible stocks. For those rifles, the rifles are measured with the stock in its extended position. The minimum length is 26" for rifles and shotguns.
As an example where you can inadvertently produce an illegal firearm... Ruger makes a 'compact' version of the 10/22. It has a reduced length stock and barrel. The barrel is just over 16" to keep it legal. One aftermarket stock option for the 10/22 is a bullpup stock. If you install the compact action and barrel in the bullpup stock, there is a good chance that the rifle will be less than 26" and therefore illegal.
Other Illegal Modifications:
In some states, there are restrictions that may change over time. Some of these are applied to the firearm before the firearm can be sent to the firearms dealers in that state. One of these is the bullet button that was previously mentioned. If you change this out to a standard magazine release, you are in violation of state law and subject to prosecution.
Ever-Changing Laws:
Some laws are passed that make firearms that don't meet the new regulations illegal. For example, if you own a rifle that takes a detachable magazine and the state outlaws rifles with detachable magazines, it may be impossible to sell that rifle within that state. It's likely that you could sell it to an out of state buyer, that's assuming that the state doesn't require that you destroy the rifle.
In one state (maybe more than one), there is a law that you can't have more than 7 rounds in a magazine. Even if you have a magazine that will hold 10 rounds, you cannot 'legally' load all 10 rounds.
Some states make it illegal to own an 'assault weapon'. The definition (in part) of an assault weapon is that it has a pistol grip that extends conspicuously below the trigger guard. If you buy a rifle that has no pistol grip and add the pistol grip, you could run into legal problems.
Some states make it illegal to add a pistol grip to the forend of the rifle.
Thanks to the friends who loaned me firearms, tools and spare parts for the images on this page.
Back to the Top
|

