 |
| Email Home Page |
|
| Email Home Page |
|
|
|
Foreword:
This page was produced after I began looking for general metal-working and machining information. It seems like there is little to help the beginner. Hopefully, this page will help fill a void. Generally, I work on relatively small pieces using aluminum stock. The information provided here is what I've learned and what has worked well for me. There may be better ways to perform some of the tasks shown on this site. If there are, feel free to email me.
Some of the things I discuss here can be dangerous (due to the nature of working with power/cutting tools). When drilling, cutting, grinding, striking or tapping threads you should wear safety glasses. Safety glasses have side shields (or lenses that wrap around to the temples) to protect against pieces entering from the side. For operations that will 'likely' result in flying metal chips, you should wear a face mask ALSO. Safety glasses should fit tightly against your face otherwise they only protect against objects coming directly from in front of you. When using compressed air to clear metal chips (or other debris), it's possible for the compressed air to be deflected from virtually any surface. This can easily cause metal chips to enter the safety glasses from below.
Marking Tools:
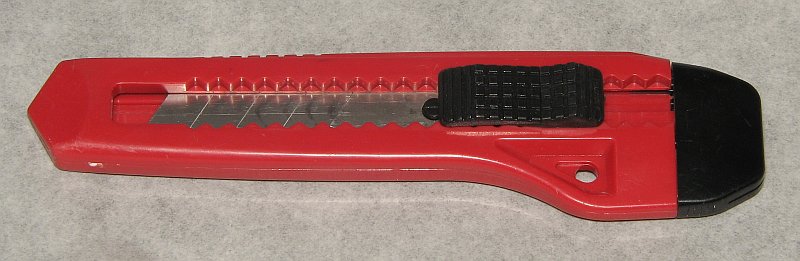
When doing precision work, a pencil, no matter how sharp, will not make a fine enough line. For marking, you can use either a scribe or a razor knife. I find it easier to get good results with a razor knife (with a blade that has been snapped off recently) but a scribe will also work well if it has a sufficiently sharp point. If you're using a razor knife, get into the habit of closing it IMMEDIATELY after making the mark. If you don't, sooner or later, you'll forget it's open and you'll injure yourself.

Rules:
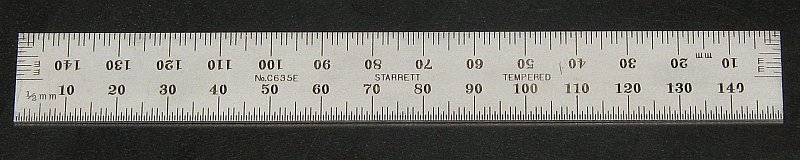
For most of the work I do, a rule (ruler) is not accurate enough. Rules are good for quick, rough measurements but not precision work. If you have very good eyesight and a rule with very fine lines, it may work well for you. I prefer dial calipers. The image below is a metric rule. This one is made of hardened steel. Many of the ones you find are stamped from stainless steel sheet stock.
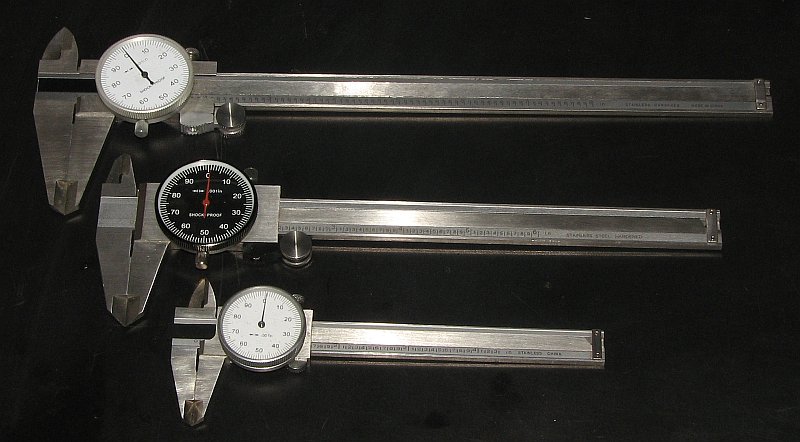
Dial Calipers:
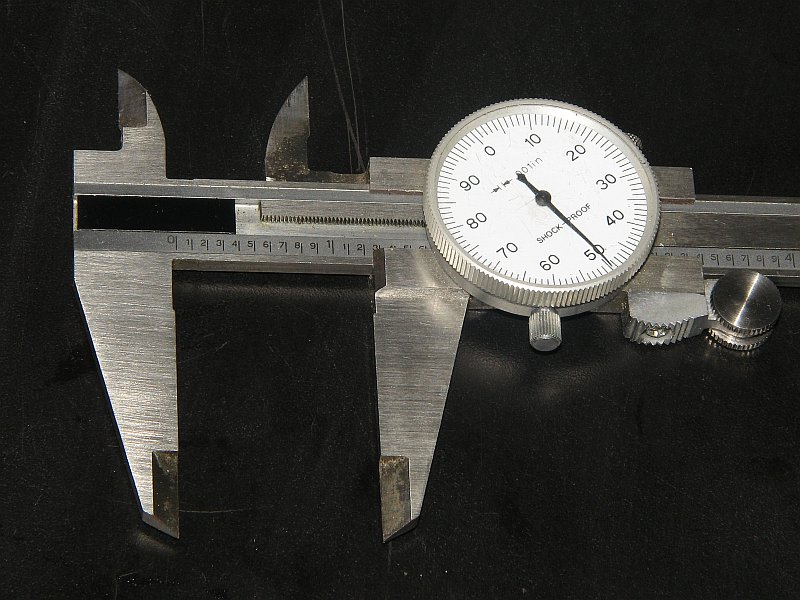
Dial calipers are very accurate and allow you to place marks very precisely on your workpiece. They come in several common sizes (4", 6". 8" and 12"). The 6 inch is the most common and generally the most useful. Below, you can see three different sizes of dial calipers.
 On the following caliper, you can see the dial. In the US, you'll generally see these marked in inches but some are metric and some have both. The entire jaw assembly (including the dial) slides along the bar of the caliper. The thumbwheel below and to the right of the dial helps you move the sliding jaw precisely. The screw under the dial locks the dial's position. To zero the caliper, you close the jaws and turn the dial so the zero mark is direction under the needle. The thumbscrew on top of the dial caliper locks the sliding jaw. This comes in handy when you need to make a mark with the caliper.
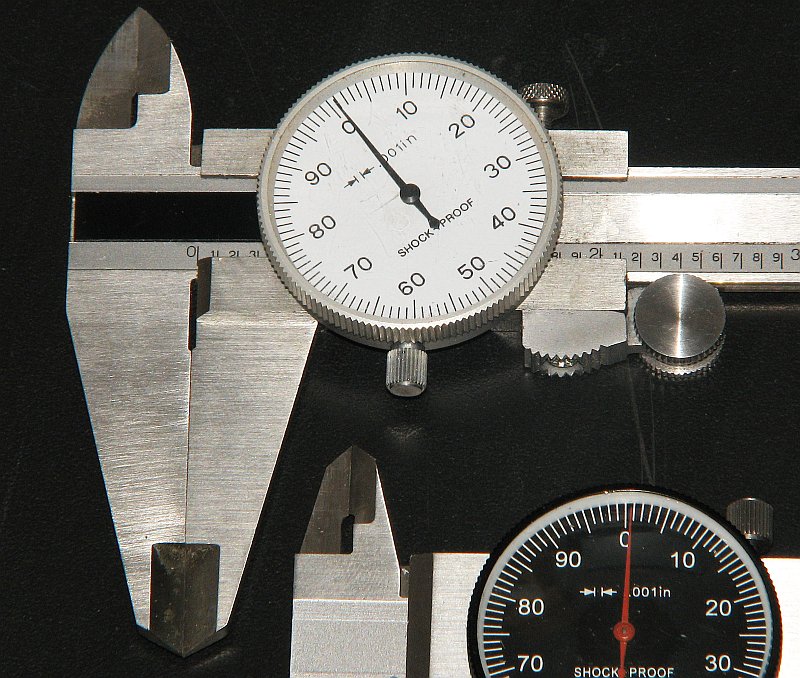 In the following image, the caliper is set to 1.250 inches. If the caliper was opened until the needle pointed to the next (clockwise) minor division, the reading would be 1.251". The inch and 1/10 inch marks are read from the bar. The hundredths and thousandths of an inch are read from the dial.
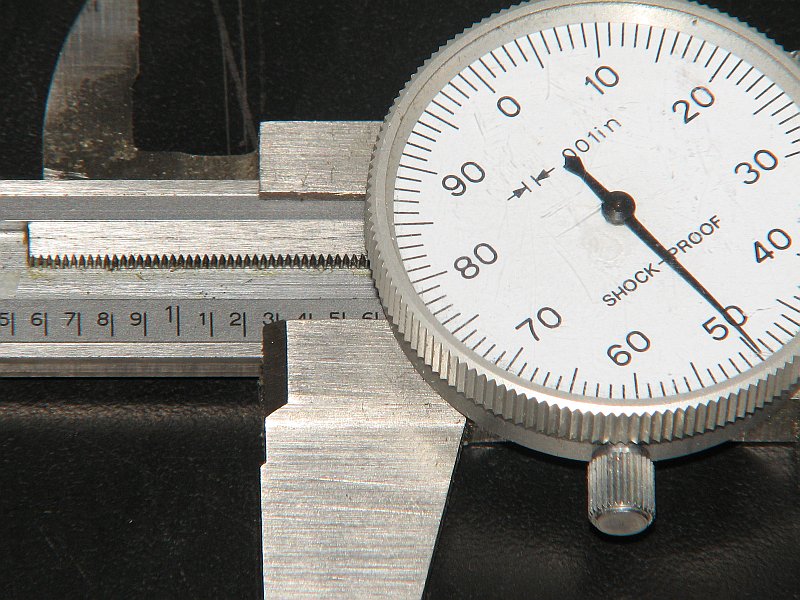 Regularly (every few measurements) check the zero on your dial caliper. It takes only a second to close it and make sure it goes back to zero. If it doesn't go to zero, run your fingers along the inside of both jaws to be sure they are clean. If it still doesn't zero, adjust the dial to zero it. Recheck it several times. On cheap dial calipers, you may have to be aware of the pressure you use when you close them. Use the same pressure when making measurements.
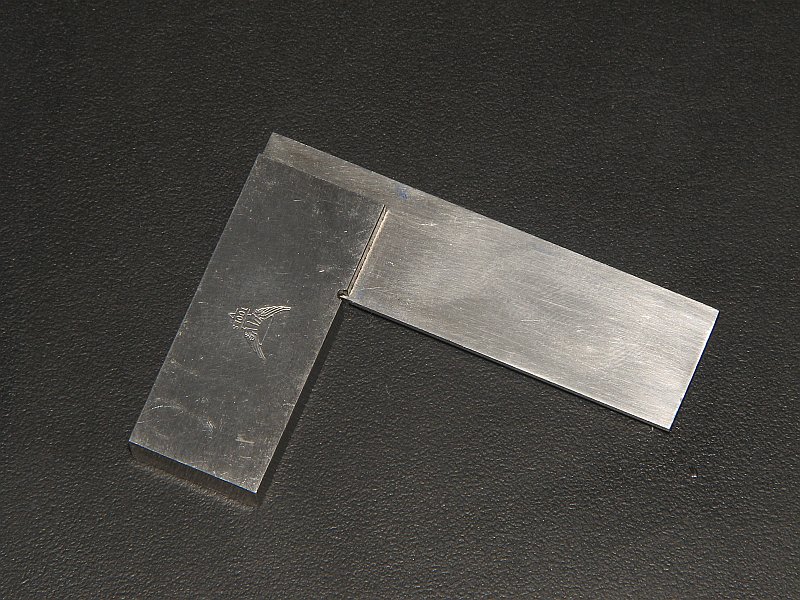
Machinist's Square:
Get a small machinist's square to make marks across a piece. A machinist's square is more accurate than a conventional square that you'd use for woodworking. Most have specifications that tell how much deviation from perfect you can expect over a given length of blade. These squares are typically made entirely of hardened tool steel. They will have a fixed blade and no adjustments.
 If you have a precision square, you need to take good care of it. If you drop it or hit its blade, you can ruin it's accuracy. If you think you may have damaged your square, make a mark on a piece of stock. Then move the square to the other side of the stock. If the blade doesn't match up perfectly with the scribed line, the square needs to be replaced. If it's difficult to tell if the line is parallel to the blade (when the square is moved to the other side of the stock), scribe a second line a few thousandths from the first line. It's relatively easy to see that the lines are not parallel when they're so close together.
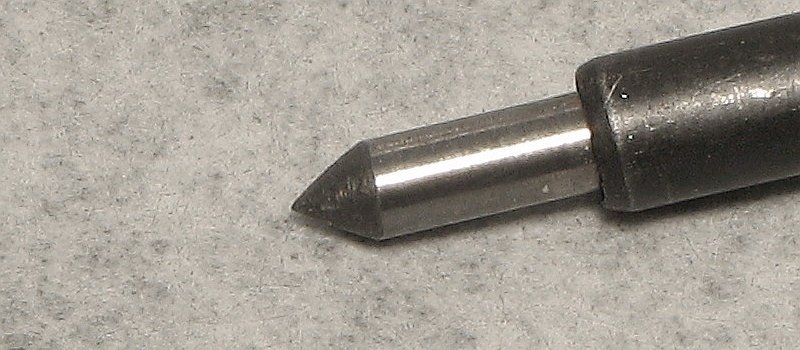
Center Punch:
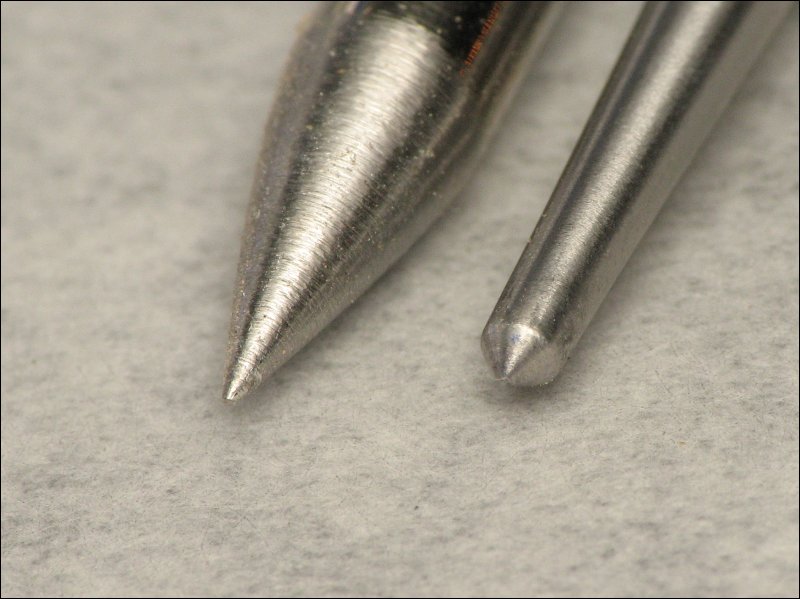
Whatever type of punch you use, you need to use one that has the point precisely ground. if you try to use one that's not perfectly round, the mark will tend to be biased to the side of the punch with most metal. Don't try to sharpen an old screwdriver on a grinder. The point will not be perfectly round. The following photos show a real center punch and a punch made from a piece of drill rod. In the second photo, notice how much sharper the point of the ground center point is.

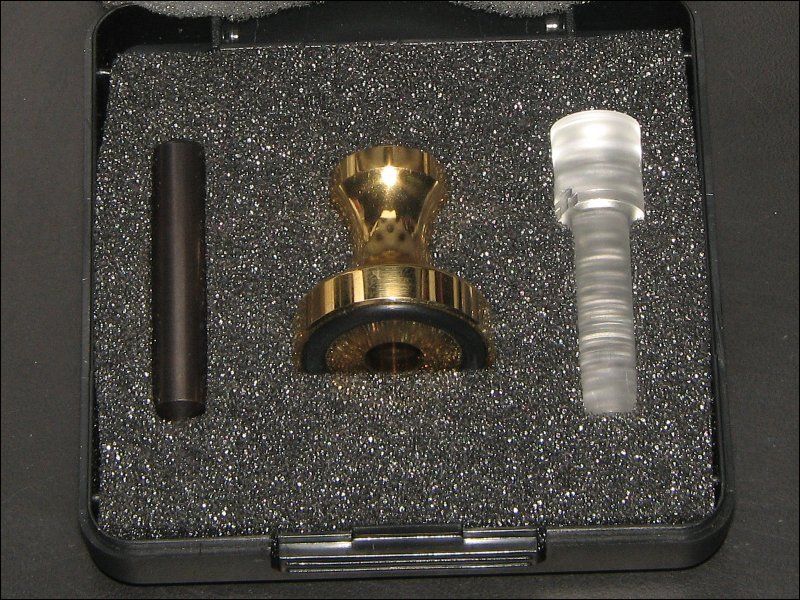
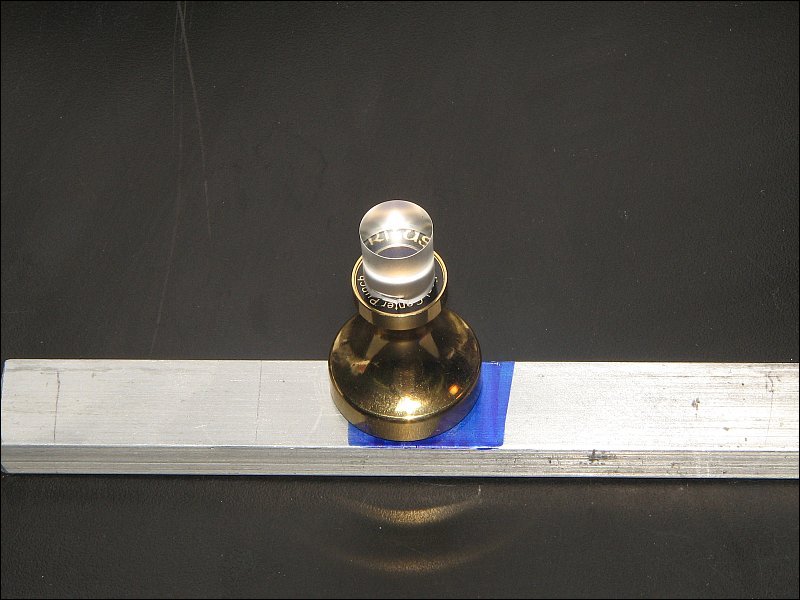
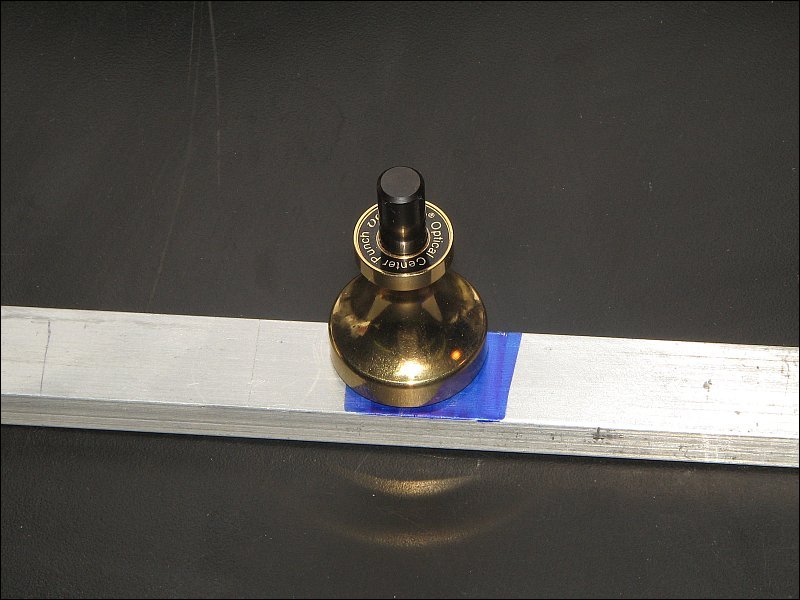
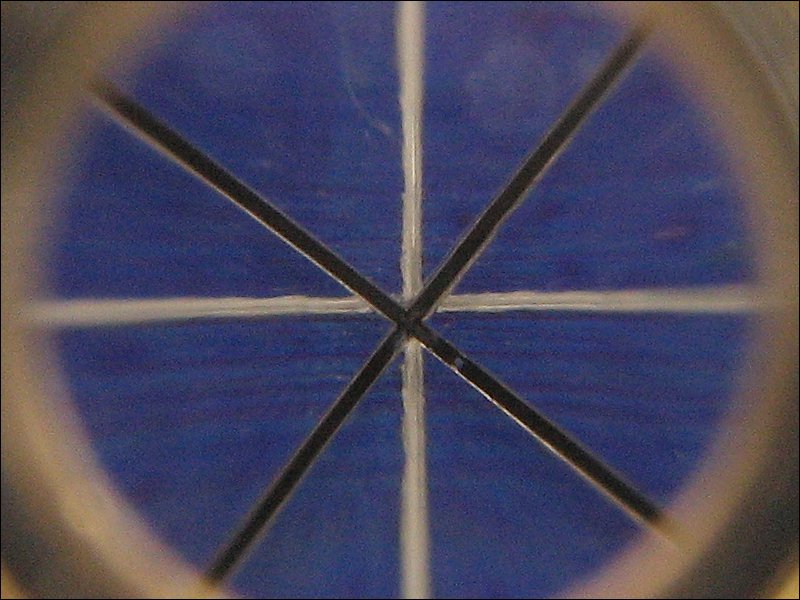
An Optical Center Punch:
An optical punch can be useful in finding the precise intersection of two scribed lines. It has a magnifier that fits tightly in a metallic base. You use the crosshairs or center spot (used on other optical center punches) in the magnifier to align the base. When you have it aligned, you remove the eye piece and replace it with the center punch. Then you hit the center punch to mark the spot. If desired, you can go back the optical piece to check for proper placement and depth of punch.
The next 4 photos show the Veritas optical center punch in it's case, set up for sighting the mark, setup for punching and the fourth photo shows the view through the eyepiece. As you can see, the eyepiece will show you the intersection very clearly. It's actually much better than in the photo (perfectly clear and in focus for entire sight area) but it was somewhat difficult to capture with a camera. I generally set the punch with the crosshairs as shown then turn it until the black lines completely obscure the scribed lines. It's sometimes difficult to see the precise center of very fine scribed lines when the crosshairs are oriented in on top of the lines. The crosshairs are not perfectly centered on the scribed lines in the photo.
Note:
To prevent movement when making a mark on a narrow piece of stock or near the edge of a piece of stock, you should place another piece of stock of the same thickness against the side of the one being marked. The rubber o-ring in this punch's base is very soft and it's easy to get off a bit if you don't have a solid surface for it to sit on.
Drill/Drill Press:
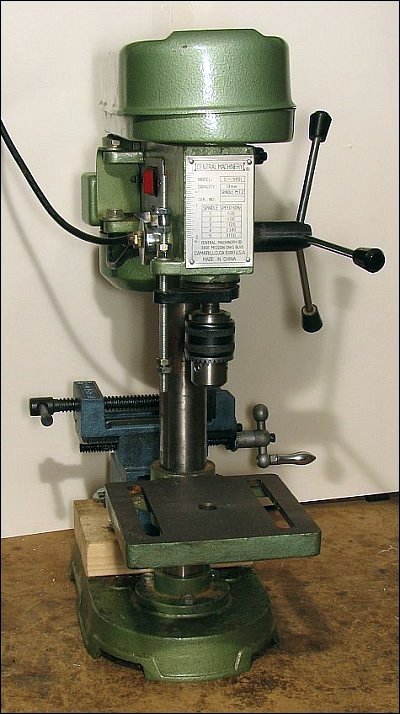
In many instances, a standard electric drill will provide good enough results when you need to drill a hole. One problem with using a hand held drill is that it's difficult to get the center-line of the hole perfectly perpendicular to the surface of the workpiece. If precision is important when drilling a hole, you need to use a drill press (or a mill or a lathe...). When properly set up, a good quality drill press can allow you to drill holes that are very nearly perfect. You can often find new drill presses for less than $100. The drill press below is an old Harbor Freight piece that's seen better days. It still works but you have to be careful with precise operations because there is so much runout in the bearings and spindle. On the right, I've rotated the head around from the previous photo. I have to mount the vise on the base of the press because it's too large to fit on the table.
Drill Press Vise:
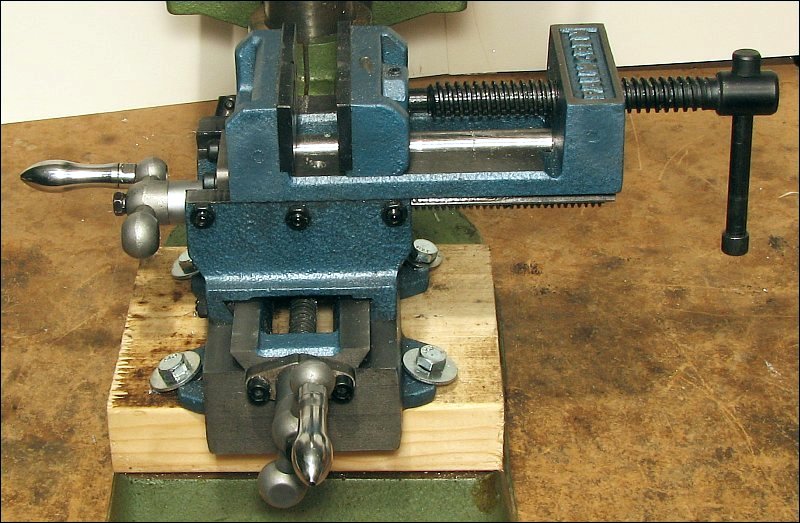
When working on a drill press, you will often need to hold a workpiece in a vise. It's safer than holding it by hand and can help to produce better results because the workpiece cannot move. There are many different types of vises. Most have ears/mounting lugs so they can be bolted to the slots in the drill press table. The most basic model has to be positioned properly and then its mounting bolts tightened. For most all operations, it has to be repositioned. A slightly better vice has an auto-centering feature. This means that both jaws move and move away from each other as the jaws are opened. The next step up is the x-y crossfeed vise. This type of vise has the ability to move in two directions. One handwheel moves the vise in and out (towards and away from the post of the drill press). The other handwheel moves it left to right. Below is one example of a crossfeed vise.
Note:
I've mounted the vise on a piece of 2x6 lumber. This is not ideal but it works well enough. If you use something like this, you need to make sure that the top of the vise's jaws are perpendicular to the center line of the spindle. If it's not, you can use shims to get it perpendicular.
Drill Bits:
The choices for drill bits are virtually infinite. They make various geometries, various materials, various coatings.... I'll simply show you a few that I use. The two below show the standard (jobber) length drill bit and a shorter, machine-screw drill bit. The standard bits can drill deeper holes and can be resharpened more times but the short bits are more rigid and less likely to be deflected when drilling.
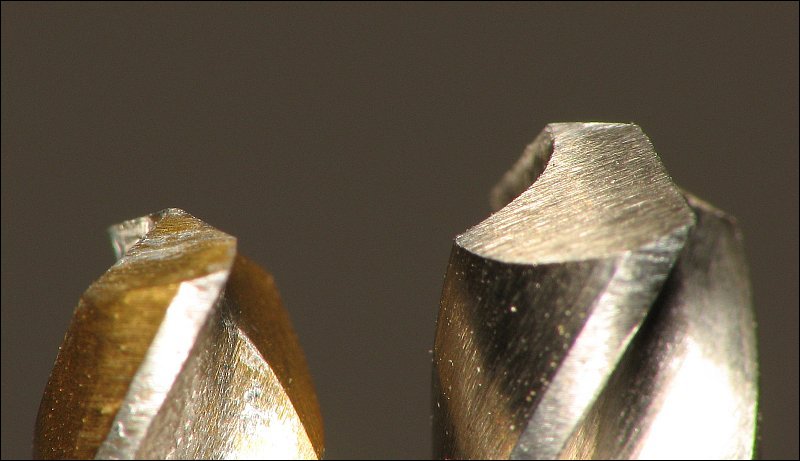
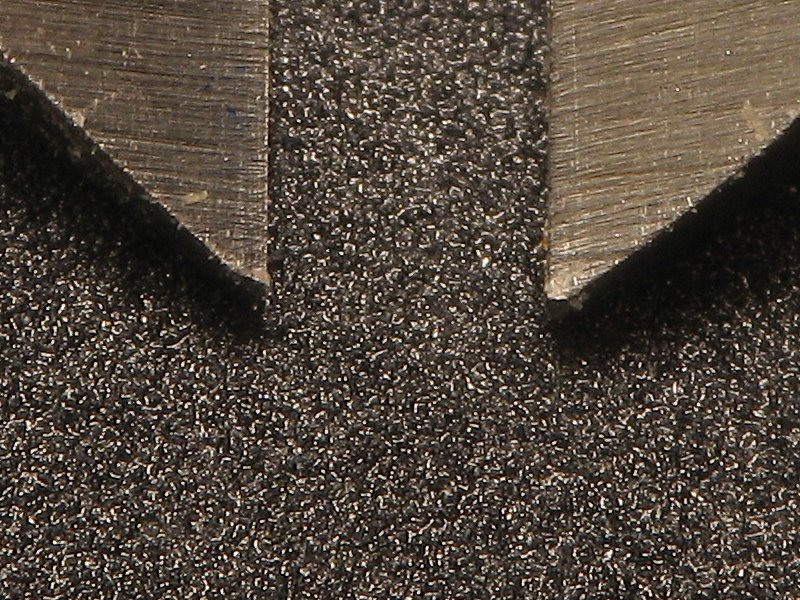
 I'm sure that you've heard of the 'split-point' drill bits. Due to the sharper point, they can cut faster with less of a tendency to walk. There weren't many good photos on the net of the points (especially the ones showing the sides of the tip) so I've included a couple.
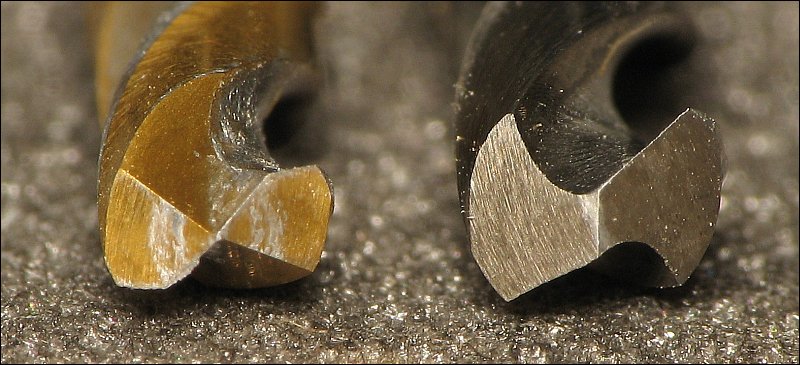 As you can see, the wide profile of the non-split tip can give an offset contact point for the tip. It looks as if the left side of the tip is a bit higher. If this is the case, the bit will try to rotate around the high point until the rest of the cutting edge penetrates the workpiece.
 In the photo above, you can see that one bit is gold colored. It's coated in TiN (titanium nitride). This is a coating that's harder than the cobalt steel to which it's applied. It's also capable of taking more heat than the steel. This acts like a buffer and protects the cutting edge of the bit from high temperature drilling operations. For home shop type of drilling, there should never be any high temperature drilling. Using a sharp bit and a lubricant (which also acts as a coolant) should prevent the bit from heating up.
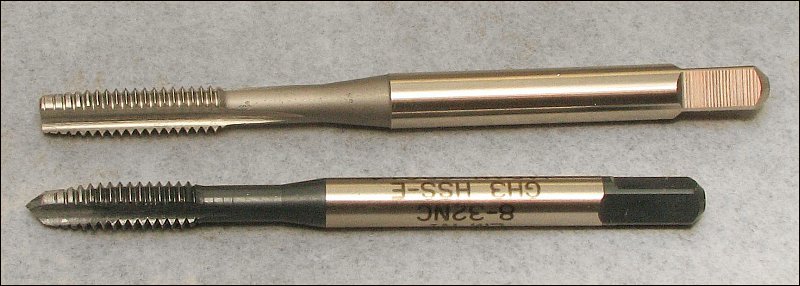
Thread Cutting Taps:
Thread cutting taps are used when you need to cut threads in a hole that you drilled in the workpiece. The next two photos show a spiral point 'gun' tap (bottom) and a standard 'hand' tap. I've had better results with the gun type taps than the standard hand taps. I've broken quite a few of the hand taps. I've never broken a gun tap. When tapping a hole, it's important to get the tap aligned straight with the hole. This is most easily done with a tapping fixture (Micro-Mark) or in a drill press (to be covered in more detail later).
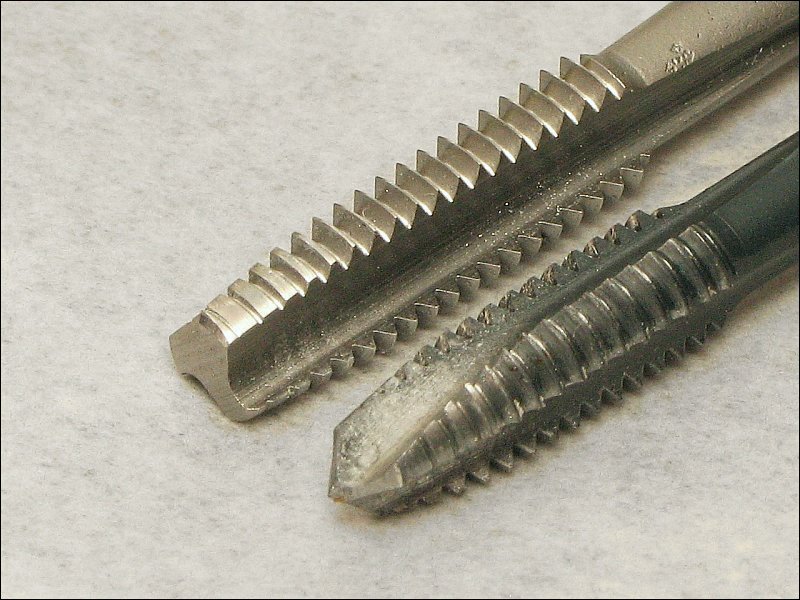
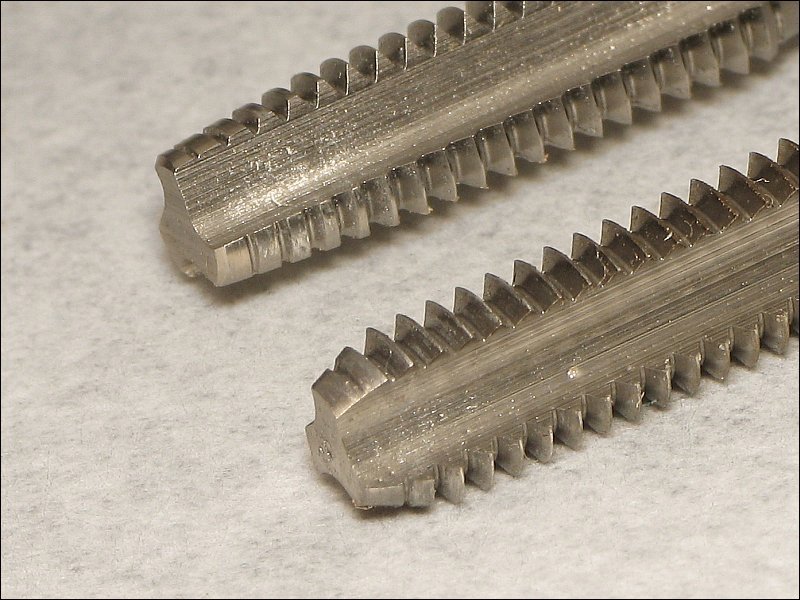
When using a thread-cutting tap, you must drill a hole that's precisely the correct size for the tap. Many times, the proper size will not be a size that you'll have in a standard set of drill bits. The bits sizes are not generally fractional inch sizes. They are often wire gauge number bits. For example, for the gun tap above, the proper bit size is a #29. For a 1/4-20 (1/4" in diameter, 20 threads per inch) tap, the correct drill size is a #7. The following photo shows a 'bottom' tap and a standard tap. Standard taps are designed to start tapping threads in a freshly drilled hole. They have a taper that spans ~5-7 threads. A standard tap cannot produce fully formed threads near the bottom of a blind hole. The bottom tap has very few tapered threads. They are made to tap very nearly to the bottom of a blind hole. Unless you're working with extremely soft material (plastic or soft aluminum), you need to run the standard tap into the hole before using the bottom tap.
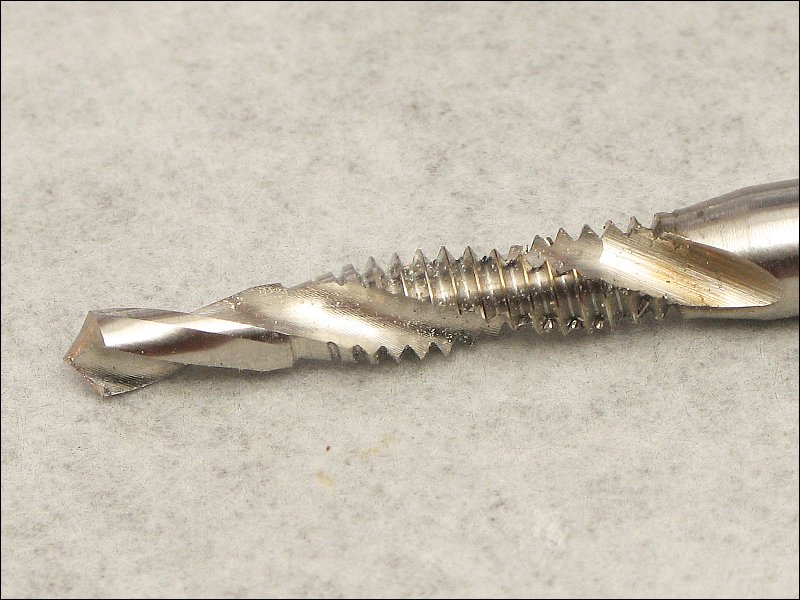
 If you only need to tap threads into through-holes in thin material (~1/4"), then this may be the tap you need. It's a tap with a drill bit point. It's limited to tapping in thin materials and cannot tap in blind holes (unless the hole has previously been drilled deeper with another drill bit). It does save some time because you don't need to change tools. Also, you know that the tap is going to be aligned with the hole because the bit acts as a guide. I actually found these when I was lookig for a tap that had a guide on the end of it.
Saws:
You'll no doubt need to cut stock to length. This can be done with a hacksaw, a band saw or a miter saw (just to name a few).
If you use a hacksaw, I suggest bi-metal blades. They have 'high-speed steel' teeth bonded to a spring steel body. The HSS teeth outlast standard teeth. The spring steel body resists breakage. If you use a miter saw and normally work with stock 1" or less (height and width), you may choose something like the Proxxon KGS 80. It's a good saw but it has a few problems (mine did anyway). It's relatively well made but the table needs some help. When locked in one of the preset detents, it's a bit off. At 0°, it's off by about 1/2°. To remedy this, I made a block to apply pressure to the table-locating peg. I probably could have bent the lever holding the peg but I wanted something more secure and rigid. The peg has play in it if the lever is not locked down tight with its pivot screw. When it's tightened sufficiently, the lever is difficult to move. My solution is very secure but it takes a few trial cuts to get the saw perfectly square. As you can see below, I've made a block in which I've installed a set screw. The set screw applies pressure to the peg and gets the saw square.
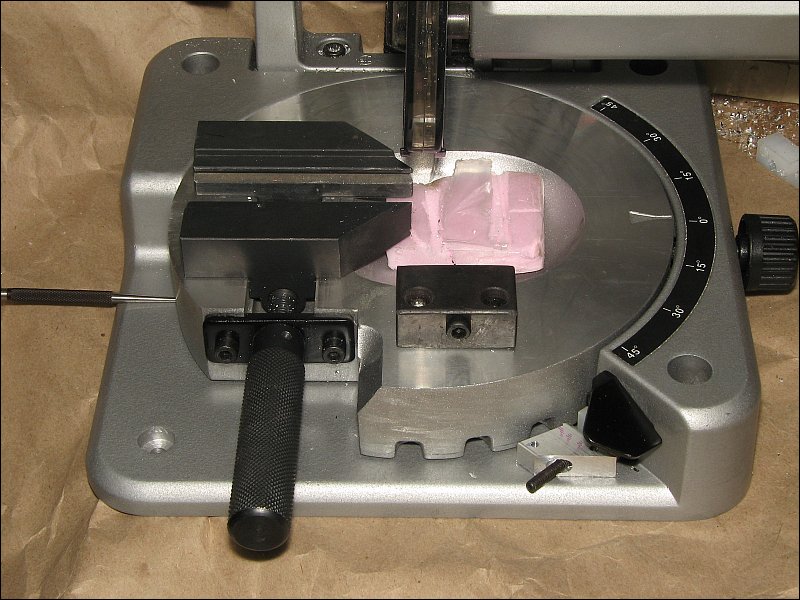
In the image above, notice that I've placed a piece of 1/2" polystyrene insulation (pink insulating board) under the blade. When cutting small pieces, as the piece is cut loose the piece gets jammed between the blade and the back of the blade well. This is very violent and it damages the both the stock and the well.
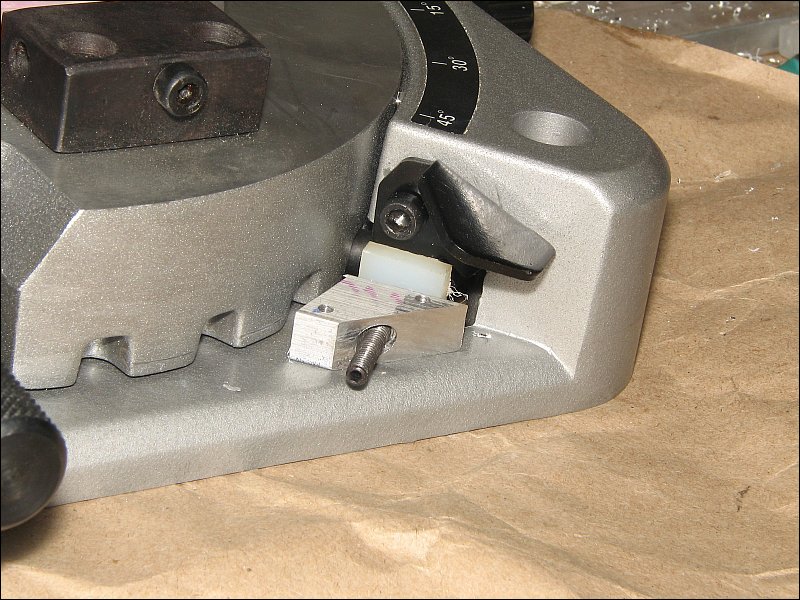 There is a lock on the side of the saw that applies pressure to the table so it can't move. It's useless without some help. The pressure applied by the lock causes the table to tilt back making it impossible to get a square vertical cut. If you want to use the lock, you must insert a wedge (I'm using a center punch in the photo) under the opposite side of the table. Even without using the lock on the side, the table isn't quite square. It's probably good enough for most people but it's not perfect.
Abrasives:
Whether you need to smooth a finish or lightly chamfer a freshly cut end of a piece of stock, you'll need to use an abrasive. The most common abrasive is sandpaper. It's most commonly coated with aluminum oxide but can have other abrasives also. You'll find both cloth and paper backed abrasive sheets. Cloth backed sheets are more durable but less flexible. Paper backed sheets are generally less expensive. There are also wet (waterproof) and dry versions available. The non-waterproof paper generally holds up to oil which will allow you to have the advantages of wet sanding even if you're abrasive isn't waterproof. Wet sanding (with oil or water) helps to keep the abrasive from filling up which will make it last much longer.
I generally use emory cloth with a light oil when I need to lightly sand a workpiece. Emory cloth is generally only available in 3 different grades (fine, medium and course). Other abrasive sheets are typically available in many different grades from 16 grit (VERY rough) to 2500 grit (VERY fine). For most sanding, you'll use something between 220 and 600 grit. Rough grit abrasives remove material very quickly but leave a rough finish. You have to choose the correct grit for your application. The next image is 220 grit sandpaper. The one below it is 400 grit sandpaper. The jaws of the dial caliper are set 1/16" apart for both photos.
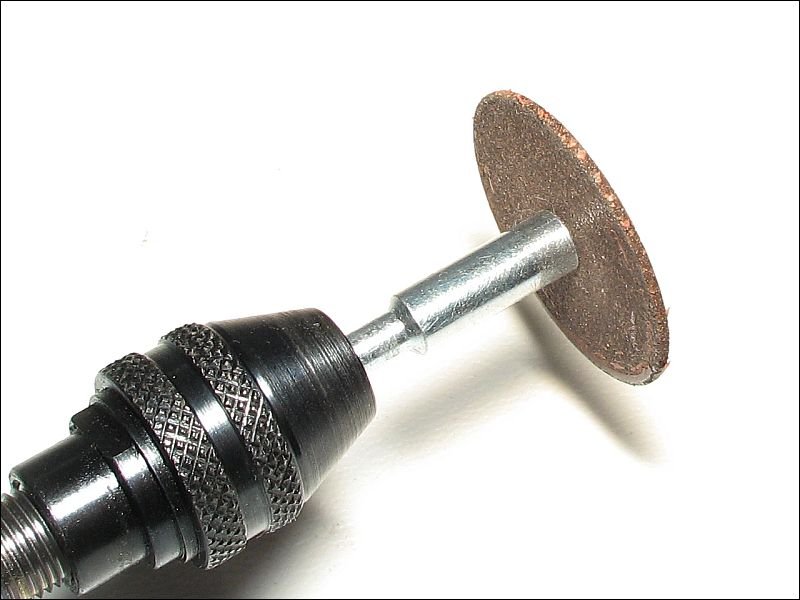
 Cutoff wheels are another type of abrasive. Generally, they used for cutting. Below is a cutoff wheel on a rotary tool. These can be very dangerous. Some are reinforced with fiberglass and some are not reinforced. While it's possible for either to shatter, the non-reinforced wheels are MUCH more likely to shatter. If they do so at the top speed of the tool (~30,000 RPMs), the pieces can cause severe injury. When using cutoff wheels, I strongly recommend using a face shield AND good quality safety glasses.
Vacuum Cleaners:
Well... I'm not sure this goes here but I'll leave it until I find a more appropriate place. When cleaning up metal shavings, chips, swarf from the work bench, you do NOT want to use compressed air. It's far too likely to cause injury (especially to the eyes -- possibly even if you're wearing safety glasses). A broom or brush will be relatively safe as long as you sweep slowly. The best option (in my opinion) is a shop vacuum. It will pick up the metal shavings with little chance of injury. The exception is when there is something that's covered with metal shavings and relatively lightweight. When the vacuum gets close to something like a rag, a piece of paper or a paper towel, the objects may be sucked toward the nozzle of the vacuum at very high speeds. This will throw the metal shaving on the object towards you. Before vacuuming the bench, remove all objects that can be moved by the vacuum.
As I mentioned above, I mostly use aluminum when I need to build something. Aluminum works (cuts, drills, sands...) much like a REALLY hard wood. In many instances, you can use carbide tipped woodworking tools to cut aluminum. Of course, before you try cutting aluminum make sure the manufacturer specifies that the tool is rugged enough to cut aluminum. If you need something stronger than aluminum, there are many types of steels available. Cold rolled steel is the cheapest that's commonly available. It's also generally cheaper than aluminum. Of course, it's harder than aluminum so it will be a bit harder to cut. You should know that most metals sold are alloys. Alloys are mixtures of metals combined to produce different properties. For example, iron is the base material for most steels. To make iron harder, carbon is added (carbon steel). To make it more corrosion resistant, nickel or chromium is added. Aluminum is generally also sold as an alloy. Aluminum alloys typically contain silicon and magneium. You'll see numbers like 6061 and 6063. These are the ones I generally work with. 6061 seems to be the one most commonly sold in various shapes (rectangular, round, round tubes, square tubes, angle...). Many times, you don't need to use metal. In fact, plastics are often a better choice. I really like ABS. It's strong and easy to work with. As a bonus, it can be 'glued' together with nothing more than a few drops of acetone. This allows you to test fit the pieces. If everything fits properly, drill tap and fasten the pieces together. Nylon is another strong material (stronger than ABS). It's generally solvent resistant so you can't use the acetone 'trick' to hold the pieces together. UHMW-PE (ultra high molecular weight polyethylene) is another good material. It's good to use when you need to have minimal friction between components. It's much like teflon (PTFE) but less expensive. For materials, try McMaster-Carr and Online Metal Supply. I've used both and the service it top notch.
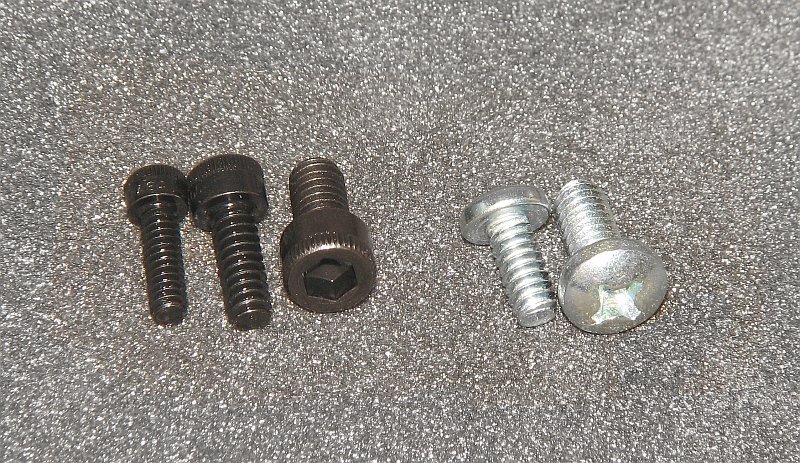
I prefer to use socket head cap screws for most everything I do. They look nice when set into a counterbore. They are almost always hardened so they're tougher than the standard mild steel screws that you generally find at the hardware store. I never use self tapping screws. They are an option if you don't like tapping threads in the workpiece but I wouldn't suggest using them for something that you intend to use for a long time. The photo below shows #4, #6, and #8 socket head cap screws and on the right #6 and #8 machine screws.
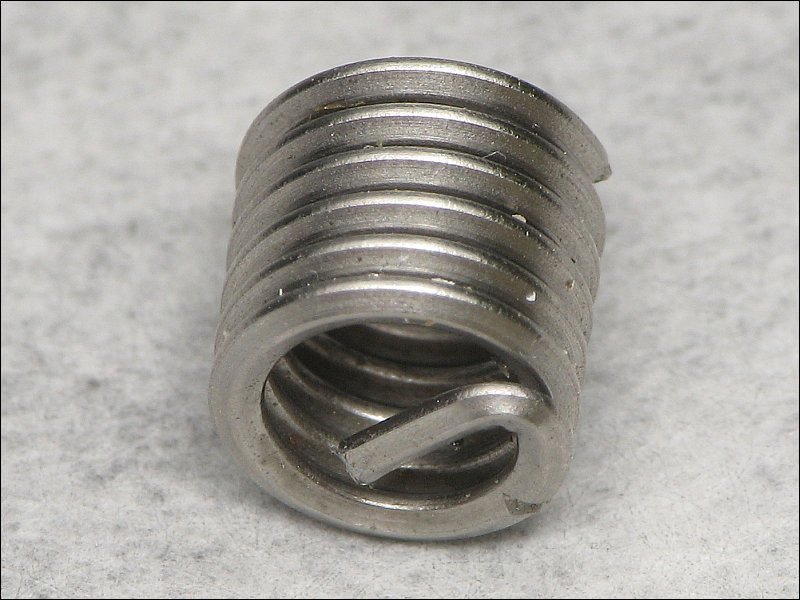
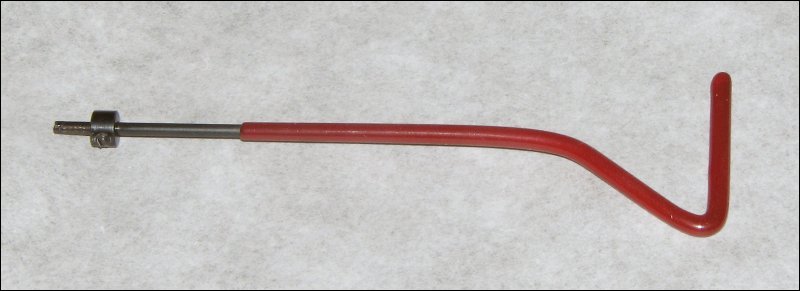
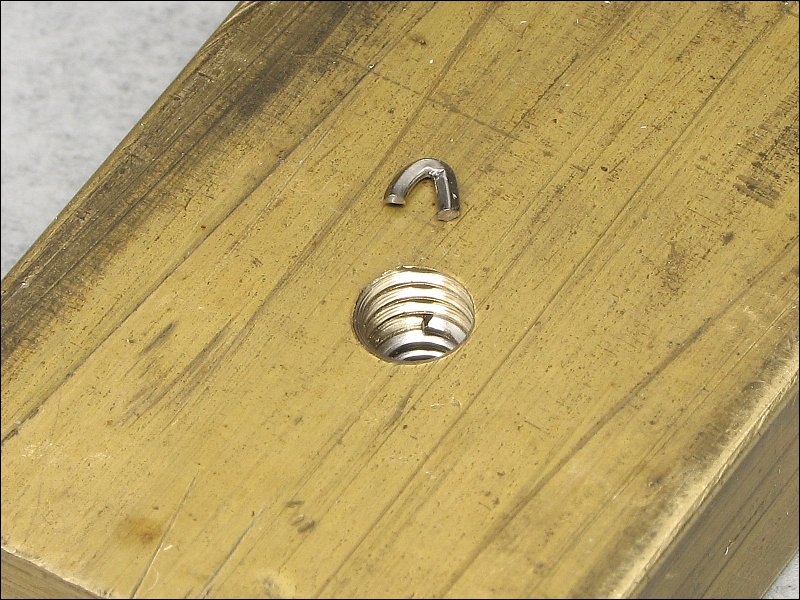
 When you have to thread a piece of plastic or really need a lot of strength in a piece of aluminum, you can use coiled thread inserts. They are sold under various brand names like Helicoil and Perma-Coil. In the jig below, you can see that I've installed a coil into the ABS plastic. These set screws are used to hold the jig on the end of a piece of stock. This is used to provide stability for the optical center punch base when center punching the end of a rectangular piece of stock. The screw with two nuts is simply a home-made thumbscrew.
 This is a photo of the coil before it's installed. The end with the tang goes into the hole first. The installation tool threads it into place. The installation tool is removed and the tang is broken off with a punch. There will be more information on these later.
Confirm the Dimensions of the Stock:
Don't trust advertised dimensions. They are seldom accurate unless you're using specialized stock. For example, 3/4" stock may actually be 0.76" instead of 0.75". This may not seem like much but it can be a huge difference if you're doing precision work (especially when you need to precisely mark the center point of a piece).
If the stock you're using is from two different manufacturers, they may not be the same size (even though they're supposed to be the same size). Sometimes, the stock will be a somewhat irregular shape. Aluminum is extruded and generally well formed. For other types of metals that use other methods of forming, the stock may not have perfectly parallel sides. If you're working with such a piece of stock, you need to take that into account when marking the workpiece. If you look closely at the right edge of the piece of steel below, you can see that the far edge is wider than the near edge. If you have a piece of stock like this, you need to use the same edge when marking the various points. If you're going to mark a center line, you have to be careful which width you use and from which edge you make the mark.
Cleaning up Rough Stock:
Many times, you will receive stock that's been weathered or has lots of lines in it (either from the extrusion process or from sliding on other pieces of stock). Use a very fine abrasive to remove fine lines from the area to be marked. This will make it easier to see the marks you make. To make the marks easy to see, you can cover the area with a blue or purple felt tip permanent marker. Even the lightest scribed mark will show up extremely well (especially on aluminum). Machinist use a special layout dye but the marker will work for most applications.
The image below shows the raw aluminum stock. As you can see, it doesn't exactly have a perfect surface.
 This next image shows the piece after sanding it for ~20 seconds with a fine sandpaper and a light oil. I sanded it with the length of the piece and when I had it as smooth as I wanted it, I sanded in circles to break up straight lines that could have been confused with scribed lines. This is best done by hand. If you use power tools, it's likely that you'll remove too much material.
Cutting the Stock to Length:
Generally, stock will be cut with a cutoff saw like the one shown in the 'tools' section (or a larger one). This will generally provide very nice cuts that will require very little preparation before it can be used. Larger cutoff saws can be used for this but they can be very dangerous when cutting small pieces unless both halves of the material are properly clamped. Larger saws have much more power and typically have very high rim speed which can send small pieces flying at very high rates of speed. Be very careful when using large, powerful saws to cut small pieces.
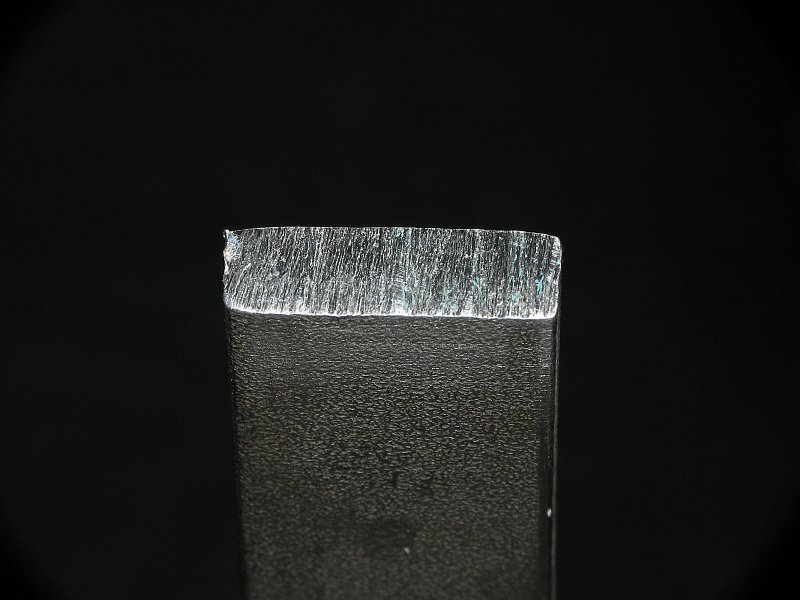
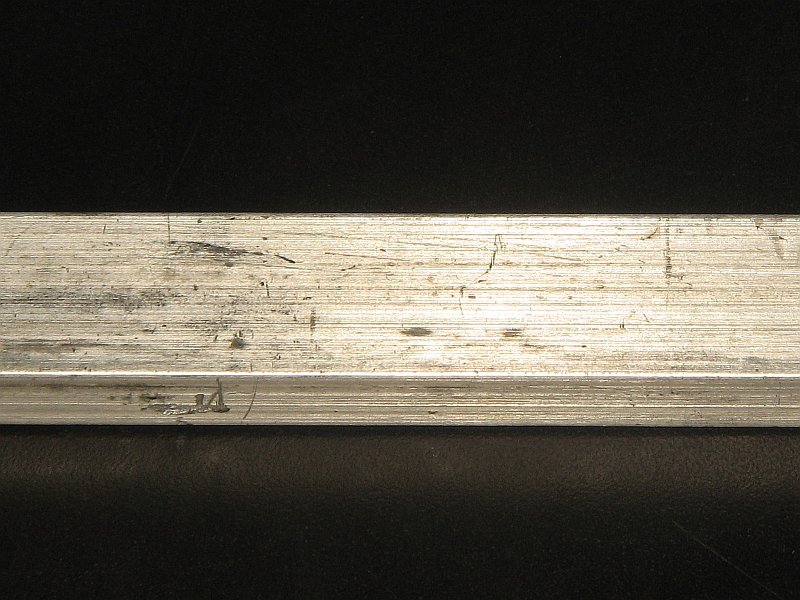
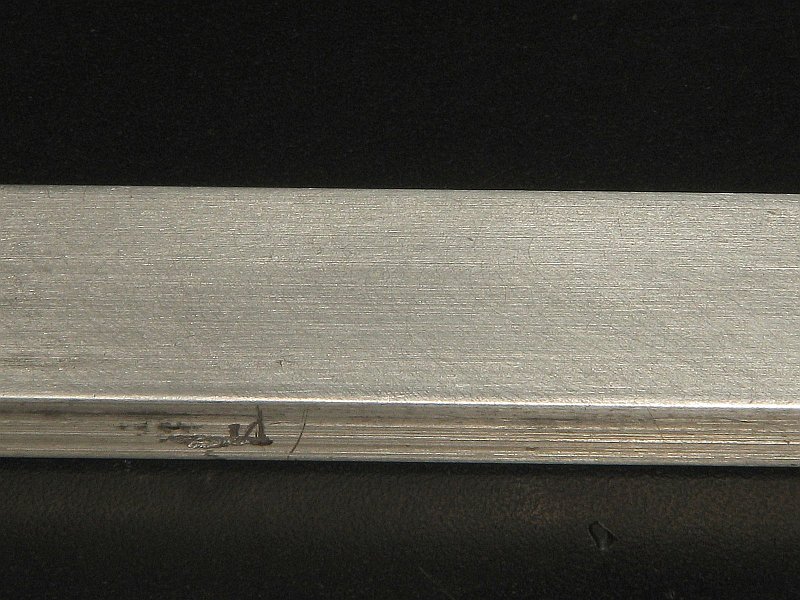
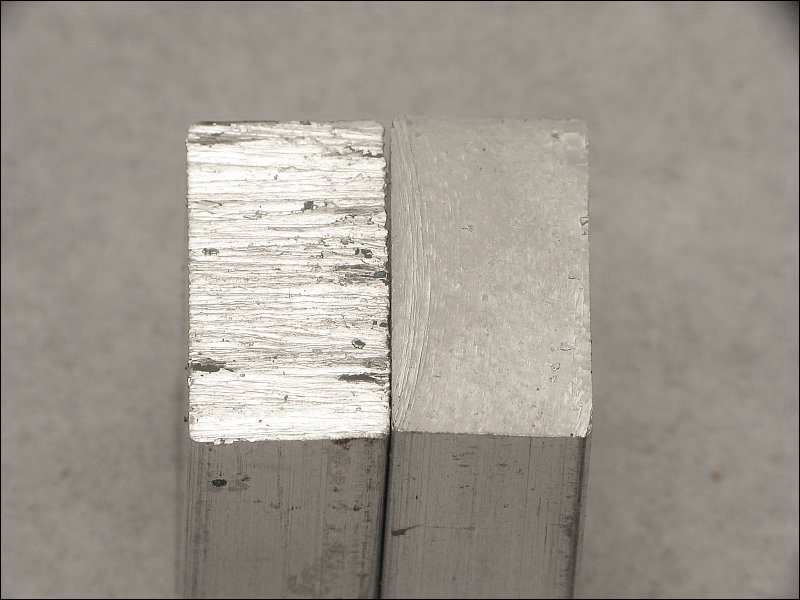
If you have to cut stock with a hacksaw and a vise, make the mark on the stock and put the piece you need 'in the vise's jaws'. Align the mark with the edge of the vise jaws and level the material with the top of the jaws. If the material is soft or needs to be protected from the rough jaws, insert some scrap stock (or other material) between the jaws and the workpiece. Even a piece of heavy cardboard will work. Cut along the side of the vise's jaws. They're generally hardened and will only be scratched by the saw blade (no serious damage). This should provide a relatively square cut. If the cut is a bit rough, hit it with a file (or sandpaper on a sanding block) while it's in the vise. Cutting more slowly and with less downward force will produce better cuts. Blades with more teeth per inch will produce cleaner cuts but will cut more slowly. Below, you can see the difference between the cuts made by a hacksaw and a miter saw (most miter saw cuts are better than this).
 Often, after you cut a piece of stock, there will be a tiny burr on the edge. If it's not going to cause a problem for the finished piece, lightly chamfer the edges with a piece of sandpaper. Laying the sandpaper on a hard, smooth surface and dragging the edge along it at a 45° angle will work well (that's what was done on the piece below). Removing the burrs will insure that the square or dial caliper will lay flat along the true edge of the stock.

Marking the Stock:
I'll assume that you're not using a milling machine and will therefore need to layout all of the drill points on the workpiece. You'll need to scribe lines in the surface of the material. I prefer to use a razor knife for marking. A scribe can also work but it may be difficult to get it as close to the measuring device as you need for accurate placement of the mark. When marking, be sure to hold the edge of the blade directly against the straight edge. If you hold the side of the blade against the straight edge and don't keep precisely the same angle (blade of knife against straight edge), the line won't be properly laid down.
Note:
The image above is a flash graphic. You can right-click to bring up a dialog box that will allow you to zoom in on the image. You can use the left mouse button to navigate when zoomed in.
If you're scribing a long straight line, you should realize that many items used as straight edges (like an aluminum yardstick) will flex and the line will actually be curved instead of straight. It's best to use a dedicated straight edge. Below, you can see two sets of intersecting lines. The ones on the blue area are easy to see. The ones to the left of the blue area are visible but much more difficult to see. Another advantage of using the marker is that you don't have to scribe it so deeply. This could be important for projects that will have fine finishes. It's also nice if you make a mistake in the placement of a mark. To cover the mis-placed mark, simply fill it in with the marker and make a new mark.
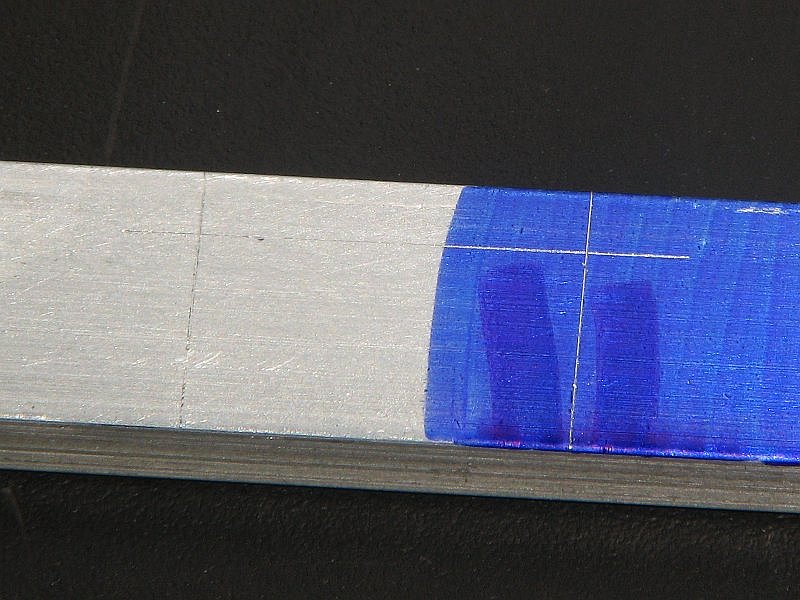 When you have to make a measurement or mark, make sure all mating surfaces are free of debris, nicks or other irregularities. Even the tiniest of these can make a difference in the quality of your work. When you need 2 marks at the same distance from an end of an elongated piece of stock, make one mark and use the square to make a line across the intersection of the two points that you need to mark. If you make two measurements and the end of the stock is not absolutely perfect, your two marks will be along slightly different lines (blue and violet lines below -- zoom in to see more detail). The following file (another Flash file) shows how using two marks on a piece of stock that's not perfectly square can cause problems. In the first two vertical pieces of stock, marks are being made at the end of the depth gauge/tang of a dial caliper. You can see that the end of the main body of the caliper is on the end of the stock. Since the end of the stock is not square, the mark from the end will be in two different places along the length of the stock. The horizontal piece of bar stock has its center line passing through the two intersections on the rightmost piece of stock. If you were going to assemble these two pieces and the holes were precisely down the center of the horizontal piece of stock, the two pieces would not be at right angles to each other. If you only use one mark and use a square to place a mark across the stock, the two pieces would at least be at right angles to each other.
|
When you need to make a mark along the length of a long piece of stock, it's better to make marks near the ends of the piece and connect them by using a straight edge. If several holes will be placed along the length of the long line, you need to use a good quality straight edge. If you have a square with a long blade, that would work well. There are dedicated straight edge tools. If absolute accuracy is required, you should get a true straight edge.
When lining up the straight edge with a scribed mark, place the blade of the razor knife 'in' the scribed mark (when scribed, it will generally make a small channel in the workpiece) and move the straight edge until it's directly against the edge of the knife. Then line up the straight edge with the other mark. Be sure to hold the other end in place while aligning the second mark. You may have to do this several times to get it perfectly aligned. After the straight edge is aligned with the marks, scribe along the blade of the straight edge.
If you're going to drill the hole with progressively larger bits, the small sharp punch point may be OK. If you're going to start with a relatively large bit, you may need to punch the intersection with a punch with a broader point. Using split-point bits will make the bit more likely to remain in the center punch dimple.
When using progressively larger bits (to insure that you're going to remain on the center), you don't need to drill through the material with each bit. Just drill deeply enough to be sure the next bit will center itself at the desired point.
|
Important!
Do not wear gloves when using a drill press. Gloves can easily get caught in the spindle or on the bit and can cause serious injury (broken bones, etc).
Important!
|
The reason I recommend using progressively larger bits is this... If you're drilling and a 1/4" bit deflects a few thousandths of an inch as it begins cutting, you probably won't notice. If you're drilling with a 1/16" bit, you will easily notice if the drill bit gets deflected or if it misses the center-punched point.
There are at least a couple of ways to get an accurately placed hole when using a drill press.
Please note that using the freehand method can work well but it can be dangerous. This is especially true if the bit grabs the piece and spins it around. If you can clamp it to the drill press table after you find the center, it will be much safer.
For more accurately drilled holes, use short bits or chuck up the bit short in the chuck. This will minimize deflection of the bit.
If you've never used a drill press, you may be surprised to see how much less torque they have (much less than a standard hand held electric drill). Most are relatively easy to stall. This isn't necessarily a bad thing. It provides a bit of a safety factor for those times when the bit gets jammed in a workpiece.
Assuming that the hole you drilled was for the tap that you're going to use... Chuck up the tap in the drill press chuck and lower the tap into the hole. Applying light pressure to the tap, turn the pulley for the spindle. Continue applying light pressure while driving the tap into the stock. When the desired depth has been reached, turn the spindle backwards until the tap exits the surface of the material. When tapping, you do NOT want to let the tap disengage the threads on the other side of the stock. If you do, it may be difficult to get the tap to re-engage the threads properly which can produce a poorly threaded hole.
Drilling the holes and tapping each one (in the drill press) just after drilling, will produce the best holes but it's time consuming. This is especially true when using multiple bits to work up to the largest size.
When tapping a through hole, I'd suggest that you use a 'gun' tap or a straight two flute tap. These taps are generally stronger than the standard 'hand' tap. I've broken a few of the 4 flute hand taps but I've never broken a gun tap or a two flute tap. A gun tap also requires less force because the chips are pushed out in front of the tap by the beveled edge on the end of the tap. Using a lubricant is often helpful but you don't want to use a thick lubricant that will prevent the chips from moving easily out of the way of the tap. On soft metals like aluminum, you should try tapping dry as well as with different lubricants. Sometimes, it's better to tap a through hole dry because the chips readily fall out of the bottom of the hole. Sometimes lubricants will hold the chips and make tapping aluminum a bit more difficult.
When tapping any material, you have to regularly reverse the rotation of the tap to break the chips free. When tapping harder materials (mild steel, stainless steel...), you will have to reverse the direction more frequently. I get better results when I blow the chips out of the flutes of the tap and through the other side of the hole being tapped. This gets the chips out of the way and prevents binding.
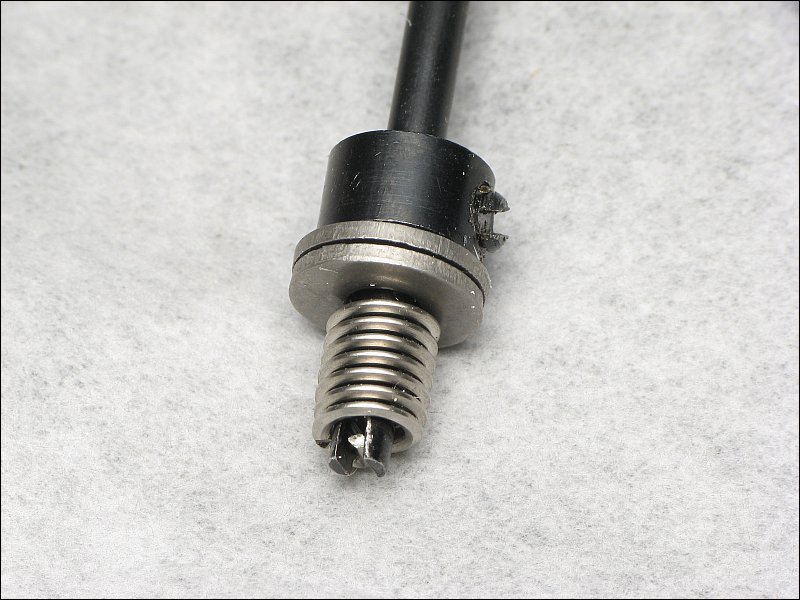
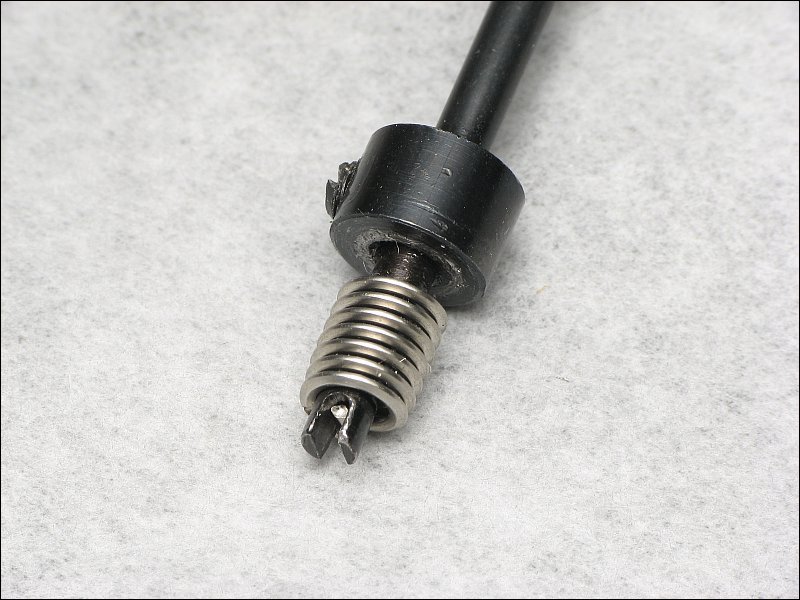
Below are the working ends of the two tools. Neither tool is perfect but both will get the job done.

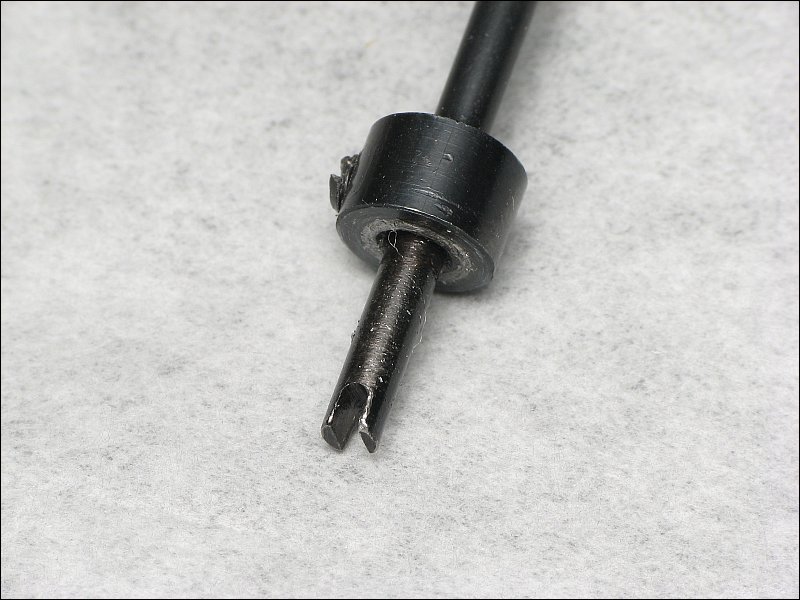
In the photo above, you can see that the bottom of the movable stop is gouged. This is from the end of the coil digging into the stop. When this happens, the top coil becomes deformed and, if not noticed quickly enough, the coil becomes hopelessly damaged and has to be removed. To stop this from happening, you can either lift the tool every half turn (to allow the coil to release from the stop) or you can insert a couple of #4 washers between the stop and the coil (as seen below).
The stop has to be set for each length of coil. When setting up the stop on the tool, you want the tang to 'almost' bottom out in the slot in the tool. If the tang is allowed to bottom out and there is space between the top of the coil and the stop on the tool, the coil will be stretched when you install the insert. This will cause the thread pitch to change and the insert will be useless. When installing the insert, keep downward pressure on the tool to keep the coils together.
You need to choose the correct insert for your situation. You want as long an insert as possible (in my opinion) but, when the insert is installed, the bottom of the insert must have sufficient clearance for the tang to be broken off. Also, you want an insert that can be installed with the top coil approximately 1/2 turn below the surface of the workpiece.
When installing the insert, you will screw it into the hole much like you would an actual screw. Until you've done quite a few of these, you should check the installation several times before it's fully installed. This will make it easier to remove if something has gone wrong. When the insert is in place, the tang must be broken off unless there is ZERO chance of the screw ever contacting the tang. It's best to remove it.
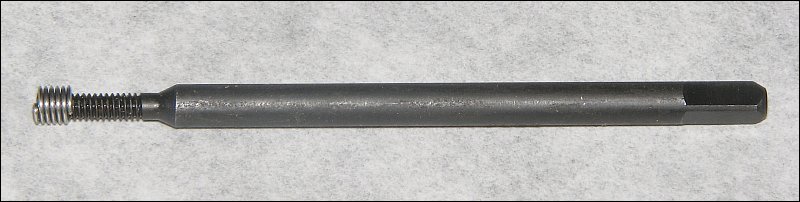
To break off the tang, the instructions say to strike sharply with a hammer. In my experience, this is difficult with any hammers that I have. Instead of a hammer, I use a piece of 1" x 1/8" aluminum stock that's ~12" long. For the punch (the piece that goes through the insert and rests on the tang so you can strike it), you need to use something with a square (non-beveled) edge. In the Re-Coil kit, a tang tool is supplied. When a tool isn't supplied, I use either a drill bit (strike the pointed end) or a piece of drill rod. The punch needs to be as large as possible that will fit through the center of the insert. Of course, you should be wearing proper safety glasses any time you're striking an object.
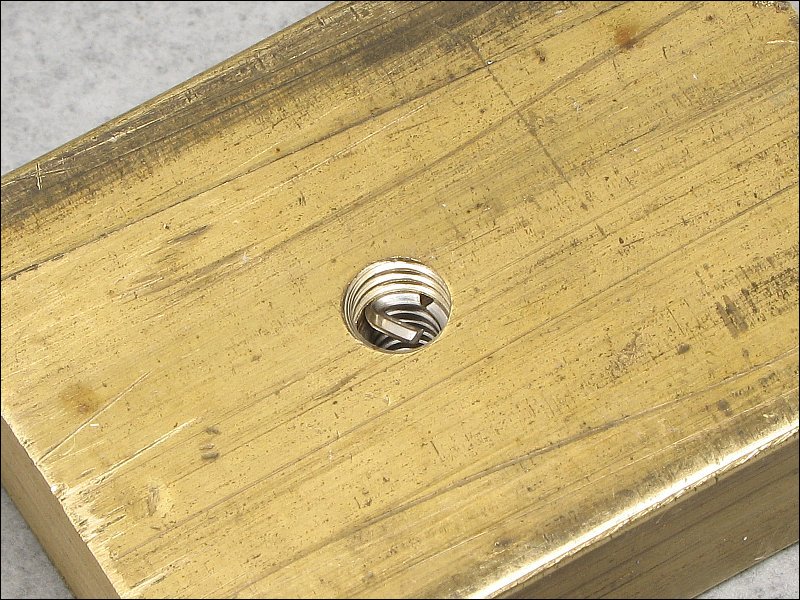
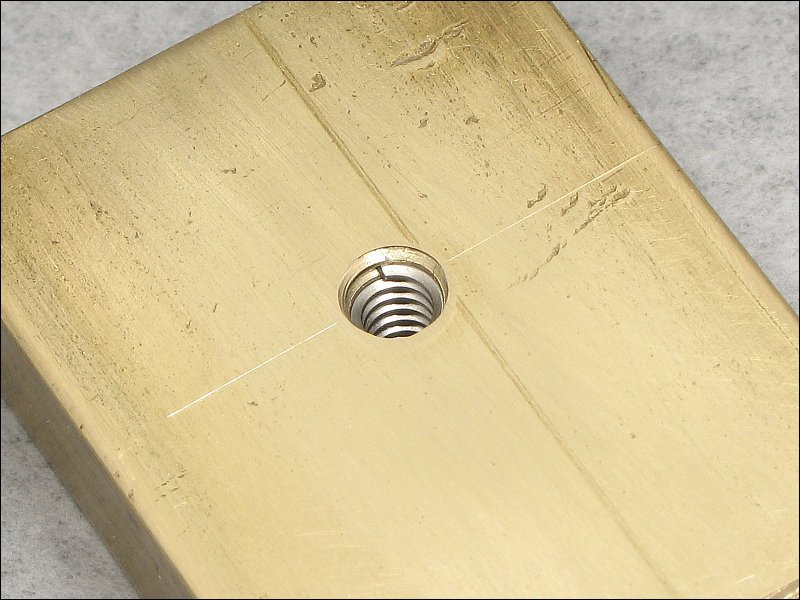
Below is what you should have after the tang has been broken off. The tang (on top of the piece of brass) has broken off cleanly. Inside the hole, you can see that the bottom coil is in place as it should be. Sometimes, if you don't strike the tang sharply enough, the bottom coil will be pulled out of place.

|
