|
This is only a VERY simple introduction to Ropes and Knots. There are much more detailed pages but the information here may make it easier to get into tying knots. Most people know a very limited number of knots and that's all they will likely need but there are other interesting knots that are very useful. This is also good for those trying to exercise their minds. It requires both mental and physical effort.
None of the information here should be used where personal safety could be in danger. Knots can easily be mis-tied and a slight difference in the way a loop is made or wrapped can make what should be a reliable knot a knot that will rollout and fail. If used for climbing or support, the failed knot could cause serious injury or death.
Here, you will find information about knots and rope but you should not forget about other items (chain, wire rope...) that can serve the same purpose, and are many times better suited for the task.
Knots vs Splices:
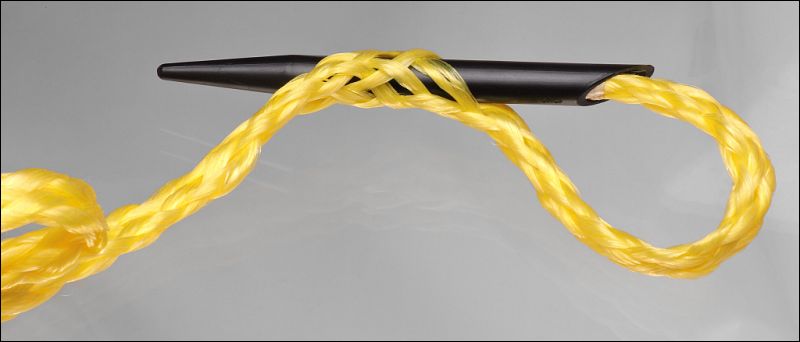
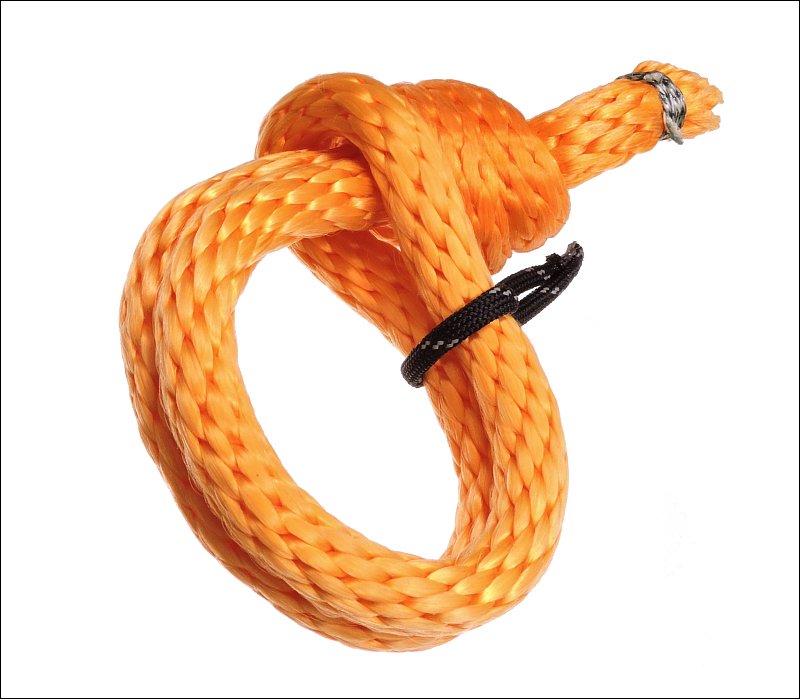
Knots and splices will both allow you to make connections to other objects with your rope. In general, you will use a splice for a long-term, fixed-use connection like those where an eye is spliced into a rope for a dock line. Knots can be tied and untied so that the rope can be used over and over for different tasks. Another reason to choose a splice is that it generally doesn't weaken the rope at the splice. Virtually any knot you tie will weaken the rope and if the rope is pushed to its limit, it will break at the knot. If you want to try simple splicing, you can buy hollow braid rope that has the 'fid' (AKA - phid) included (black object in following photo).
Breaking Knots Down to Simpler Parts:
On Various knot sites, you'll find that they tell you to first construct abc knot, then perform several more steps. At that point (unless you have absolutely no trouble learning new, complex knots), you should look up the abc knot they mention and make it until it becomes second-nature. Then go back and make the complete knot that you were trying to learn earlier. You should also try multiple knot-tying tutorials. Some people have simpler or different ways of tying knots that may be better for you. You may have to use 3, 4, 5 different sources to learn to tie the knots that you want to learn.
Testing Knots:
When testing knots (and you should test so you will better understand how they perform), you need to be careful. Testing small ropes is much easier if you're testing to the breaking/failure point. Small rope can be stressed with a ratchet strap. Larger ropes may require much more force. Whatever method you use, you need to be sure that there is safety built in. For example, when testing some relatively small (3/16") polyester rope, I used a come-along between a truck and a tree stump. To prevent the hook on the come along from flying when the rope broke, a bungee cord with snap-hooks was used to limit the distance the large hook could fly. For larger rope, something more substantial would be required.
If you're going to use a ratchet strap, get a heavy duty strap and a ratchet with an extended handle (makes it easier to apply more force). If you buy one with a 'wire' hook, if it's not welded together, the hook can be removed by spreading the hook and sliding the strap out of the hook. That removes the heavy metal component and reduces the risk of injury when the rope breaks.
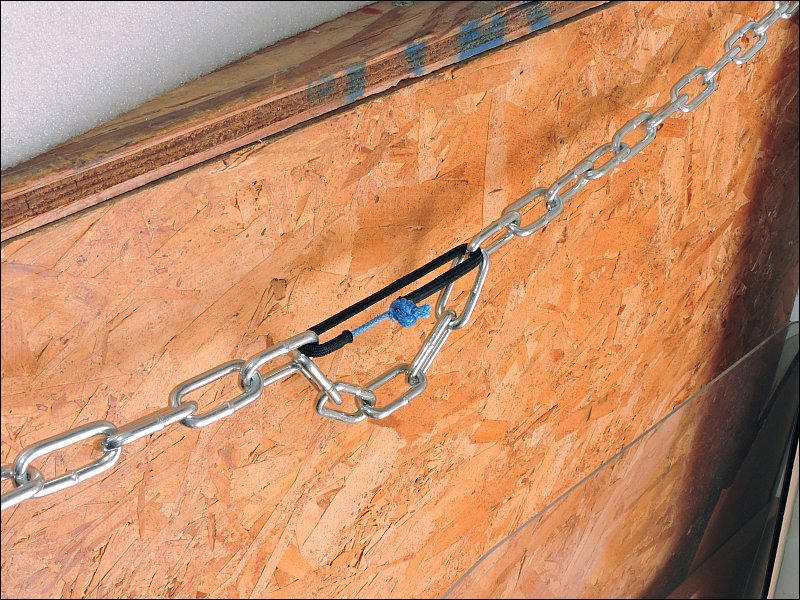
For smaller scale testing, I use a length of chain and connect the device (soft shackle, or whatever I'm testing) between links of the chain in a way that creates slack in the chain. That way, when the rope breaks, the chain simply extends the few inches that were taken up by the device being tested.
One end of the chain is held in place by two 5/16" x 3.5" lag bolts. The third lag bolt is simply a retainer in case the others pull out or break (unlikely). These go into a 2x4 under the OSB and plywood.
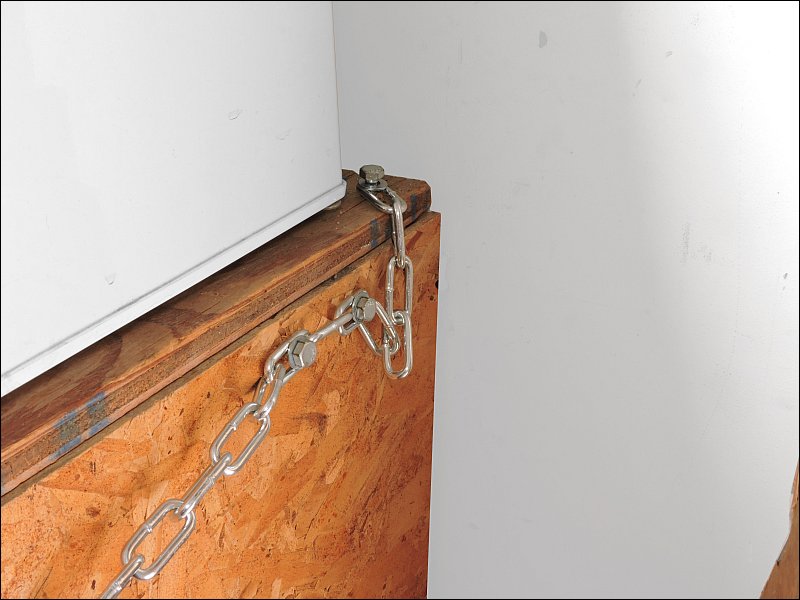
On this end there is a shackle to help adjust to whatever is being tested. To pull against the knot, a piece of heavy-walled pipe is inserted through the soft shackle and levered against the end of the wall.
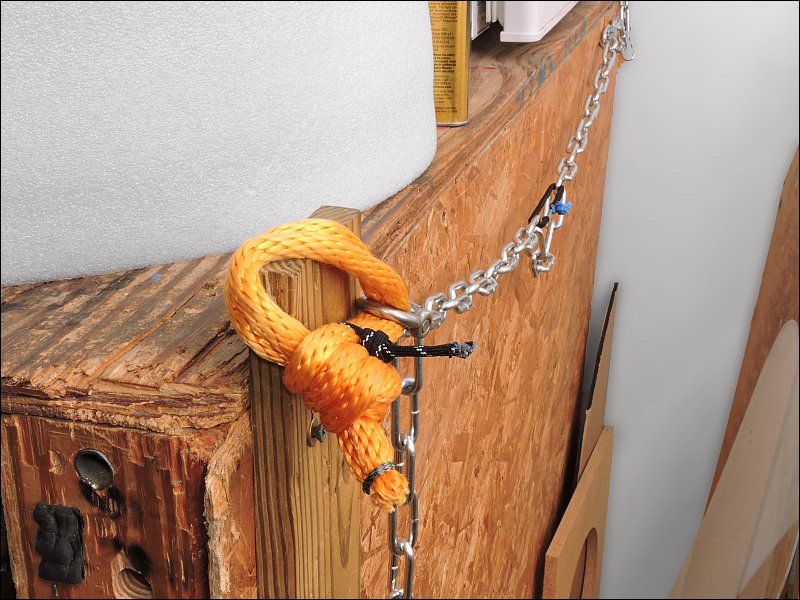
Something similar to this can be built on a 4x4 and clamped to a workbench or table. What you need is a way to apply force in a very controlled way so that when the knot fails, everything is restricted in a way that nothing goes flying.
Breaking Strength vs SWL or WLL:
When you look at the strength rating of rope, chain, cable... you'll generally see two specifications. The SWL (Safe Working Load) or WLL (Working Load Limit) is what the manufacturer believes is the greatest load that you should apply to the rope. The breaking strength is generally many times greater. For chain, the breaking strength is typically four times the SWL. For rope, it is generally greater than 4x. If only one of the specs is given, you'll generally see something that states the 'safety factor'. If the SWL is given and the safety factor (or design factor) is 10:1, the breaking strength (could be given as minimum breaking strength or average breaking strength) is 10x the SWL.
Rope that's stressed can fail well before it's rated tensile strength is reached. The failure is often caused by the heating of the rope. When rope is exposed to friction, it will heat up. This heating can cause a slightly reduction in tensile strength or catastrophic failure if the heating brings the rope near its melting point.
An obvious point where you can see friction on the rope is where it's rubbing against an object. What you may not realize is that the simply tightening (or slipping) of a knot can cause excessive heating and failure. When you initially stress a rope with a knot, you may want to apply slow, steadily increasing pressure to let the knots reach their tightest before testing for strength. In some instances, you may wet the knot to help lubricate and reduce heating. Final testing should be with the rope/knot as it will be when used as designed (both wet and dry of it's going to be used on a boat or camping.
When testing, you also have to test the knot in all of the various ways that it will be used. If it's going to take a significant shock, you have to simulate that (in a safe way). You may need to test wet, dry, hot cold...
Static vs Dynamic:
When buying specialty ropes, one option is whether the rope is static or dynamic. A static rope (many times made of polyester) will stretch very little. These are generally made for rigging. Ropes made for climbing are typically 'dynamic' ropes (often made of nylon) and are designed to absorb some of the shock if there is a fall. If a rope is stressed to it's limit, being a more dynamic rope may help it to survive the shock loading. This is very important when someone is relying on that rope for survival (rock climbers, arborists...).
Rope Materials for Practicing Knot Tying:
There are many different types of ropes. Those used for climbing or rigging are special ropes and not available at the local big-box retail stores. The climbing and rigging ropes have special properties that ordinary ropes don't have. For climbing/rigging, you don't generally want a slippery rope. You want a rope that will hold a knot well. For practicing knot tying, a slippery rope is better. The 7/16" or 1/2" braided polypropylene rope that is available at many of the big-box retailers is very good for practice because it can be easily untied because it's slippery and it's inexpensive. The fact that it's slippery and knots can easily be untied makes it less suitable for instances where you need a reliable knot that won't slip. Of course, there are knots that can be used that aren't likely to slip. I'll mention those but learning to tie them will have to be found on another site.
The two ropes below are used in climbing and rescue work. They are very firm, not very flexible and are not slippery. They make good, safe climbing ropes but are not (in my opinion) great for learning to tie knots.
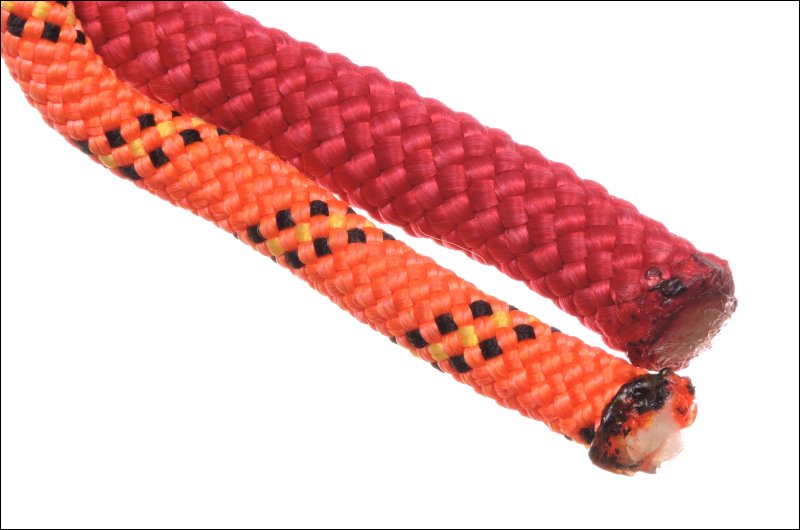
Previously, cost was mentioned. For 1/2" polypropylene rope, you can expect to pay $10 for 75ft of 1/2" braided rope. The ropes above (professional climbing/rigging ropes) cost approximately $1-$3/foot for 1/2" rope.
Braided vs Twisted:
The most common type of rope is twisted rope. It's generally 3 larger strands that are themselves made up of many finer strands/fibers. This is the type of rope generally used as ski rope. Braided rope has a much finer outer texture that's made up of many strands. Don't confuse sheathed cord for braided rope. The sheath may look like a fine braid but most of the material that makes up the strength of the cord/rope is contained in the sheath.
When using twisted-strand type rope, you have to be aware that it will have a tendency to rotate slightly under load. If you suspend a load from a twisted rope, the load will begin rotating. At some point it will generally stop and rotate back the other way. This can be a problem in some situations. Braided rope generally doesn't rotate when loaded.
Length of Practice Ropes:
The length of the practice ropes will depend on the knots being tied and the diameter of the rope. Larger ropes require more length to form knots. For 1/2" rope, each section of practice rope should be about 6' long. Small rope (1/8" or so) can be as short as 2' for most ropes. The larger rope tends to be easier to work with because it's not so flimsy and the various loops and other parts of the knots will stand better while completing the knot.
Preparing the Ends of the Cut Rope:
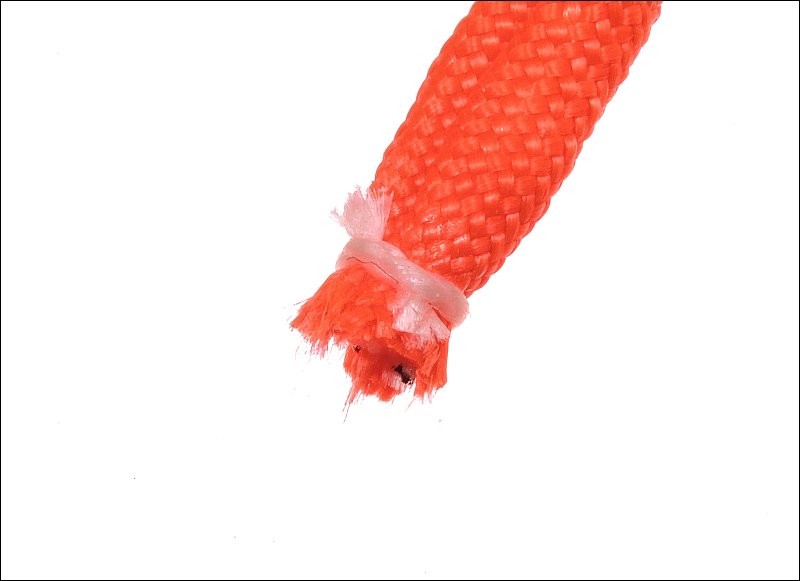
If you've ever cut a rope, you know that it unravels very quickly and the end becomes a mess. When cut by the manufacturer or retailers (who sell rope custom cut to length), it's generally cut by a 'hot knife' (a thin metal strip that has electrical current passed through it and heats up due to that current). When cut that way, the ends of the strands become fused together. For those without a hot knife, the rope is cut with a regular knife and the end is immediately melted (generally with a cigarette lighter). There are other ways to fuse the ends (using a heat gun, etc...) but the cigarette lighter is most commonly used. This method works best on ropes that are the same (or similar) material throughout. Some cords have a core that doesn't melt.
When the end of a rope is fused, it makes a sort of a burr on the end of the rope. This tends to act like many tiny hooks. These will catch and pull the outer fibers on your ropes which makes them 'fuzzy'. To avoid this, there are several options. If you're going to use heat to fuse the end, you can heat the end and after removing the heat, grab the end of the rope with a cloth or paper towel and pull the molten plastic to a point. The end points will still tend to grab when passing the point through a small loop but it's not as bad as when the end is burred.
Whipping:
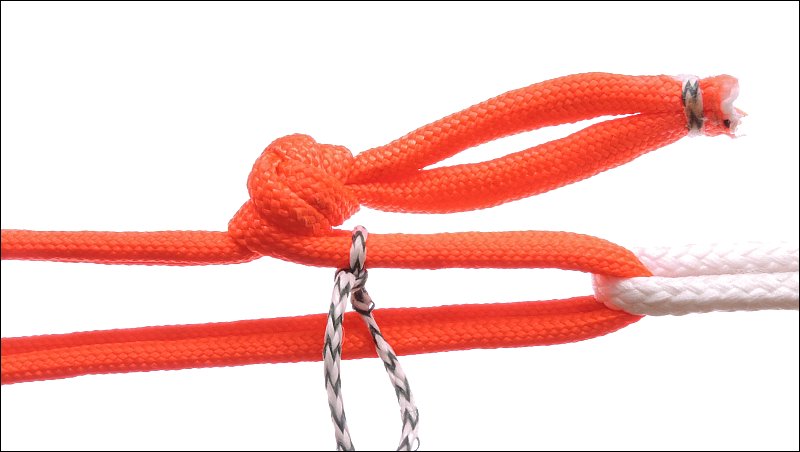
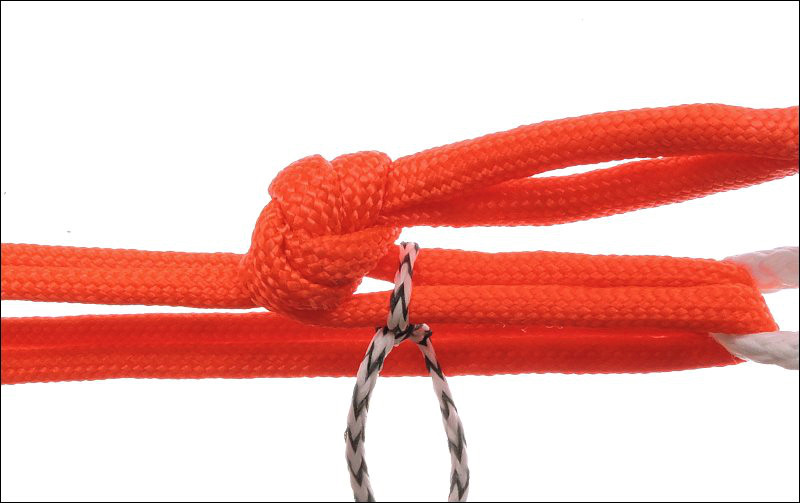
Another method that can be used to limit the fraying of the ends is whipping. When you whip the rope, you wrap a smaller cord/string/line around the rope. There are specific types of whipping but the easiest is to tie a half knot (the same as you tie when tying your shoes before you make the bow). If you moisten the line very slightly (one drop of water would be far too much) where the line crosses and apply a dot of super glue (while pulling the string tight). That will prevent the rope from unravelling. After the glue has hardened, you cut the excess as close to the rope as possible. This isn't an accepted form of whipping but it works well enough to let you get started practicing tying knots. Accepted forms of whipping are not difficult to learn but it may not be something that you want to learn until you've determined if you like knot tying. The line used to whip the paracord in the following image is a strand of the inner core of a scrap piece of paracord.
Note:
It was previously stated that the ends of rope could be fused by heating. If you use super glue (any of the CyanoAcrylate adhesives), be aware that the burning of the adhesive produces fumes that are extremely unpleasant. If you're going to fuse the ends AND use CA glue for whipping, fuse the ends before applying the CA adhesive or do so where there is no risk of inhaling the fumes.
While it's not 'whipping' it can serve a similar purpose.... Dipping, that is. For instances where I want the end of a rope stiffened or a knot to be more slip resistant, I dip the rope in shellac (Zissner wax free shellac, just what I had on hand). It takes a while to dry but it works well when you are making up extra ropes to practice with. The dipped ends don't catch on the outer fibers of the rope when pulling knots apart so the practice ropes look better longer. Again, this isn't something that you'd do for anything where safety is involved.
High-Tech Ropes:
When you start to research ropes, you'll see various trade names like AmSteel-Blue (comes in various colors, including blue), Dyneema (the fiber used to make AmSteel-Blue), Spectra... These are some of the newer high-tech ropes/materials. They are used where maximum strength to weight ratio is needed. For many applications, much less expensive materials like Nylon or Polyester work perfectly well. In fact, many times, the high-tech fibers aren't as good because they don't stretch enough which can make them more like chain or steel cable than rope.
Paracord:
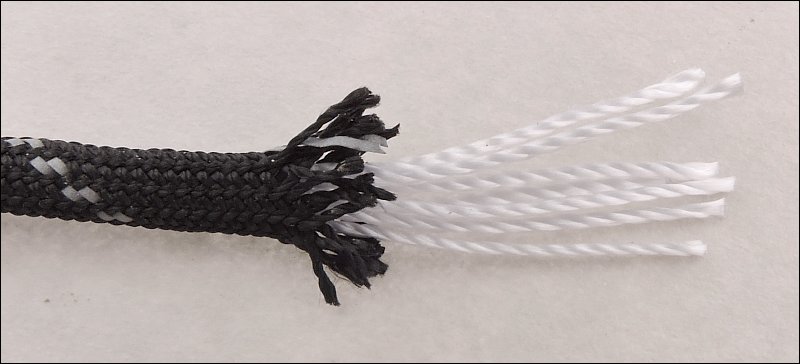
Paracord is used as the lines for parachutes. It's good general purpose line for many things but not everything. For example, if you need an eye spliced into the end of a rope, it's not possible with something like paracord because it's a jacketed cord. There are 7-9 internal strands of nylon (for mil-spec paracord) enclosed in a jacket. The jacket is responsible for much of the strength and the internal strands are difficult to work with so you have to use other methods to form an eye in the cord. At one time, it wasn't widely available but now you can buy it at virtually any big box retailer. If you need or want special colors, you can find a greater selection online, generally.
Mil-spec paracord was mentioned previously. This is not mil-spec cord. Mil-spec cord will have one of the 7 strands color coded. This allows the military to identify the manufacturer if there is a problem with the cord (doesn't meet spec...). Having one color-coded strand doesn't guarantee that you have mil-spec cord but if there is no color coding, you know it's not mil-spec. Of course, not many people are going to use it for anything that's going to endanger life or property if it doesn't meet spec.
Soft Shackles:
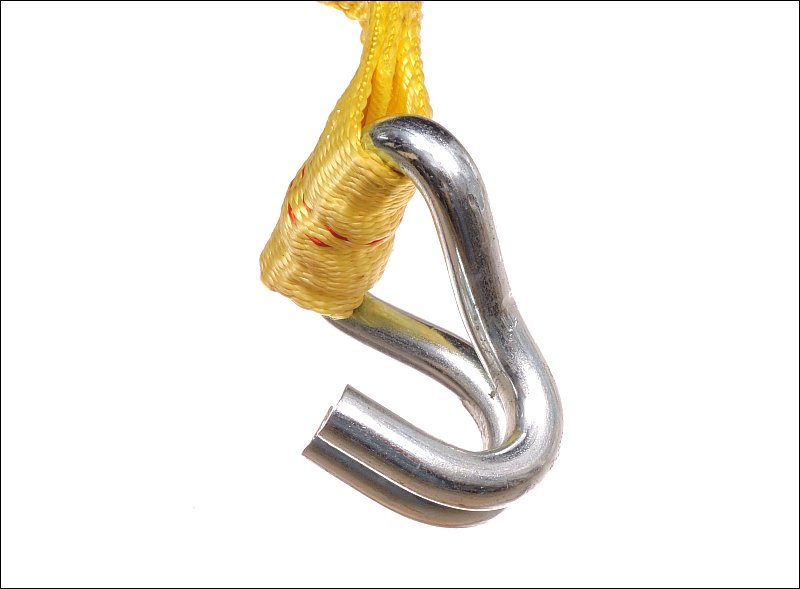
This is another item that you'll see when researching knots and ropes. A soft shackle is used in place of a hard shackle. They're preferred, many times, because they're light-weight. This is good for instances where you want to reduce the weight being carried. The soft shackle is safer than a hard metal shackle where the breaking of a tow or snatch strap could send a shackle flying. A quick version of the soft shackle can be seen below but for critical applications, you should make a shackle with an accepted design (or thoroughly test your designs to determine whether they're up to a given task). The knots and design for recognized soft shackles are a bit more complex but many of the designs have been tested and are accepted as safe (within design limits). Soft shackles are typically stronger than the line from which they're made because there are two strands of the line. They're not twice as strong as a single line because they have a knot in them and any time you have a knot, it's going to be a weak point in the line.
Typical soft shackles have part of the rope buried in the center of the main body of rope and the main body is drawn up tight against the knot to hold the loop tightly closed to prevent it from slipping off of the knot. It's a lot more refined design than the one above but requires a specific type of rope, the tools and the knowledge to build it. This one uses a small length of paracord to make a noose of sorts to keep the loop closed.
Note:
A noose is not the same as a hangman's knot. A noose is basically a single-loop slipknot. A hangman's knot is a specific type of knot that was seen in old western movies where someone was being hanged for a crime.
The following two images show what this type of soft shackle looks like under a load.
Previously, it was stated that some ropes weren't well suited for soft shackles. The small rope in the following image is one that's not easy to make a standard soft shackle but it's very good material with a very high tensile strength (much higher than paracord). One problem is keeping the neck of the loop closed so that it's less likely to slip over the knot. Here, the sleeve from a piece of paracord was transplanted onto the higher tensile strength cord (2mm Dyneema SK-75). The ends of the sleeve was flared with the end of a ball point pen and then heated to fuse the ends. It needed to be flared because the fused end wouldn't stretch and the doubled strands of the 2mm cord wouldn't fit through a fused sleeve without the flare. The sleeve was cut a bit long so that it would naturally push up against the two ends of the Dyneema.
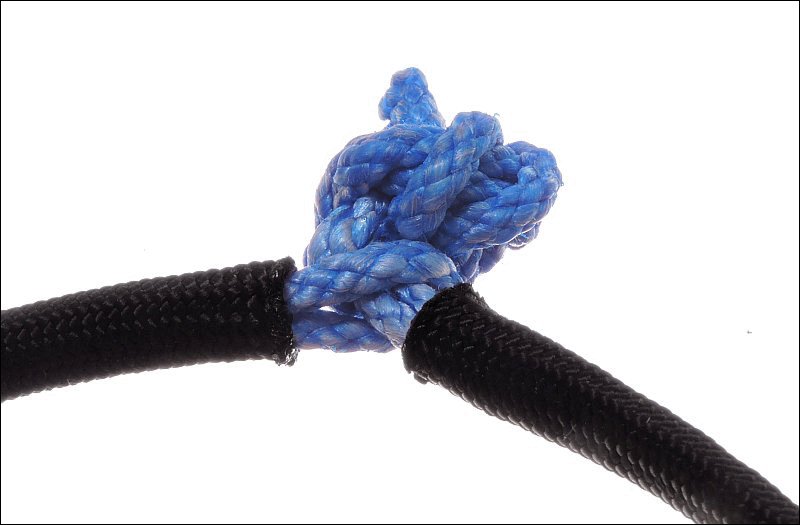
In the image above, you can see that the knot is much larger that you might expect. The Dyneema is very slippery and many knots won't hold when the knot is loaded. this is an e-star stopper knot.
Easy or Difficult to Un-tie:
When you are learning knots, you'll generally find that various bits of information will be included. This includes uses, advantages and disadvantages. One of the items will likely be whether it can be untied under a load or whether it's binds after being heavily loaded. Some knots bind so badly that they cannot be untied after being loaded and if they're near the end of the rope, it's better to just cut them off. If the line is expensive or the knot will be in the middle of a long line, you'll want to choose the right knot for the application. For most any application there are several perfectly good knots that will do what's needed.
Hitches, Bends and Stoppers:
In general, hitches refer to knots that connect a rope to some object. Bends are knots that connect two ropes together. Stopper knots are safety knots that are tied behind a knot that prevents the knot from rolling out or 'capsizing'.
Climbing
I'm not a climber so this section isn't a how-to. It's more of a primer for those who may want to learn to climb. It's more of an intro to the equipment used and some of the terms.
Types of Climbing:
There are different types of climbing (rock climbing, arborist tree climbing, ice climbing...). They use similar equipment but the various types have specialty equipment. For example, an ice climber would use crampons and an ice tool (pick, axe...). The other types of climbers here wouldn't likely have those. The rock climber would likely have anchors like 'stoppers' (also known as 'nuts') and 'cams'. An arborist isn't likely to use those.
Carabiners:
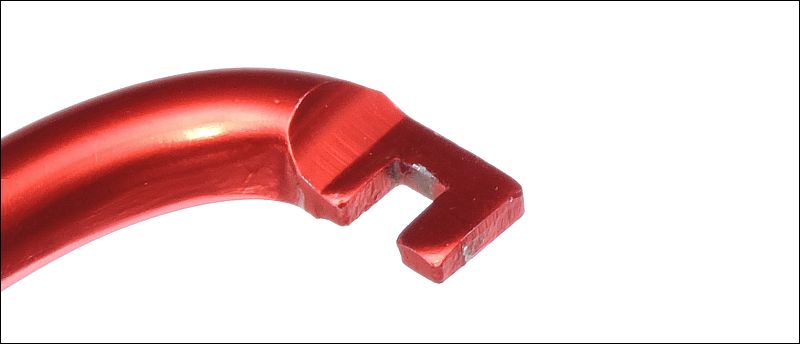
Something that every climber would have is a 'carabiner'. You've probably seen the cheap type (image below) that are sold for keychains (and are typically marked 'not for climbing'). This carabiner has plenty of sharp edges and corners and the cutout in the nose for the gate is a design that will catch on virtually everything that touches it.
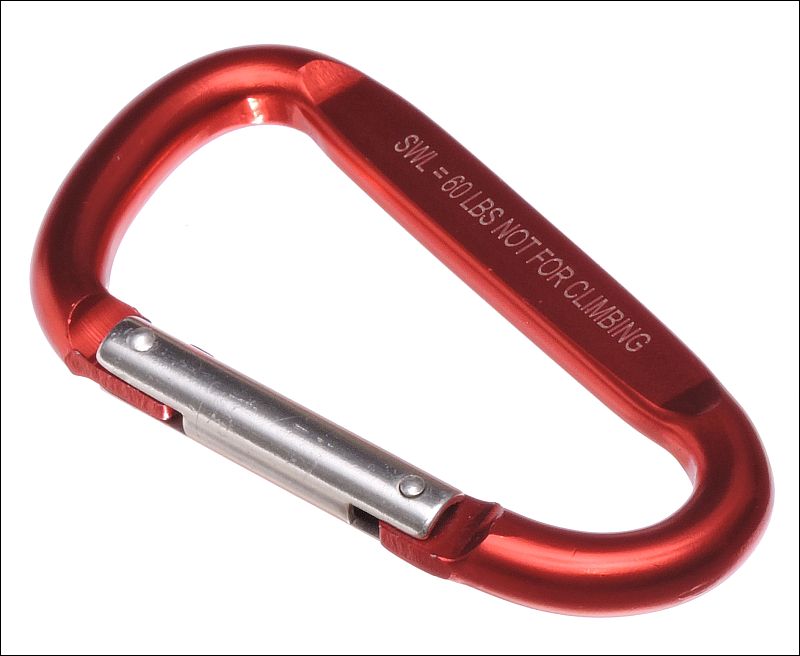
This gate has no lock to prevent accidental opening. All you have to do is push on the gate and it opens.
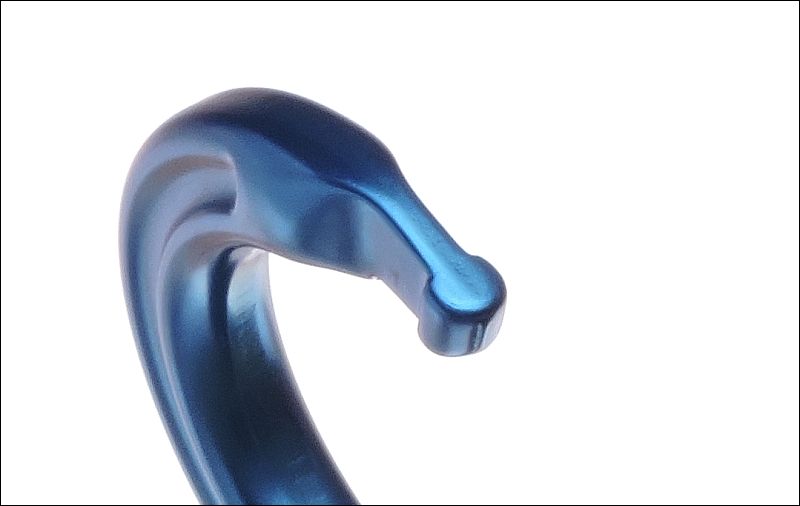
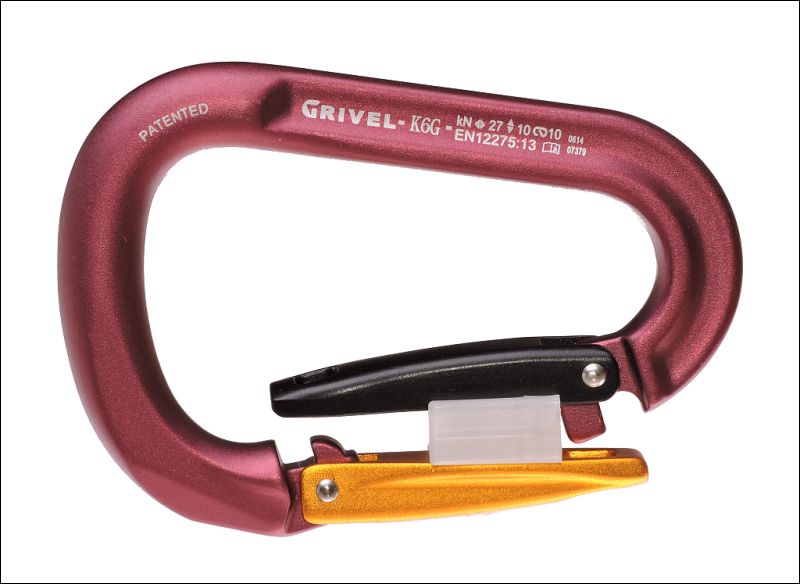
The ones used by climbers are similar in appearance but completely different in materials and design. The attention to detail is impressive. It's smooth, has a perfect finish, all corners are rounded... The nose design here is a keylock and is designed not to snag on anything, This is a DMM Ultra-O carabiner, made in Wales U.K. You'll find that much of the climbing equipment is made in Europe.
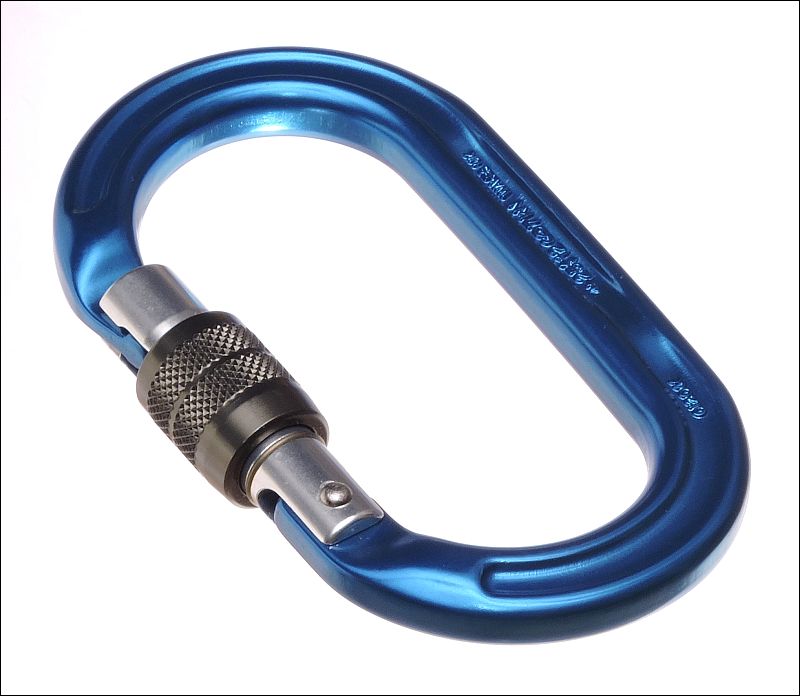
The gate on this carabiner is lockable. It's a screw-lock. To lock it, you rotate it clockwise until it stops. Then you push on the gate to confirm that it's locked. Rotating it counter-clockwise a few turns (as it is above) will retract the locking nut far enough to allow it to open.
The 'keychain' carabiners can be purchased 10 for $3 from China. The ones made for climbing range from about $10 to $50 each. The average price for a good quality carabiner that can be used for climbing is $15.
Carabiner Materials:
Most climbers try to minimize the weight that they have to drag up a rock face, tree or ice cliff. That means that the materials of their tools will need to be lightweight as well as strong. The 7075 aluminum alloy is both. There are carabiners made of other materials for special purposes but most are an aluminum alloy (alloy means that it's composed of more than one element to produce the desired properties). Carabiners made of stainless steel or brass may be used in marine applications but are not ideal for climbing. For instances where strength is especially important, carbon steel carabiners are used. They will be heavier than aluminum carabiners but that's the tradeoff.
Carabiner Ratings:
You won't find simply weight ratings on a carabiner. They are rated in kiloNewtons. One kiloNewton is approximately 225 pounds. This is the breaking point for the carabiner. Most carabiners designed for climbing are rated for at least 20kN and are commonly rated for up to 30kN. The highest rating is for when the carabiner is loaded nearest the spine and the gate is closed. The markings below show that this one is rated for 27kN when loaded along its spine with the gate closed and only 10kN with the gate open. When cross loaded (along the spine) it's only good for 10kN.
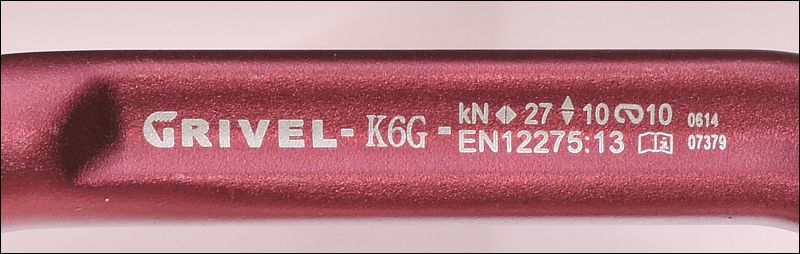
The ratings for the carabiner above are within norms but the gates are anything but normal. This is a twin gate carabiner. It has two gates that reduce the chance of an accidental opening. The piece of plastic between the gates is only there to hold it open. Non-locking carabiners can fail if something causes the gate to open. This is commonly a piece of rope that contacts the outside of the gate. If this happens, the rope can fall out of the carabiner resulting in a fatal fall if sufficient protection isn't installed in the climbing/rope system.
Rope Manufacturers:
Back to the Top
|

