The images on this page have been taken with the browser window narrowed to allow everything (within reason) to fit in the window of most any standard computer monitor. When/if you use this software, you will run it maximized and it will fill your entire monitor.
Blender is a 3D animation application that is VERY powerful. Few people will ever use everything it is capable of doing. For myself, I don't plan on doing any animation but I was interested in learning something new. Unlike most of the software that people use (unfortunately, MS Paint),this software generates vector graphics. That means that whether they're the size of a post card or the size of a billboard, the sharp resolution will remain the same. The files are not like bitmap/raster graphics where scaling up results in blocky/jaggy edges.
This software is free and mostly interesting, if you don't mind making a few
million mistakes along the way. Who knows? You may be an artistic genius and make a blockbuster animated movie.
The reason that this page is here is because I could not find what I needed to get started quickly. There are a LOT of tutorials but virtually all of them seemed to gloss over things that I needed to know. This information assumes that you've been using various types of graphics software and at least know the basics, in general software terms.
If you want to learn or need to know 3D software but will never need to have realistic images with lighting, shadows and such, Google Sketchup 8.0 (before it was sold to Trimble is very good. It can be downloaded from OldVersions.com. Trimble's version up to 17 is also free but 8.0 is good software. The following is an example of what you might draw up in Sketchup (done with 8.0). If you hit this page from outside the site. There is a basic Sketchup tutorial above this in the tutorial (Item 10).

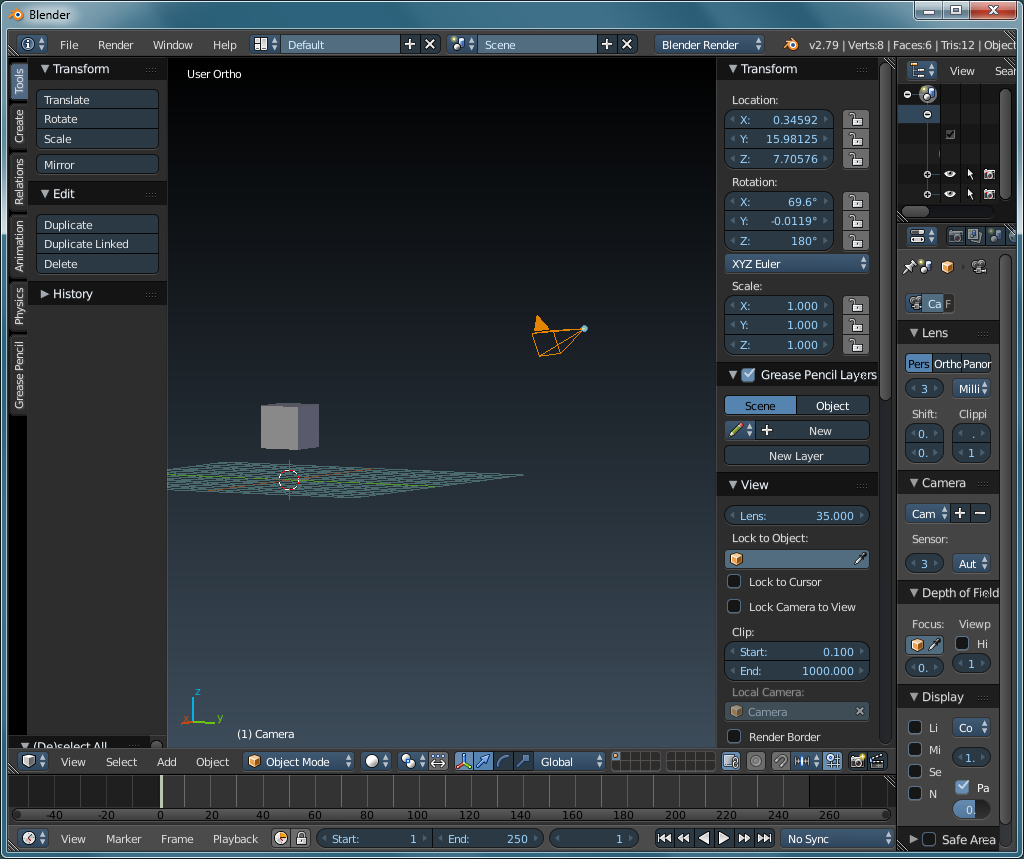
This is simply the 'first steps' of the long journey (you can stop, anywhere along the way) to learning what Blender can do. When you start this software, it may seem incredibly complex (and it is) but the complexity is necessary to give access to all of the features. You can forget about much of the information on the screen to start. I know I said that you shouldn't be intimidated but I have to show you the
beast lovely software in
all most of its
horror glory. This is the main screen. The 3D workspace is in the center. The various toolbars are around the perimeter. In the workspace, you can see the starting cube. Every time you start the software, you get a complementary cube. The grid is the floorplane. The triangular object in the upper-right is the camera. In this software, you build the scene, simple or complex, whatever you need. You place and edit the objects. You paint and/or texture them and then light them. That's as far as I'll go with this tutorial. The more complex stuff like rigging, animation, the physics of motion... can be left to the Blender gurus.
Note:
The images are a bit long and may require scrolling on some computers. Using 'full screen' mode can help, in some instances. Use F11 to toggle full screen for most browsers.
This page isn't for those who refuse to read. From my other pages and sites, people seem to be afraid of text. Either that, or they're too lazy to read. Nah.... Myself, I prefer written lessons because you can find items that you need help on much quicker. Try doing a ctrl-f search on a video. It ain't going to happen. Here, if you need to find something, come back and in a few clicks, you've found what you need. If you do need to re-read something and can remember the name of the feature or come other key word, do a ctrl-f search for the page.
If you screw up a layout (panels are frustratingly ornery), close the program. Wait a few seconds (most programs have to clean up after themselves) and re-open it. It will be just as before. If you now have a hole in your monitor and your hand hurts for some reason, reopening the software won't fix either of those.
This was moved to another page to help reduce the length of this page. Click
HERE.
To make the layout less scary, you can go to the menu at the top of the default layout and choose 3D view. It's going to look less intimidating but a bit bare. First, click both T and N on your keyboard. That will flyout the tool and properties panels (left and right below). In the properties panel, find the 'display' section (seen below, un-ticked). If the arrow is pointing right, click it to open that part of the menu. Un-tick the 'render only' box. This will cause the floor grid, camera and lights to show with your object (likely the start-up cube).

If you want to do a couple of simple things, left-click various locations and see how it places the 3D cursor. Next, center click (push the mouse-wheel down) and while it's down, move the mouse. You can see how you move the scene, or maybe more accurately, your position. Lastly, right-click on the cube, the camera and the light source to see how it highlights them. While highlighted, if you again right-click, they will stick to your mouse and move, until you left click to place them. If you really want to get fancy, click one of the x, y or z keys to constrain the movement to one of those axes.
Initially, there are no 'dimensions' in blender. You can change this to imperial or metric but they are not necessary unless you're making something to scale for the real world. I'd suggest that you leave the units set to none unless/until you have a reason toe change it. The rotational angles default to degrees. You can change it to radians if you'd like.
If you've never worked in 3D, you'll find that object positions are sometimes hard to determine. Rotating/orbiting around, zooming in and out will help you 'get your bearings', so to speak.
Maybe it's because I don't fully know the software but it appears to get 'stuck' fairly often. Hitting the escape button (sometimes, more than once) gets it going again.
After using the program a bit, it's obvious why there are different reactions/menus in the two most common modes, edit and object. Edit is where you manipulate the various aspects (vertices, edges, faces) of an object. Object is where you manipulate objects. To get an idea of what's different, switch between the edit and object modes with the tab button or the button below the 3D editing window (workspace).
In most software, you select with the left mouse button (when you select through clicking). In this software, the left click is to place the 3D cursor and to verify the position (drop) of various objects.
when you have to move an object, at first, it's often better to do it by the xyz handles (colored arrows) on its 'widget' (their name, not mine). Doing it free-hand by selecting and grabbing can move it in ways not intended. When you move by grabbing the arrows/handles, it limits the movement to the axis that corresponds to the handle you used.
To move it free-hand right-click an object to select it and then right-click again to move it. If you want to have your mouse clear of the object from some reason, right-click to select it then click G on your keyboard. This is the 'grab' command. The object will then follow the movement of your mouse but the cursor will be clear of the object. When moving objects, you can (should, if you need precision)
It's easier to start if you manipulate objects by the numbers. You can find rotation, location and dimensions in the properties menu. N on the keyboard opens and closes it. The menu is long when all sections are open. Close the ones you don't need. Until you know what you need, remember to scroll up or down. The software typically brings the relevant items into view but that may not alway be true.
I find it a bit strange but the objects are created bisected by the ground plane. To move them up (if you want the object 'on' the ground plane), look at the dimensions of the object
When moving manually, the object moves precisely with the mouse movement. Holding the control button down will make the object move incrementally. Holding the shift button down will make the movement of the object about 1/10 of the mouse so you can more accurately move the object. Thos workd but there are generally better options.
When you place an object, remember that it's going to be created at the position of the 3D cursor. You can center the cursor with shift-c. There is a good chance that there is already something there so you can do a couple of things.
* Drag that object off of center (recommend ctrl-grab widget handle) and then create the object.
* go into the properties menu and set the cursor position values to all zeros.
* Center the cursor and then go into the menu and set one of the x/y coordinates to a number that will move the cursor out from center.
Using the shift-c is a good start because it puts the object in the center of the ground plane.
numpad 1 - Front view
numpad 3 - Right side
numpad 5 - Perspective
numpad 7 - Top
numpad 0 - Camera view
Back to the Top

