|
Basic Small Engine Repair
Note:
This page is, for now, not much more than a collection of notes. If you have questions or suggestions for this page, feel free to email me. If you haven't done so, you should read the Basic Go-Kart Mechanics page, specifically the parts involving small engine and carburetor function.
Overview:
This page is going introduce you to the most basic small engine repair and is written mainly to help you get an engine that has been improperly stored running again. This tutorial is for those engines that are mechanically sound but won't start. If the engine you have has completely seized (cannot rotate the crankshaft), it needs more than what will be covered here.
Pay Attention to Fine Details:
Generally, when working on small engines the parts are relatively dirty and somewhat oily. This makes seeing some (important) things difficult. You need to work in a well lit area. If your eyesight isn't good, wear your glasses or get a pair of 'cheater' glasses (Wal-Mart, pharmacy...). Many people refuse to admit that they need glasses but when working with small parts that have to be disassembled and critically reassembled, it's important that you see well. The cheater glasses are rated in diopters. Typically a +1 diopter lens is good for those with fairly good eyesight that just needs a bit of help with very small items. The +1.5 to +2.5 are the most commonly used among the people who I know that use this type of eye glasses. You can buy them cheaply online (eBay...) but you can't try them on when you buy online. If you buy them locally, put them on and find something nearby with small print so that you can see how they work for you. Typically, the lower power lenses give you a wider range of viewing distances. The high diopter (+3 for example) can allow you to get very close but also require that you get real close to whatever you're looking at. If you can no longer make your eyes focus at close distances and have to put them at near arms-length, these glasses will help.
Penetrants:
When working on older equipment, you will eventually encounter seized bolts. For bolts or studs with nuts, you can use a penetrant like PB Blaster or Kroil. You apply the penetrant into the area where bolt and nut make contact and let it soak for a while (at least 30 minutes). For really stubborn situations, you may have to let it soak overnight. When you have a situation like this, you need to be careful. If you break off a fastener, it may have to be drilled and tapped and that can be very time consuming. For basic drilling and tapping information, you can refer to the Basic Metalworking page of this site.
Starting Fluid:
Many people are tempted to use starting fluid when an engine won't start. While it may be OK to use a small shot of starting fluid for an engine that's in good working order but a little 'cold-natured', it shouldn't be used to start an engine that has problems that need to be resolved. Starting fluid must be used sparingly. Too much can damage an engine. If you're working in a confined area (not recommended but sometimes there's no choice), you should not use starting fluid. It's EXTREMELY flammable.
Pull-Starting an Engine that's Hard to Start:
When working on small engines without electric starters, you will likely have to pull on the rope a bit more than you'd like. This can quickly cause blisters. If you wear gloves, it helps greatly. I've found that the type with the rubberized palm/finger area and the open fabric backs work the best. If you can find them with padding for the fingers, those are even better. Get the gloves before you begin. If you try it without gloves and get blisters, the gloves won't help much. Of course, if the engine is properly repaired, it will start on the first or second pull. Unfortunately, most people (like myself) are often too lazy to do everything to get the engine running properly before they begin pulling on the rope.

Kick-back:
You should know that some engines will 'kick back' when you try to start them. This is generally due to pre-ignition of the fuel. This happens more commonly when an engine is 'out of time' but can also happen when the engine is in good working order. If you use starting fluid, you can expect it to happen since starting fluid ignites more easily than fuel alone. When the engine kicks back, it's likely going to be at least somewhat painful. In some instances, it's VERY painful. When pulling on anything larger than a 2HP engine, you should use both hands where possible.
Proper Storage:
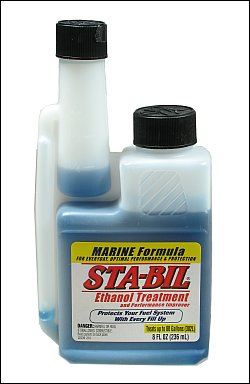
The best way to prevent having to repair an engine is to provide proper maintenance and storage. The most common problem with small engines (the types found on the various lawn and garden equipment) is that they are improperly stored for an extended period. Generally, lawn and garden equipment is used for only 1/2 of the year. Lawn mowers, string trimmers and blowers are typically only used during the summer months. Snowblowers and such are only used in the winter. Other equipment like chain saws and generators can go for years without being used. If a piece of equipment is only going to be un-used for a few months, you can protect the fuel system with fuel stabilizer. Seafoam and Sta-bil are two popular stabilizers. Stabilizer won't do much for fuel that has already broken down. It's designed to keep fresh fuel fresh.
If you decide to use stabilizer during storage, fill the tank and add the recommended amount of stabilizer for the amount of fuel that you have in the tank. Run the engine for about 10 minutes to allow most of the old fuel to leave the carburetor. If you don't run the engine, the stabilized fuel won't get into the carburetor so it can't do its job.
Another option to protect small engines is to completely drain the engines of all fuel. For this, you would run the engine until it runs out of fuel. You can pour, drain or siphon out (with a proper siphon bulb, not your mouth) most of the fuel if there is a significant amount remaining in the tank. After the engine stops running because it's run out of fuel, you still need to drain the bowl. For gravity-feed carburetors, there is generally a 'bowl' under the carburetor. Virtually all of them have a center bolt. Removing the bolt allows the bowl to drop down. When removing the bowl, watch for the gasket around the top of the bowl. If it doesn't release cleanly (tears or breaks because half stuck to the bowl and half to the carburetor body), you will need to install a new one before you use the engine again. After the bowl is removed, wipe it dry and reinstall it.
Ethanol and Small Engines:
Many small engines were designed and built before ethanol was being used in gasoline. In some instances, the ethanol can cause serious problems. Fuel with 10% ethanol can be used. Most won't run on E85 (85% ethanol). There are some modifications that can be done to older engines but it's not generally worth the cost. Ethanol in gasoline has been blamed on other problems like corrosion of the fuel system and premature failure of the fuel lines. Stabilizers like the 'marine' version of Sta-bil are supposed to help reduce or prevent the damage.
Gas Cans:
While this isn't exactly related to engine repair, it's important. When storing gas cans, you should do so where there is adequate ventilation and where they will not be subjected to significant heating. Of course, you should not store them near anything that will create a spark or has a flame (like a water heater that operates on natural gas). It's also important that they not be stored where they will be exposed to direct sunlight. If you close a gas can when it's cool (early in the morning, for example) and then place it where the sun will be directly on it later in the day, excessive pressure will build up in the can and can cause it to split open. This can create a significant fire hazard.
Basic Requirements:
Small engines are typically very simple. The most important things (assuming that the engine is intact physically) are the the ignition (to provide the spark to ignite the fuel), ignition timing and the fuel delivery
Ignition/Spark Timing:
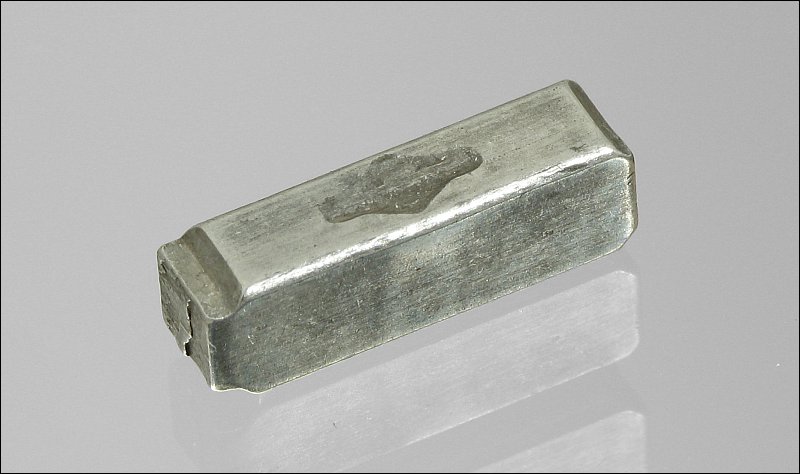
The timing for an engine that has been running well doesn't generally change unless there is a significant event that causes it. That even, for the most part, is when you are using a push-type mower and you hit a root or other solid object with the blade. This generally stops the engine and you find that it will not re-start or runs poorly when re-started. the most common problem here is a sheared or partially sheared flywheel key. The key (for scale, this key is about 0.56" long) is a small piece of metal that keeps the crankshaft aligned with the flywheel. This is important because the flywheel holds a magnet that induces high voltage when it passes the ignition coil. This high voltage is what makes a spark in the gap of the spark plug. If the spark isn't produced at precisely the right time (due to a mis-alignment of the crankshaft and the flywheel), the engine won't run or will run badly. When you suspect this is the problem, you will remove the flywheel and examine the key. It should not have any deep cuts or notches in it. If it does, it needs to be replaced. Bear in mind that this will not prevent the coil from producing voltage so it will appear that the engine has good 'fire' (strong spark).
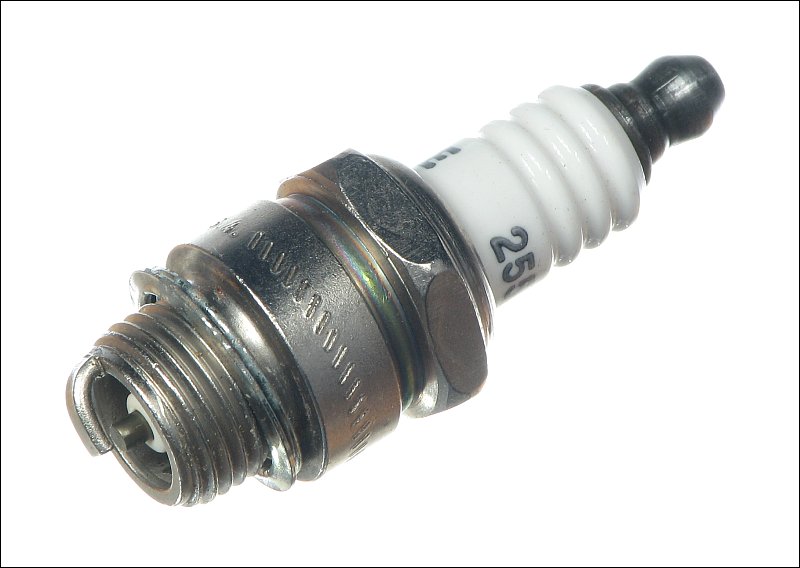
Ignition:
To determine of the ignition of an engine is producing a spark, you will generally pull the spark plug, insert it into the coil wire, hold the plug against the cylinder head and pull the starter rope. If you see a strong spark in the gap in the spark plug, it's likely that the ignition system is working properly. If it is not, you need to make sure that the 'kill switch' or the ignition key switch isn't in the off position. Most small engines ground some part of the ignition system to prevent the engine from producing the high voltage required to produce a spark. The simplest is the type that simply has a metal lever that you touch to the tip of the spark plug. Others have a wire that goes back to the ignition coil. Many small engines have the kill switch built into the throttle lever on the carburetor. When the throttle is moved to beyond the 'slow' position, it grounds a wire. That's kills the engine.
Safety and Common Sense:
It's important that you NOT check the spark when there is any fuel spilled on the engine or around the engine. If there is fuel present and the spark plug produces a spark, it could ignite the fuel. When working on small engines, it's important that you use good judgement and take safety precautions. For example, you don't want to work in a confined space. You don't want to have a tank of fuel nearby (if there is a small engine fire, having a tank of gasoline, even a small 1-gallon tank, could result in a much larger fire). You should have a fire extinguisher close at hand. It's best if you have another adult present in case of an accident. Common sense is very important when working with gasoline. Most people take gasoline for granted and don't realize how fast or how hot it burns.
Weak Spark:
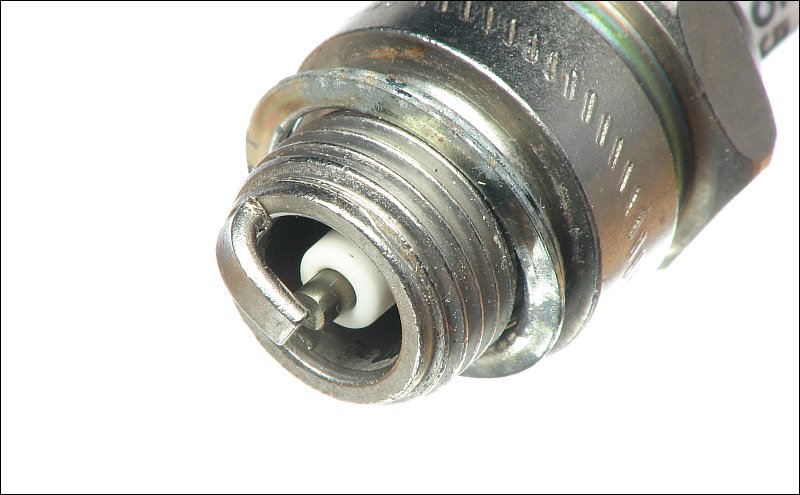
If the spark is weak, the problem could be a fouled or otherwise defective spark plug. The spark plug has two electrical terminals. The ground electrode (the curved one) is connected to 'ground' (the engine block). The center electrode passes from the top terminal, through a high-voltage ceramic insulator and out of the bottom of the spark plug. It's important that the white ceramic insulator be free of anything that can conduct electricity. A fuel-fouled plug won't spark because the electrical current can more easily flow through the fuel (or other conductive contaminates) than the air-gap in the spark plug. Another type of fouling is carbon fouling. When an engine isn't running properly carbon can build up on the components in the combustion chamber (which includes the spark plug). If the white ceramic insulator is covered with a heavy black deposit, the electrical current can flow through that coating which will result in no spark or a weak spark.
Cleaning Spark Plugs:
When cleaning spark plugs, it's not good to use sandpaper. It's possible for some of the abrassive to get into the engine and scar the cylinder. Generally, you can stretch a piece of cloth (like T-shirt material -- clamp one end in the vise and pull the cloth tight), slide the edge of the material between the electrodes and work the plug back and forth to clean the electrodes.
Setting the Spark Gap:
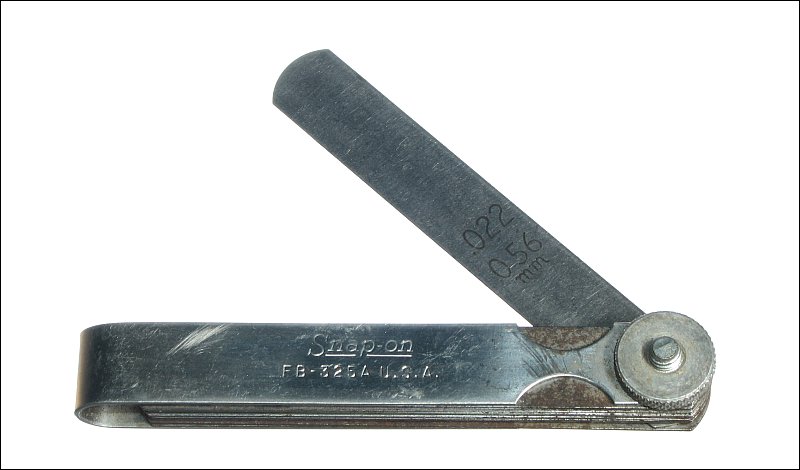
Most manufacturers provide spark gap specifications (the distance between the center and ground electrodes on the spark plug). These are typically checked with a set of 'feeler gauges'. You select the one that matches the manufacturer's specs (often 0.030 or so) and slide it into the gap. It should fit but not loosely. The next photo shows a set of 'feeler gauges' with the 0.022" blade showing.
Checking a Spark Plug with a Multi-Meter:
A spark plug can sometimes fail internally. To check them, you need to understand the two types of plugs. One is a 'resistor' plug, the other is a 'non-resistor' plug. To reduce possible radio-frequency interference, a resistor is built into the center electrode of a resistor spark plug. This is more important for automobiles to reduce interference when listening to broadcast radio but resistor plugs are sometimes used in other types of engines.
When checking a spark plug with a meter, you should read infinite resistance (same reading you would get if the probes were in contact with nothing but air) when checking between the ground electrode and the top terminal. You would make this test with the meter on the highest resistance scale if you don't have an auto-ranging meter. Be aware that you cannot be touching the metal part of both probes when making this test because your body will conduct and make it appear that the plug is conducting.
The second test is done on the lowest resistance range for non-resistor plugs. You will place one probe on the top terminal and the other on the electrode that exits the white ceramic insulator near the ground electrode. You should read less than 100 ohms but typically near 0 ohms.
The second test is a bit different for resistor type spark plugs. I don't know if there is a definitive resistance that you should read but a reading of about 5000 ohms seems to be common. If it's well over that, the plug is likely defective. If it's too low, the plug may not technically be 'normal' but it's likely to work as it should as far as the engine operation is concerned. As an example, I had a chainsaw that used a RCJ7Y plug that read 11,000+ ohms and the engine wouldn't even 'pop' (not even when using starting fluid). I thought that the carburetor might be gummed up since it had set up for nearly a year but replacing the plug allowed the engine to start on the first pull (after changing the plug).
Previously, it was stated that the spark was generated by a magnet on the flywheel passing an ignition coil. On older engines, there was a simple coil that used mechanical contact 'point's and a condenser to control the timing. These could fail which could produce a weak spark or no spark at all. Most engines from about the mid 1980s have gone to an electronic ignition system that eliminates the need for ignition points. The electronics are built onto the ignition coil and are encased in plastic for protection.
Fuel Delivery:
This is the most common issue that I've found with small engines. There are several possible problems.
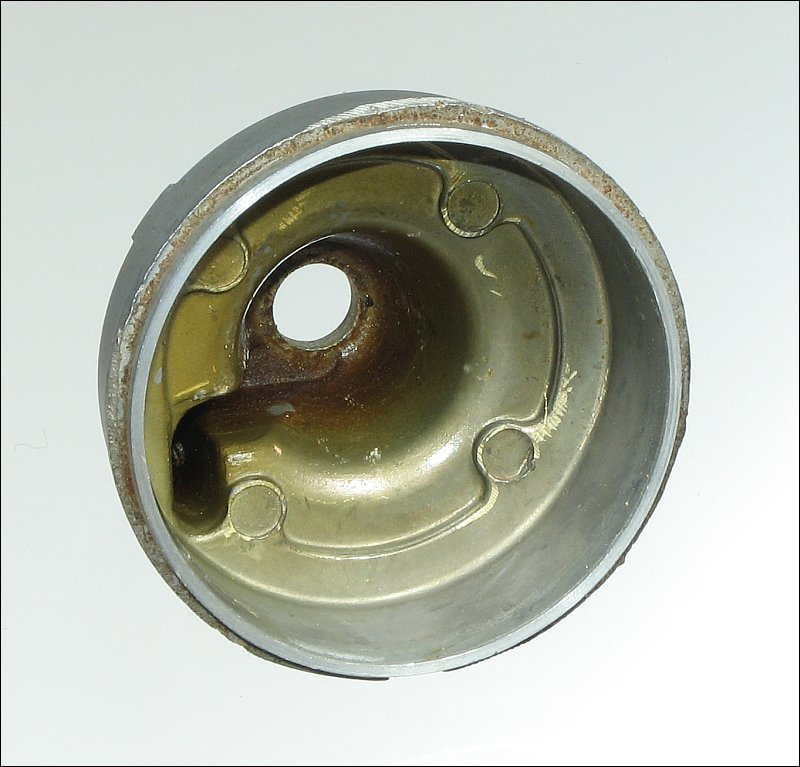
When engines are stored improperly, the fuel deteriorates and turns to a sort of a lacquer. It's commonly said that it's turned to varnish. When this happens, the fuel becomes dark and has a distinct, unpleasant odor. When it's really bad, the fuel becomes thickened. At the worst, it turns hard (about as hard as hardened Elmer's carpenter glue). Simply adding new fuel won't cut the material. If it does, it takes a very long time to cut it enough to allow the engine to run properly. Generally, the lacquer has to be either physically or chemically removed. In the following image, you can see the bowl of a carburetor that has varnish in it. The varnish is concentrated in the bottom of the bowl. The entire bowl should be the light-gray color that you see near the top of the bowl.
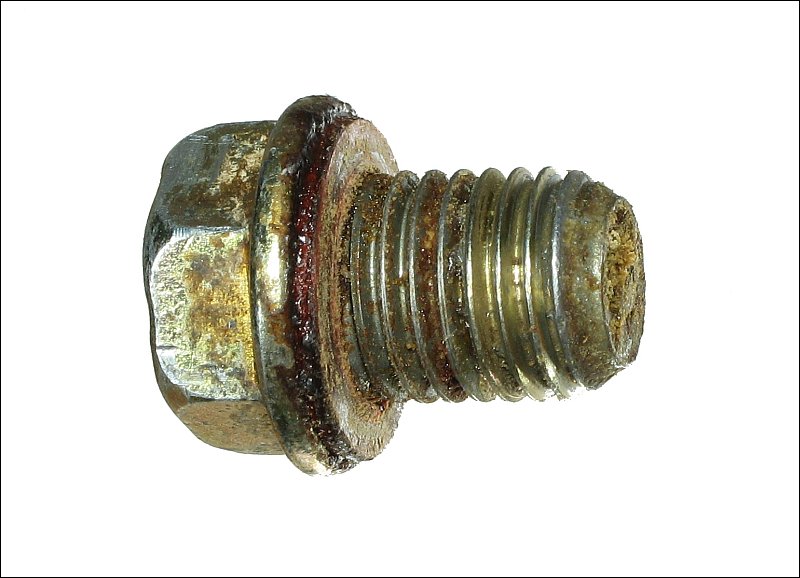
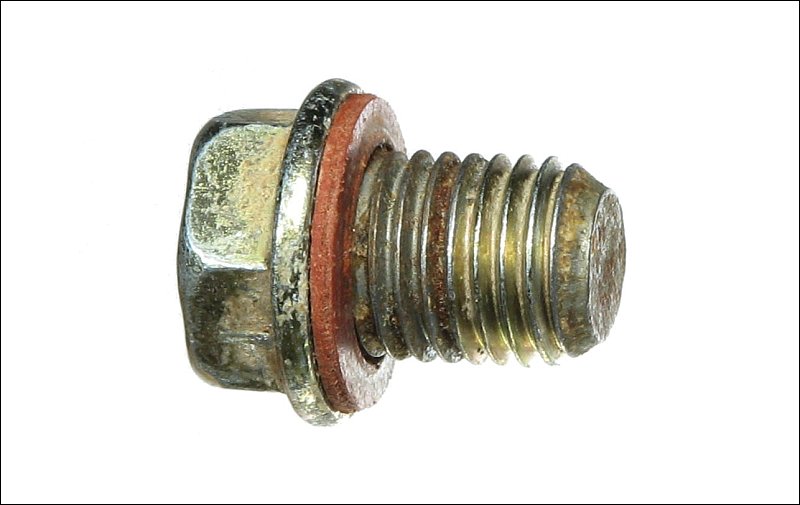
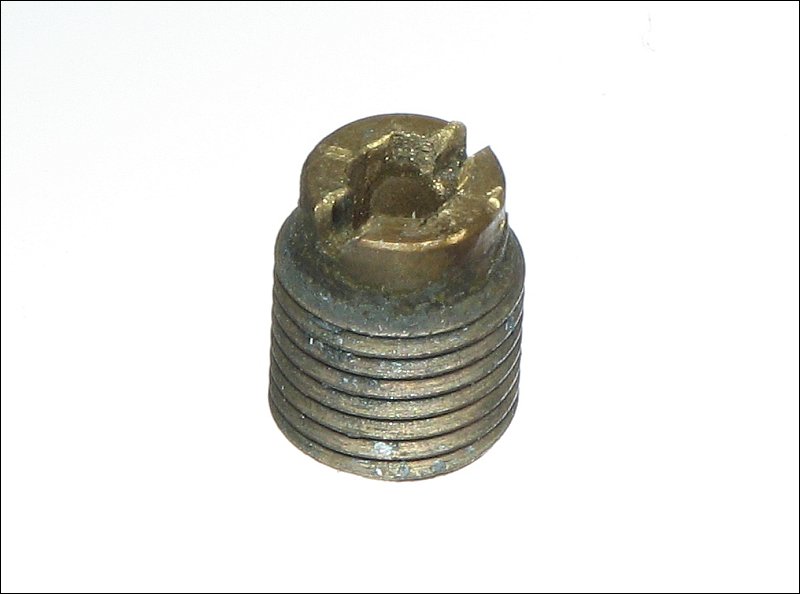
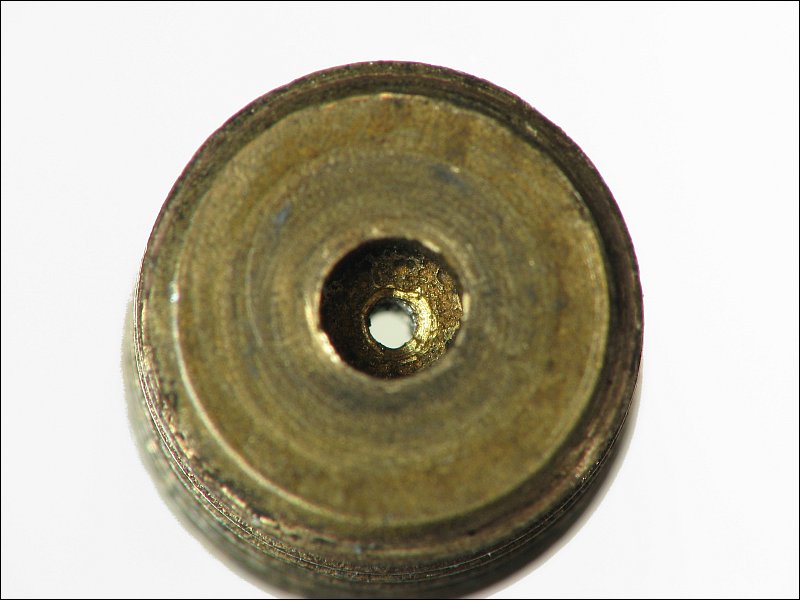
The following two photos show the bolt that holds the bowl on. The first is before cleaning. The second is after soaking in solvent. You can see that the dark orange/brown varnish has been removed. This isn't a critical part but in carburetors where the jet is built into the nut, cleaning is very important.
It's extremely difficult to clear some fuel systems if they become plugged with varnish. If they have a built-in fuel filter (in the tank, not removable or replaceable), it may be difficult to clean. If the tank has an attached fuel valve, that will make cleaning it even more difficult. You can remove the tank, pour carburetor cleaner into the tank and agitate the tank (shaking with the gas cap on) to help clear it but it may take some time to get it completely clean. If you do this, drain the tank completely before reinstalling it on the engine.
It's generally best to replace the fuel line on an engine that was improperly stored and the gas evaporated from the system. The lacquer lining the hose will continue to flake off and cause carburetor problems.
Cleaning the carburetor can be time consuming, depending on how badly it's gummed up. Generally, the bottom-end of the carburetor is where the most problems will be found. There are two common types of carburetors used on 4-stroke engines. One type has the tank mounted above the carburetor (which allows a gravity feed for the fuel). The other has the tank below the carburetor. If you viewed the Basic Go-Kart Mechanics page, you saw a Briggs and Stratton Pulsa-Jet Carburetor. That type of carburetor uses the on-board fuel pump to pull the fuel up to a point where the engine manifold vacuum can pull the fuel through the metering jet. The jet determines the fuel-air ratio. The fuel-air ratio has to be correct for the engine to run properly.
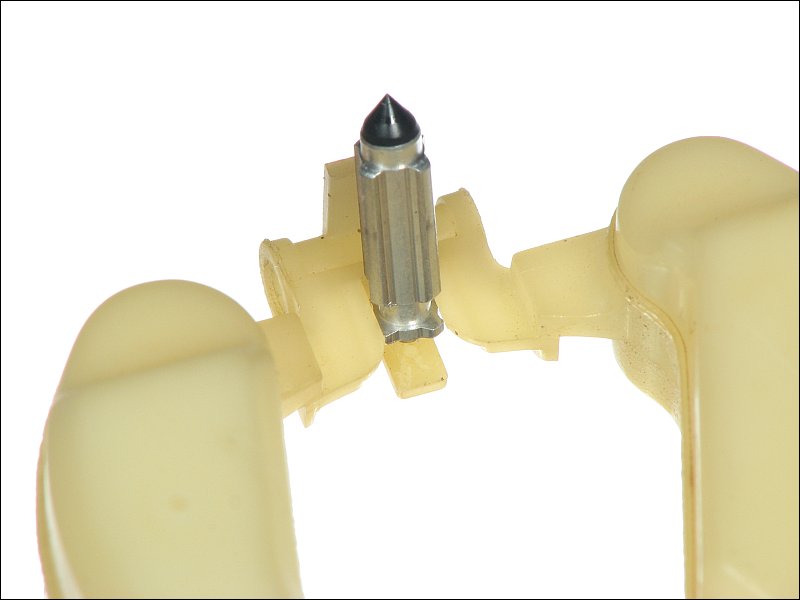
The other common carburetor has the tank above the carburetor and gravity feeds the fuel to the bottom of the carburetor (into the 'bowl'). To limit the flow into the bowl of the carburetor, there is a float that operates a needle valve against a 'seat'. As the fuel reaches the correct level in the bowl, the float closes the needle and seat valve so that no more fuel can flow from the tank. In some engines, this mechanism fails and fuel will flood from the carburetor. If the fuel flows into the engine, it can get through the rings on the piston and dilute the crankcase oil which can cause engine failure. When the float valve is working correctly, the fuel is at a level in the bowl that allows the manifold vacuum to pull the fuel through the metering jet. In the Briggs Pulsa-Jet carburetor, the jet is on the side of the engine and is generally the adjustable type. In carburetors with floats, the jet is typically in the bowl. Most are not adjustable. For those that are adjustable, you'll see an adjustment screw on the bottom of the bowl. The non-adjustable jets are built into the nut that holds the bowl on the carburetor.
Below, you can see the float on the carburetor (the carburetor is upside-down in the photo). These can be metal or plastic. If you remove the float, shake it. If you hear something sloshing around in it, fuel has leaked into it and it needs to be replaced. The float pivots on the pin that you see near the bottom of the photo. You remove this pin to remove the float.
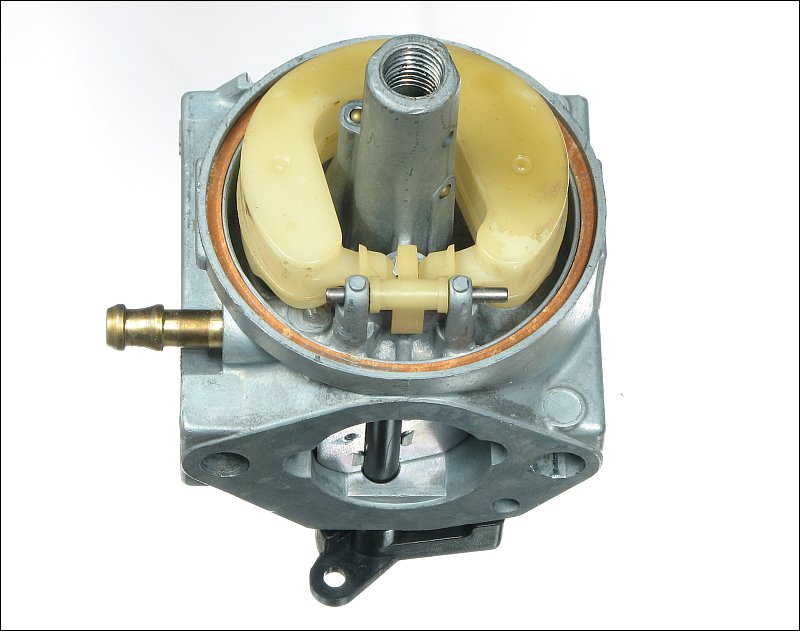
When you remove the float, you have to do so carefully. There will be at least one component attached to it (the needle valve). Sometimes, a tiny spring is also attached. Below you can see how the needle for the fuel valve is held in a fork on the float.
Cleaning the Jets:
When old fuel has turned to varnish and has plugged the jets, you can use either chemicals (carburetor cleaner) or a probe to clean them. With carburetor cleaner, you simply soak the jet, agitating it regularly until it's clean. You can buy carburetor cleaner with dip baskets at auto parts stores and even at Wal-Mart. If you're going to try to clean it mechanically (with a wire/metal probe), you must be VERY careful. The holes in the jets are a specific size to deliver the correct amount of fuel (to produce the correct fuel/air ratio). If the jet is partially plugged or the jet has been enlarged (by improper cleaning), the engine will not run correctly. When cleaning, never use a drill bit unless you have the exact right size and be very careful not to remove any metal. If you have a set of torch tip cleaners, they can be used to clear a clogged jet. In some cases, it's best (to reduce soaking time) to clear as much as possible with the tip cleaners then soak.
Note:
When replacing the lid on a gallon can of carburetor cleaner (or any hazardous substance), put the lid in place and push it down as far as you can with your (gloved) hands. To seal it completely, place a towel or rag on top of the can and gently tap it down (around the perimeter of the lid) with a rubber mallet. You need the rag/towel on top of the lid to prevent any liquid that's in the groove from splashing on you.
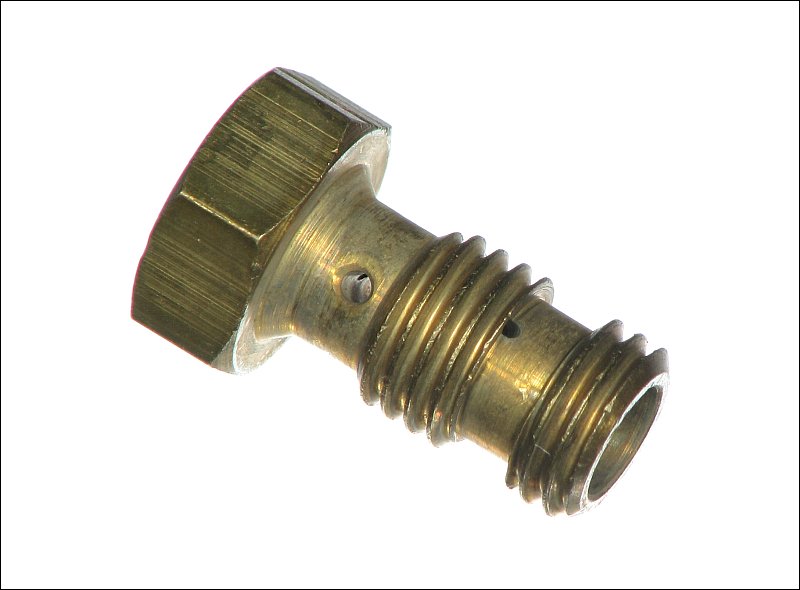
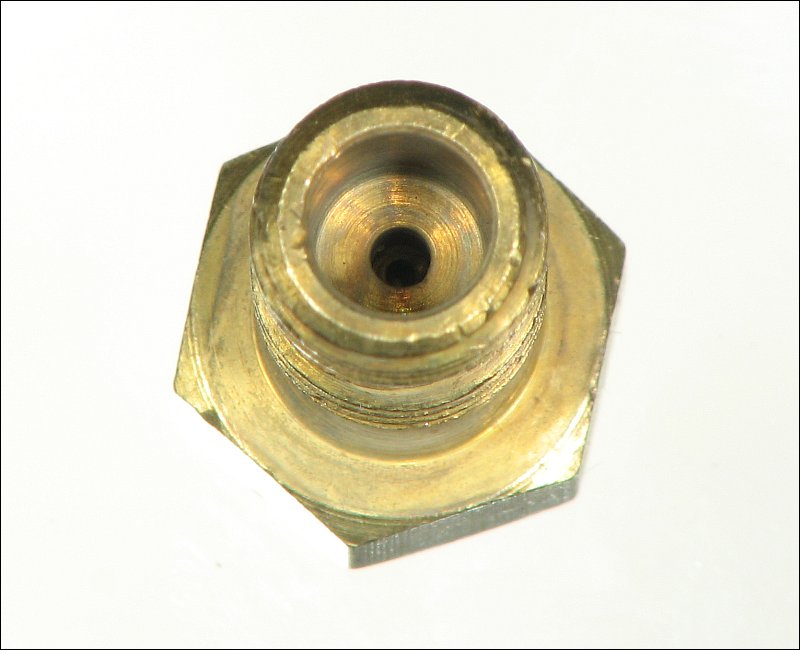
There are various types of jets. The one in the following image is made of brass and is screwed into the body of the carburetor. It can be removed to be cleaned or replaced.

The next two photos show the jet out of the carburetor.
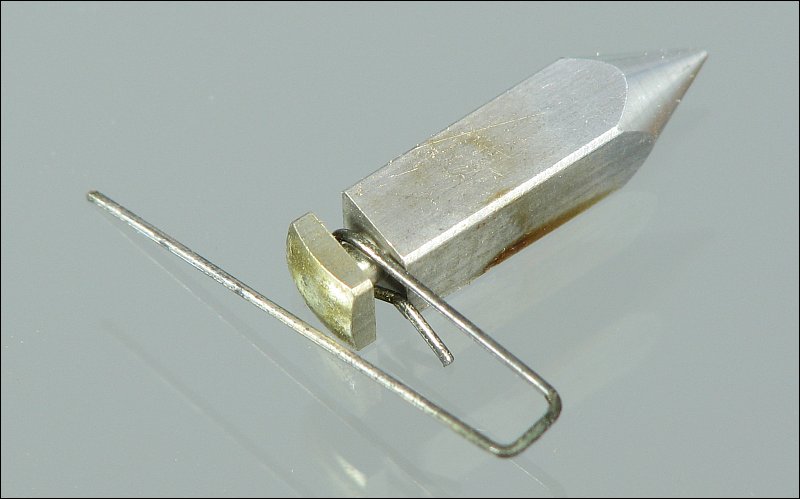
The jet/carburetor above was for a Honda engine. The jet below is for a Tecumseh carburetor. This one has 3 holes on the body of the jet. The bottom hole goes straight through (2 holes). Those are for high speed operation. The one near the top of the jet is the idle jet. All of these are ported to the center hole. All of these passages have to be perfectly clean for the engine to perform as it should.
Idle Adjustment Screw:
The next photo shows the idle speed adjustment screw. The screw simply pushes against the throttle lever to hold the throttle plate open a bit.
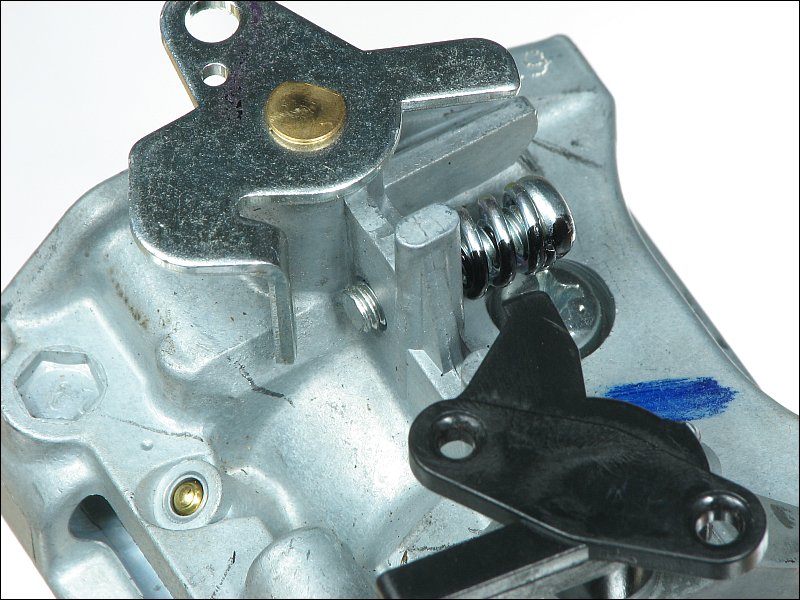
The Choke Plate:
There are two plates that can close off the airflow through the carburetor. One is near the engine. That's the throttle plate. The one at the rear of the carburetor is the choke plate. Generally, when an engine is not running, the throttle will be held wide open by the governor. When you spin it over, the engine develops a vacuum which pulls air through the carburetor. With the throttle plate open and the choke plate closed, the engine pulls a very rich mixture of fuel through it. The fuel/air ratio is much higher than when the engine is running normally. It needs this rich mixture to start. After the engine has run for a few seconds, you can generally set the choke to off (choke plate no longer blocking the throat of the carburetor). When the engine reaches the design speed, the governor pushes the throttle plate closed to a point where the engine holds at the correct speed.
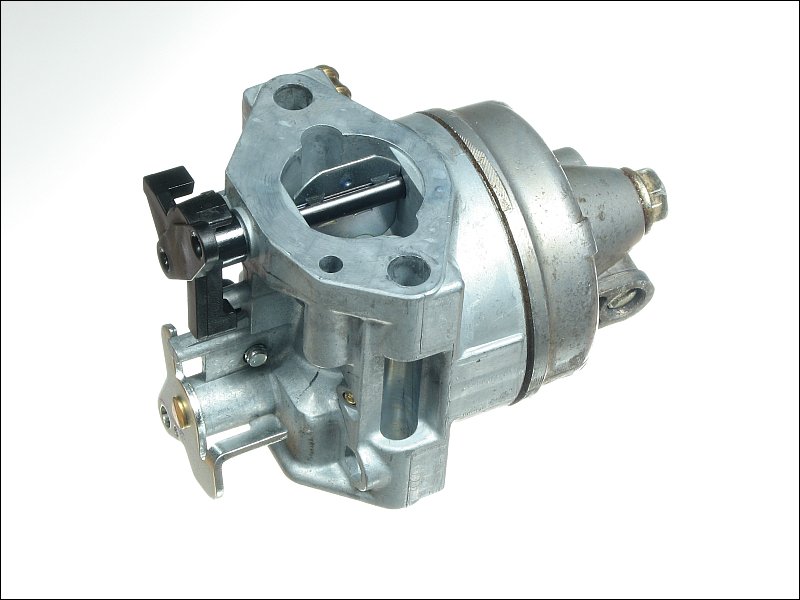
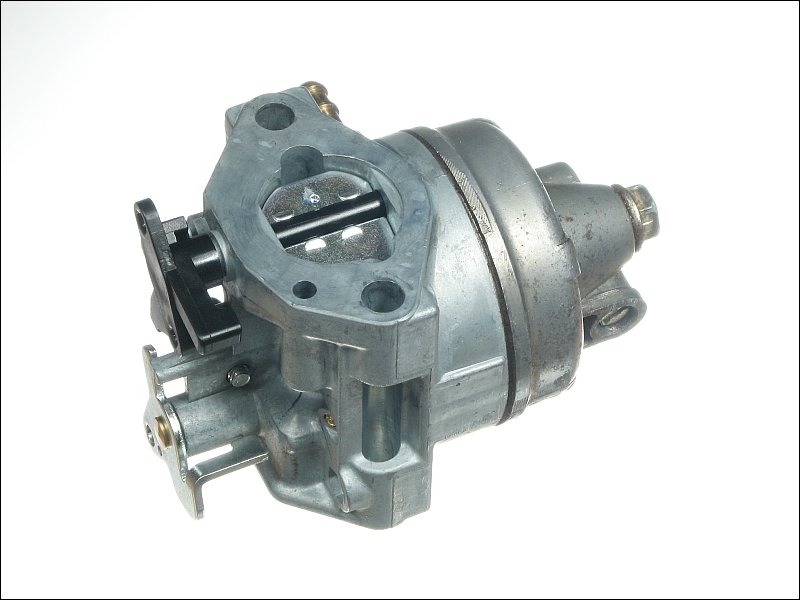
This is the choke plate closed. When reassembling the engine, you may want to either close the choke or tape over it. If you drop trash, a screw or nut into the throat of the carburetor, it could be difficult to retreive. If you don't notice that something fell into the engine and start it, it could destroy the engine. This also applies to the intake and exhaust ports. As soon as you put the head on the engine (if you had it off) or when you remove either the carburetor or the muffler, you should cover or plug the holes (with a 'clean' rag if you use a rag).
Primer Bulbs:
On some carburetors you will see a red primer bulb. You press it 2-3 times to pump fuel directly into the throat of the carburetor. This will allow most engines that use this type of carburetor to start on the first or second pull. These rarely fail but if they do, you can buy replacements. The one below was purchased from Lowes. It's for a Briggs and Stratton engine.

Back to the Top
|

