Sample Images
Raw notes.
(<< click)
Blender is a 3D animation/graphics application that is VERY powerful. Few people will ever use everything it is capable of doing. Unlike most of the software that people use (unfortunately, MS Paint),this software generates vector graphics. If something is generated in vector graphics, it means that whether the image is the size of a postcard or the size of a billboard, the image will remain sharp and clean. The files are not like bitmap/raster graphics where scaling up results in blocky/jaggy edges.
-
-
A section header with a name like 'Anything - OM' means that the section is specifically for 'object mode' except where indicated otherwise. The same applies to EM, for 'edit mode'. These are two of the main modes that you'll work in, initially. The features being described may work in other modes but these are the ones were going to use for this basic tutorial.
LMB, RMB and MMB are left, right and middle mouse buttons. MW would be mousewheel.
-
CTRL-anything is the control key and whatever other key pressed together. The same applies to SHIFT- and ALT-.
-
The 'T-panel' (tool panel, on the left) and the 'N-panel' (number panel, on the right) are opened and closed with the keyboard. There is sometimes a little '+' sign where the panels exit into the 3D workspace. The N panel is a second properties menu... of sorts. It lets you select options and read/enter various values. Remember T as tool and N as number.
-
If you see '<^>' before a section header, it means that there is a link to a page dedicated to the specific topic. To quickly find the linked pages, perform a CTRL-F search for <^>.
-
For any commands, like CTRL-C or CTRL-V, understand that the capitalization is because it's important. You wouldn't use uppercase for any commands. Also, the hyphen is simply there to mean that they are used together, pressed at the same time and not a sequence.
-
Other Notes:
-
Don't expect this to be written like a well-written story or novel. There will be terms used repeatedly, most spelled out. This is to get them burned into your memory. It will be repetitious but will help some to remember the various features of the software.
-
In Blender, the term TRANSLATE means move.
As with all developing software, there will be revisions. That and the ability to greatly change the layout of the software may make the version you have look significantly different than what's here. The functionality will be largely the same, especially at the most basic level that you will see here. When you go to a site like Blender's you might find two version (maybe more) available. One is designated as 'stable'. The other is generally a 'beta' version that's out for review, mainly to find software bugs. The developers generally believe it's 'stable' (working as it should) but want it tested before its release. The beta version that's currently available doesn't 'install' like most software where it's integrated into the operating system. The beta version is more like a 'portable' version of software and is essentially a stand-alone version. There is no risk (as far as I know) for this type of software (clean software from a reputable company) to do any harm to your computer. Someone correct me, if I'm wrong.
This software is free and mostly interesting, if you don't mind making a few
million mistakes along the way. Who knows? You may be an artistic genius with a blockbuster animated movie just waiting to be made... if you just knew how to use
Blender. You can come back and read this while you're waiting for it to download. It will download some Microsoft software that it needs to run and that is time consuming to download and install, so be prepared for that.
The reason that this page is here is because I could not find what I needed to get started quickly. There are a LOT of tutorials but virtually all of them seemed to gloss over things that I needed to know. They seem to be more of 'look at what I can do' than something that's produced to teach. While I hope that I don't seem to be doing that (I won't with my limited knowledge), this information assumes that you've been using various types of graphics software and at least know the basics how to use a mouse (how to open, save and close files...), in general software terms.
If you want to learn or need to know 3D software but will never need to have realistic images with lighting, shadows and such, Google Sketchup 8.0 (before it was sold to Trimble) is very good. It can be downloaded from OldVersions.com. Trimble's version up to 17 is also free but 8.0 is good software. The following is an example of what you might draw up in Sketchup (done with 8.0). If you hit this page from outside the site. There is a basic Sketchup tutorial above this in the tutorial (Item 10).
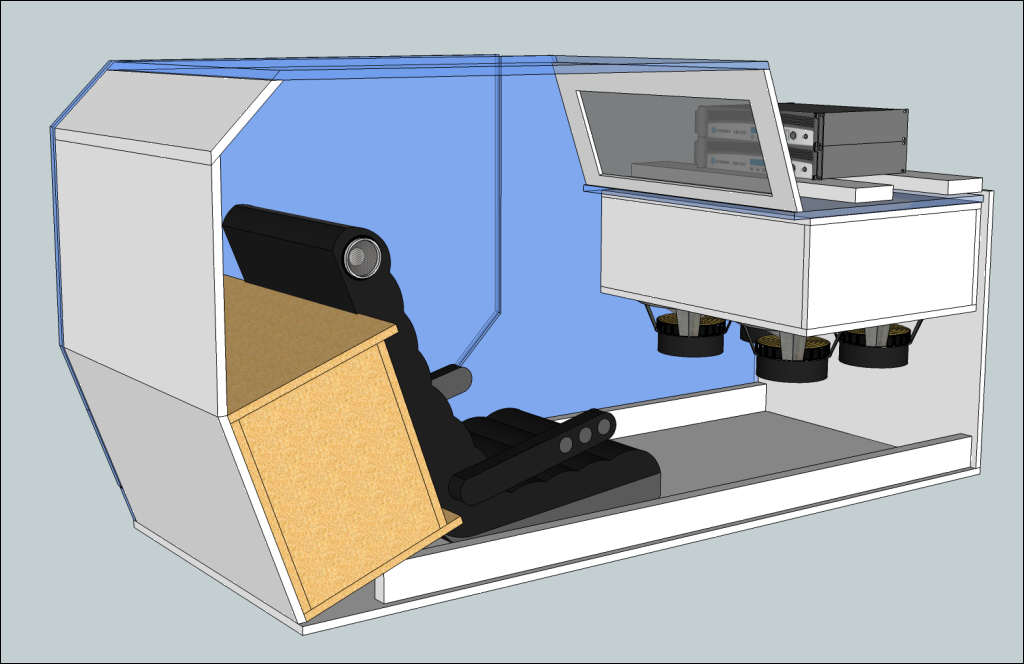
For those of you asking... what sort of idiot starts a page about Blender 3D software with a photo done in a competing application... Well, the kind of idiot who thought adding another tutorial to the hundreds of other tutorials for Blender was a good idea. I've never found a better way to learn something than to try to teach it to someone else. You might look at this as seeing notes I made for my own reference (which is actually how this started).
This short page is simply one of the 'first steps' in the long journey (you can stop, anywhere along the way) to learning what Blender can do. When you start this software, it may seem incredibly complex (and it is) but the complexity is necessary to give access to all of the features. You can forget about much of the information on the screen to start. I know I said that you shouldn't be intimidated but I have to show you the
beast lovely software in
all most of its
horror glory. This is the main screen. The 3D workspace is in the center. The various toolbars are around the perimeter. In the workspace, you can see the starting cube. Every time you start the software, you get a complementary cube. The grid is the ground-plane. The triangular object in the upper-right is the camera. In this software, you build the scene, simple or complex, whatever you need. You place and edit the objects. You paint and/or texture them and then light them. That's as far as I'll go with this tutorial. The more complex stuff like rigging, animation, the physics of motion... can be left to the Blender gurus.
Note:
The images are a bit long and may require scrolling on some computers/devices. Using 'full screen' mode can help, in some instances. Use F11 to toggle full screen for most browsers.
The image that pops up in the center of the window when the software opens is called the splash banner. It's generally something that you just click away and don't even read. This one is more useful than most. Besides giving various information about the developers, it gives you a list of recent projects. You can open them without having to go to file >> open...
This page isn't for those who refuse to read. From my other pages and sites (mainly the car audio site and from MANY years helping with amp repairs), people seem to be afraid of text. Either that, or they're too lazy to read. Nah....? Myself, I prefer written lessons because you can find items that you need to go back and re-read much quicker. Try doing a ctrl-f search on a video. It ain't going to happen. Even scanning the video, you might miss what you're looking for because only a fraction of the frames are shown in a scan with the scrollbar. Here, if you need to find something, come back and in a few clicks, you've found what you need. If you do need to re-read something and can remember the name of the feature or some other key word, do a CTRL-F search for the page.
You probably already know this but, computers and software crash. This can mean the loss of large, time-consuming projects. Save your work regularly while working on it. Remember that you'll lose everything that you've done since the last time you saved it, if there is a crash. After a long work day, I'd recommend going into your computer's file manager (My Computer in older Windows machines) and right-click copy the file and paste it into the same folder. It will show up as a copy. If you're doing a very large project, save copies outside of your computer (I've heard that one got stolen once). If it's not too large, email it to yourself.
If you screw up a Blender screen configuration (panels are frustratingly ornery), save your file (top left, save or save as) and close the program. << Seriously. Life's too short to fight with this aspect of Blender. All they have to do is add a right-click over the grab handle with a close or revert option. With the genius of the developers that designed the complexity of this software, they must not fix it because they think it's funnier to leave it as it. After closing Blender, wait a few seconds (most programs have to clean up after themselves) and re-open it. It will be just as before. If you now have a hole in your monitor and your hand hurts for some reason, reopening the software won't fix either of those.
This was moved to another page to help reduce the length of this page. Click
HERE.
Click the 3D workspace to clear the splash banner. Use CTRL-down arrow to minimize display. Click N to open N-panel. Click T if the T-panel isn't open. This will give you most of what you need, initially. CTRL-down arrow toggles the window configuration so click that again to return to the previous view.
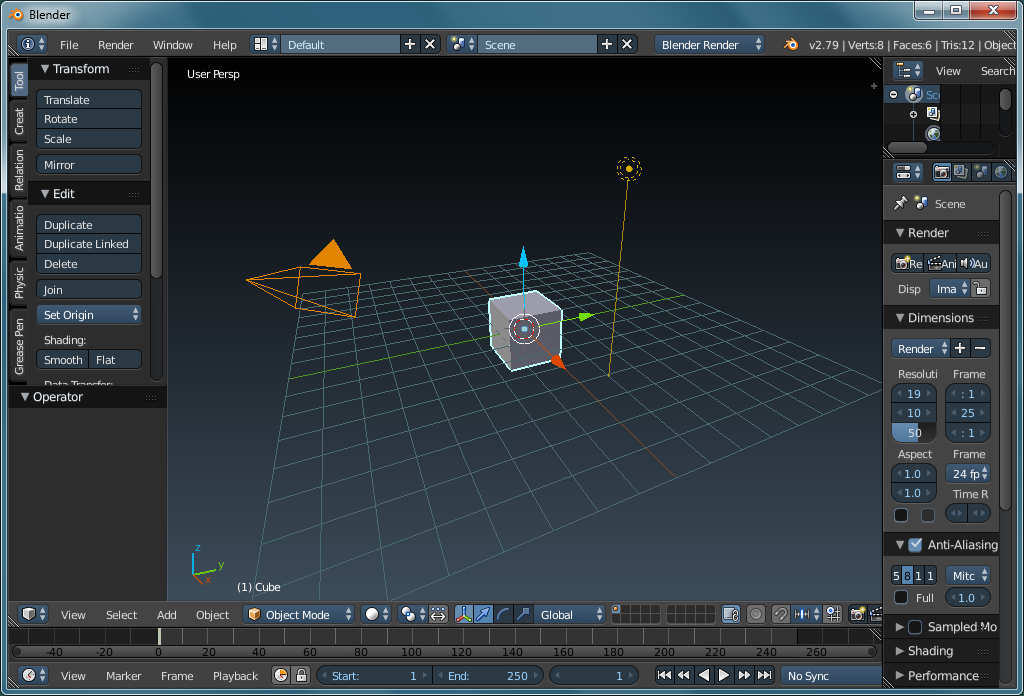
To give you the best chance of getting something from this and other related Blender pages here, it's going to be best if you open Blender and get some hands-on practice. The following scene is what you'll see when you open the program, after closing the splash banner. These are some of the things you should try. The mouse cursor will have to be over the 3D workspace for these to work as expected.
Right-click various locations and see how it places the 3D cursor (small, thin, round candy cane). Next, click the MMB (push the mouse-wheel down) and while it's down, move the mouse. You can see how you move the scene, or maybe more accurately, you move your position. Lastly, right-click on the cube, the camera and the light source to see how it highlights them. While highlighted, if you again right-click, they will stick to your mouse and move, until you left click to place them. If you really want to get fancy, click one of the x, y or z keys to constrain the movement to one of those axes.
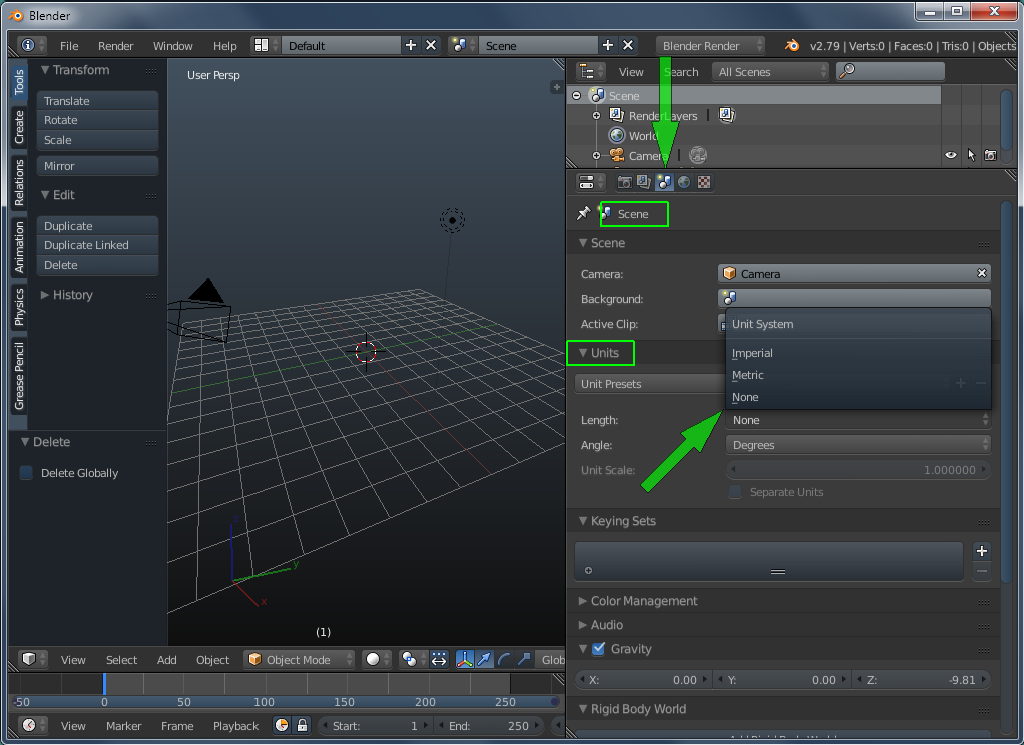
Initially, there are no real 'dimensions' in Blender, they are simply 'Blender Units'. You can change this to imperial or metric but they are not necessary unless you're making something to scale for the real world. I'd suggest that you leave the units set to 'none' unless/until you have a reason to change it. The rotational angles default to degrees. You can change it to radians if you'd like. For most,
2∏ radians is more abstract than 360°.
Side note:
Earlier, it was stated that Blender produces 'vector' graphics and that vector graphics can scale, essentially, infinitely. This is one reason that no real units are needed. As long as items are properly sized/proportioned, you can make them whatever size they need to be.
If you've never worked in 3D, you'll find that object positions are sometimes hard to determine. With symmetrical objects like the primatives (simple stock shapes... not including the monkey, she's a very complex... primate), you can be upside down and not even know it. Rotating/orbiting around, zooming in and out will help you 'get your bearings', so to speak. If you want an example of how far off you can be, place the 3D cursor somewhere on the screen and then orbit around to see how far off you are.
Maybe it's because I don't fully know the software but it appears to get 'stuck' fairly often. Hitting the escape key (sometimes, more than once is needed) gets it going again. If that doesn't work, try the ENTER key and the A key. Remember to put the mouse cursor over the 3D workspace when doing any of these.
-
-
EDIT mode is where you manipulate the various aspects (vertices, edges, faces -- internal mechanics) of an object.
-
OBJECT mode is where you manipulate objects.
After using the program a bit, it's obvious why there are different reactions/menus in the two most common modes, edit and object. To get an idea of what's different, switch between the edit and object modes with the tab key or the screen button below the 3D editing window (workspace).
For me, learning the keyboard shortcuts for the common tasks is easier than finding the buttons on the screen because there are so many menus and panels and sometimes, the list of options is positioned where you have to scroll to see what you need. Not everything is available via a keyboard shortcut but many of the most useful items are. One side note, except for a couple of the 'function' keys (top row of a standard keyboard), many can cause changes that are difficult to undo. As is stated elsewhere, if you make a mess of the display (panels, menus...), save your work, close and restart Blender.
The following are files that you can use for a reference. If you don't want to use them, do yourself a favor... Keep a list of the keyboard shortcuts that you find yourself using. Write them down the first time you use them and then make a second column/list for those you use repeatedly. If you print the file below, highlight the shortcuts you fine useful.
-
THIS is a printable copy that's black text on a white background in PNG format.
-
THIS is a version that is green text on a black background. I use it for wallpaper on my desktop. All that's needed it to 'peek' at the desktop (bottom right button - in the systray) to see the list.
One thing (of the many things) that you should know is that Blender isn't only aware of the mode you're in. It's also aware of where your cursor is. For any given screen, the keyboard shortcuts will change their action with regard to the cursor's location. If it's over the 3D workspace, keystrokes will have a different action than when the cursor is over controls (properties area and such). So, you can't just leave your cursor anywhere on the screen and expect all functions to do as you might expect.
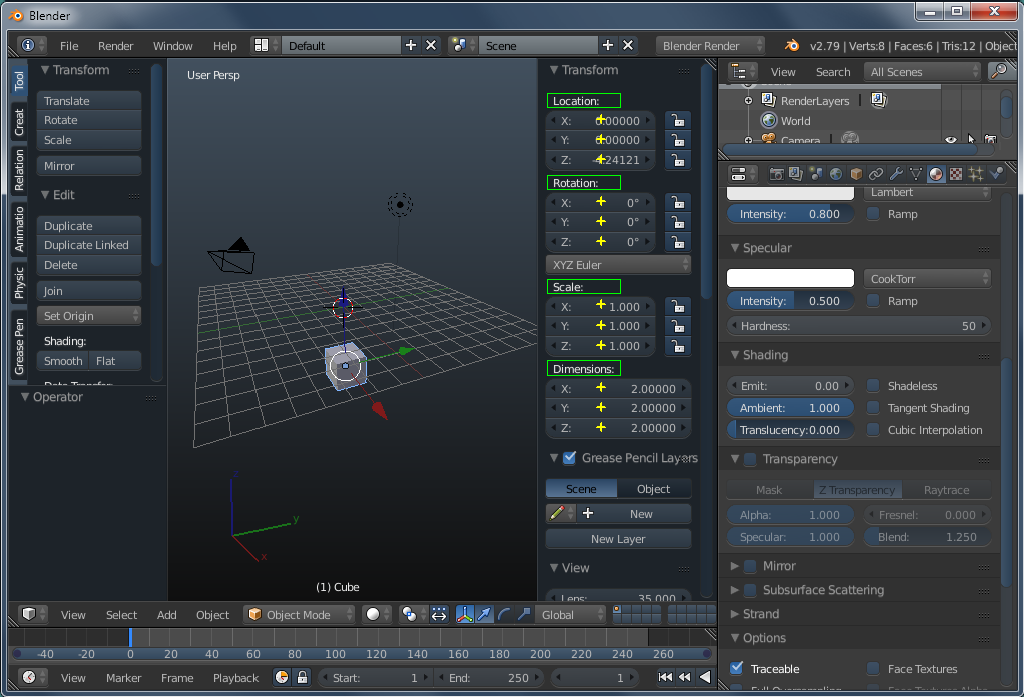
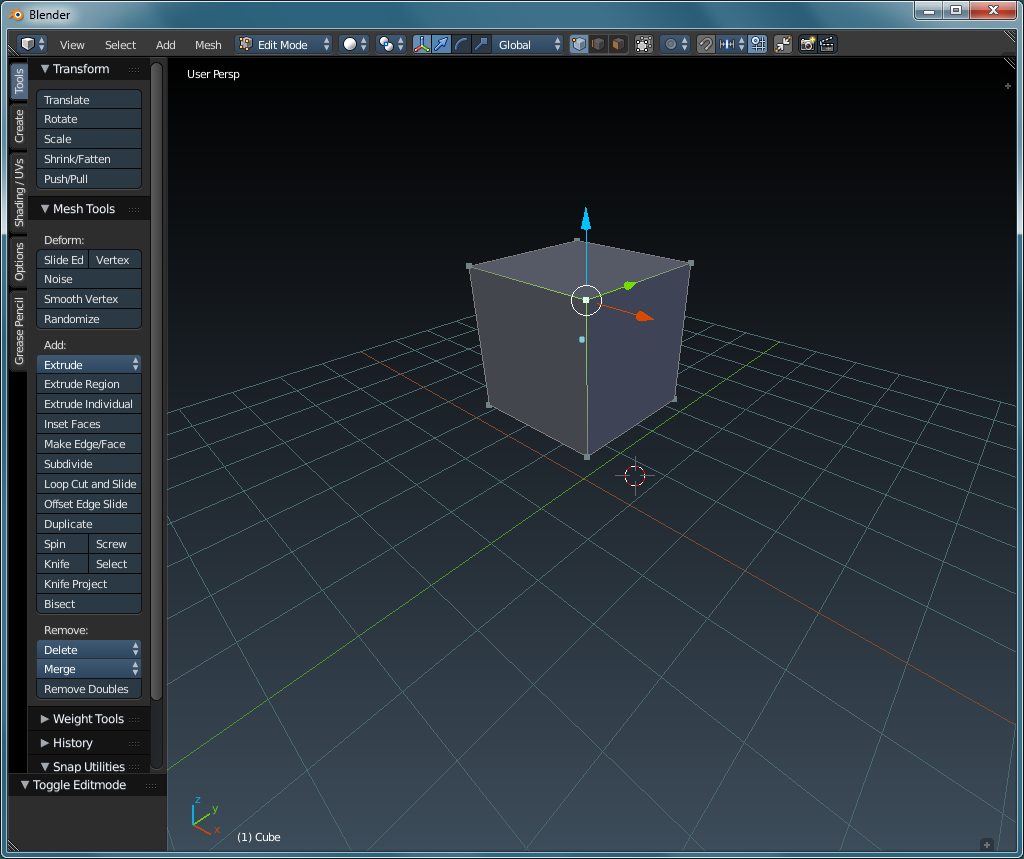
In the next 3 images, you see the toolbars for both the object and the edit modes. Between is the switching menu to switch between them but it's generally quicker to hit the tab key which does the same thing. One thing to note, if you don't have an object to edit, it won't switch to edit mode. Later on this (or a related) page, more will be explained regarding the various tabs.
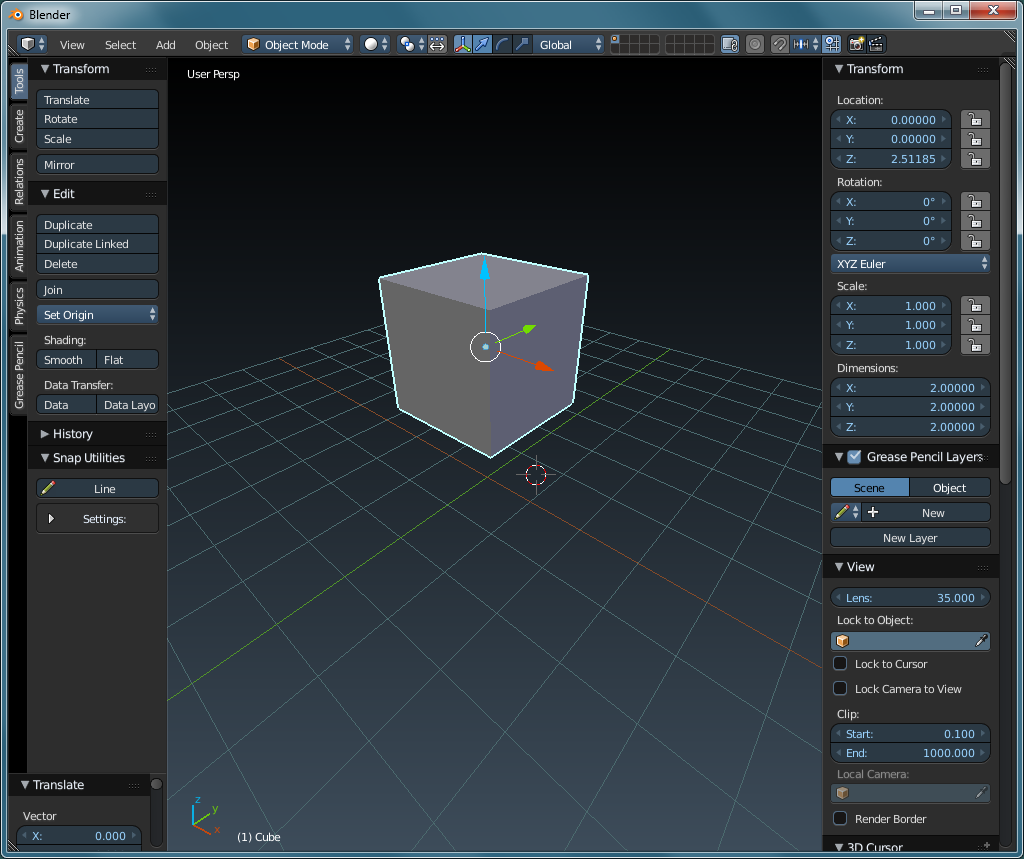
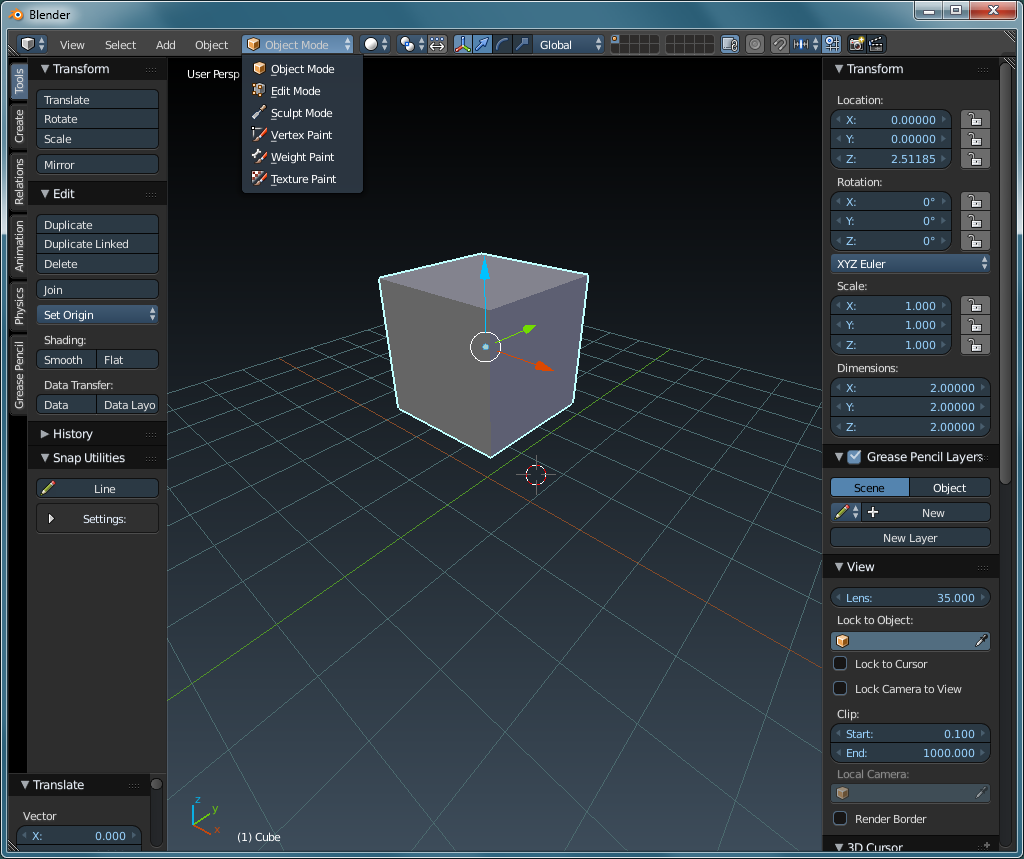
Something you should notice (besides the mode change) is the way that the object is highlighted. In OBJECT mode, the entire object is a solid structure. In EDIT mode (below), each individual part is a separate entity. There are 6 faces, 8 vertices (one on each corner) and 12 edges. The edges span between the vertices. In object mode, you manipulate entire objects. In edit mode, you can edit the way that those objects are arranged. This information is part of what's shown just above the workspace.

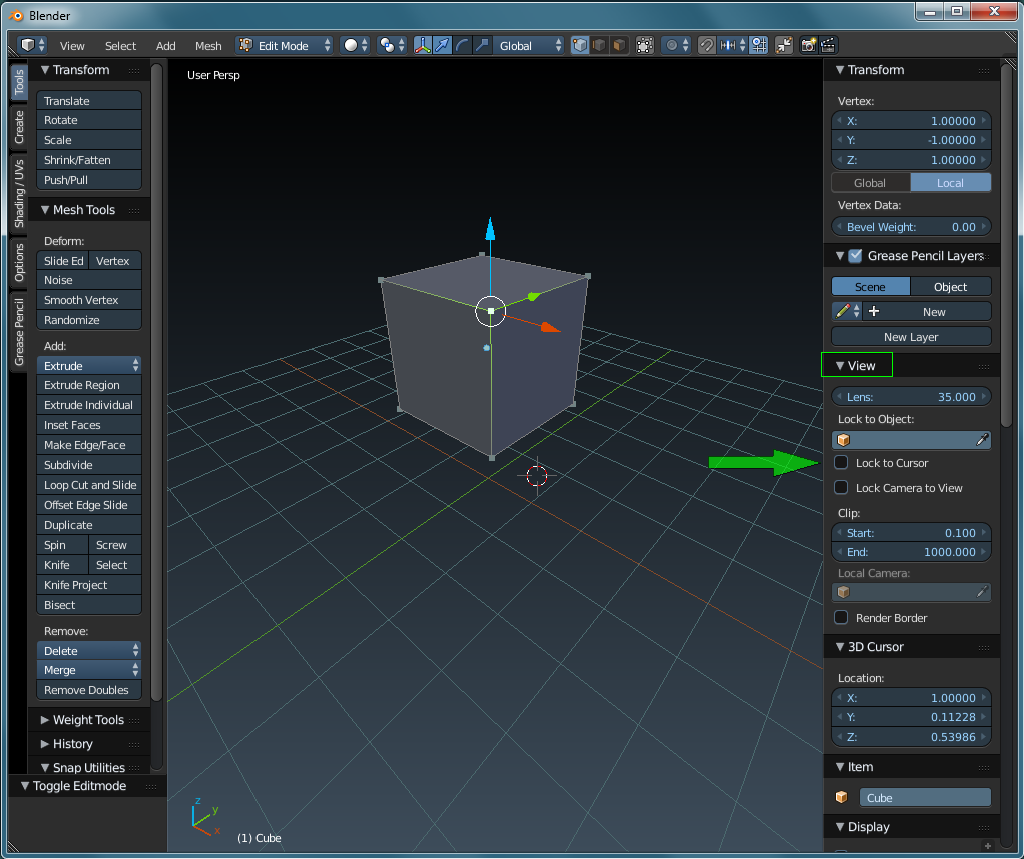
There is a nice option in the image above. It's the 'lock to cursor' feature. When you're just starting out, you may have some trouble quickly/precisely navigating with pan and zoom with the mouse. If you're trying to examine one object or one point, place the 3D cursor at that point and until you de-select that option, the view will be on that point. If you want the cursor at the center of the object, you can use the SNAP feature. Select the object (if that's where you want the focus) and use the SHIFT-S keyboard shortcut to bring up the SNAP menu. Select CURSOR TO SELECTED option and the cursor will snap to the origin of the object that's selected.
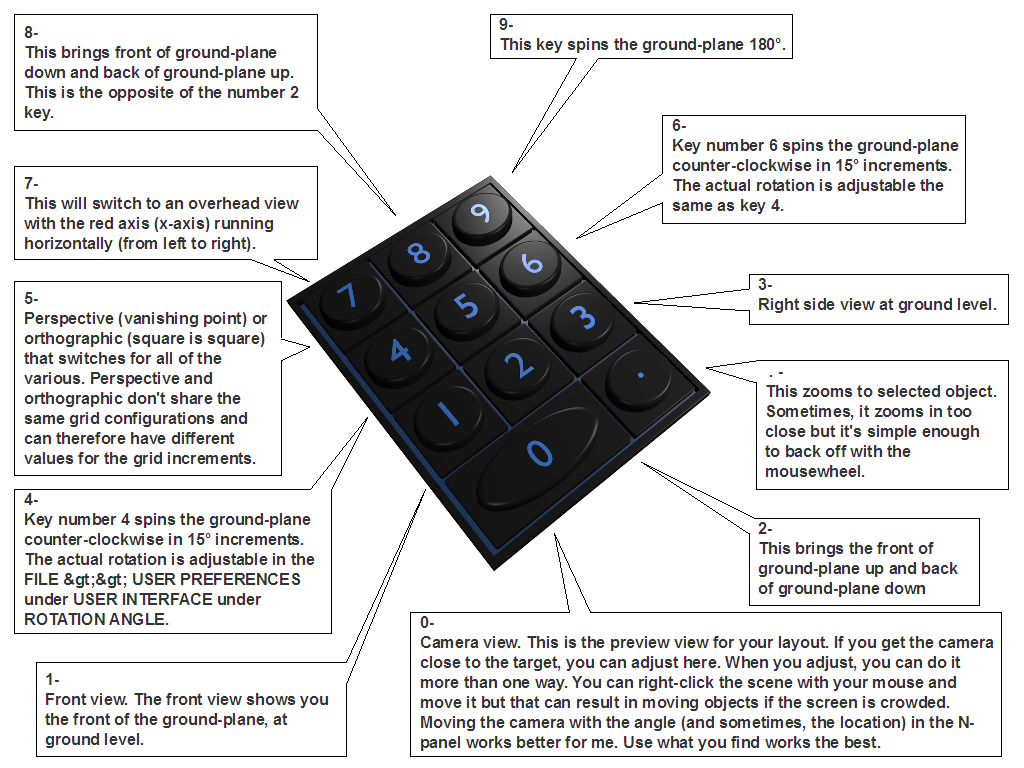
Sometimes you may zoom in or out too quickly and you lose track of the object, or even the full stage. There are at least three options to get you back where you need to be to be able to navigate to where you want to be. The HOME key. In some extreme instances, you have to use CTRL-HOME and finally the trusty CTRL-C. The latter centers the 3D cursor on the grid and zooms you in nicely.
Moving the viewpoint is generally done with the LMB (clicking and holding) or the mousewheel (click-hold-drag 3D workspace) but can be done other ways. If you need to really want to get in tight (tighter than the mousewheel will generally get to an object), use the walk/fly mode. SHIFT-F enables it. Escape or RMB disables it. The WASD keys move. The W is forward. The others move you in their location with reference to the W key. If/when you try this (you should, even if you don't currently need it), look below the 3D workspace for all of the options  that you can use with this feature.

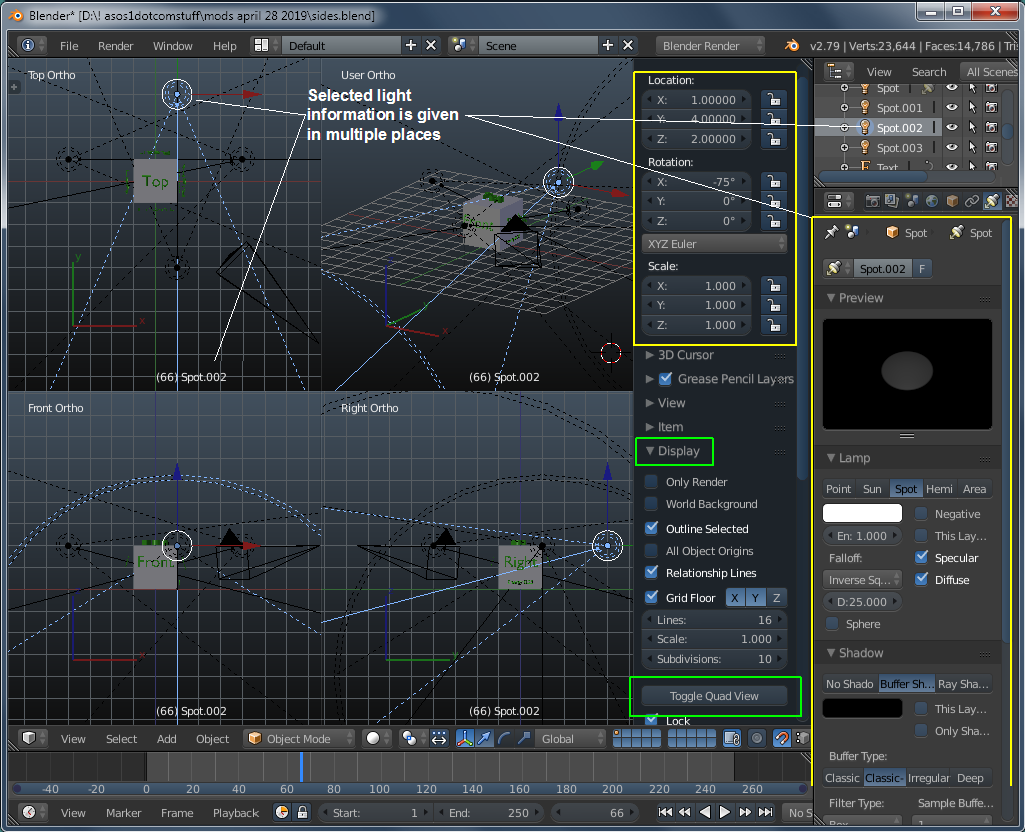
Below is an example of some of the places that you can find information on a particular object. The white lines show where information applies to one single light. The 'outliner' in the upper-right is a list of what's in the 3D workspace including cameras and lighting. There is something that you may not notice if it's not pointed out and that's the 'toggle quadview' button under the 'display' section of the N-panel. One reason that you may not notice it is because it may not be visible. Look at the triangles next to the section names in the panel. If they're pointing right, the section is collapsed/closed/hidden. When pointing down, you can see the items for that section. Closing the sections that you aren't concerned with will make more of the important items visible and require far less scrolling to see what you need to access.

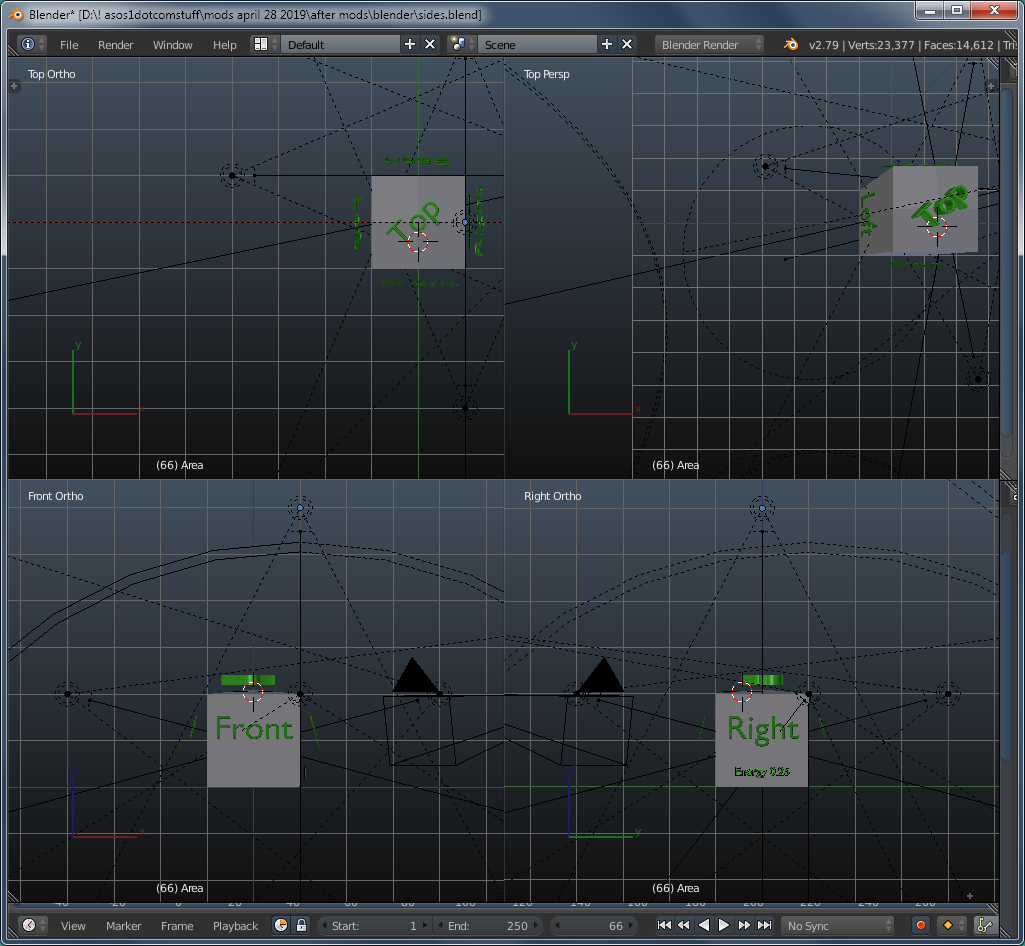
The difference in orthographic and perspective is the difference between a technical view and a more realistic view. In perspective mode, when you're looking straight down on an object like a cube, you won't see the sides of the cube. That's while looking straight down. As soon as you move the object off of center, you begin to see the sides and the top (which was perfectly square), begins to become distorted. The distortion is the same as what you see when looking down a straight run of railroad tracks (when no train is coming). The tracks are well apart up close but the farther they get from your position, the closer together they appear. In the quadview below, the 'user persp' view is distorted off to the side. The other 'ortho' view remain un-distorted. In the front and right sides, the bit you see on top is because the top of the cube has a small peak that was added to affect the shadows when rendered.

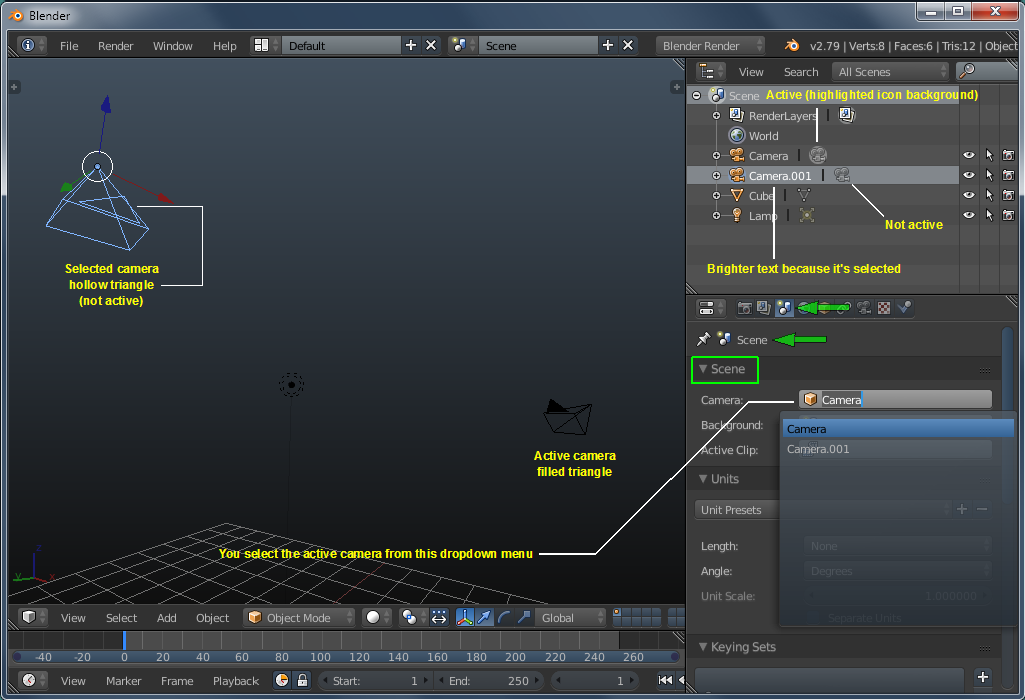
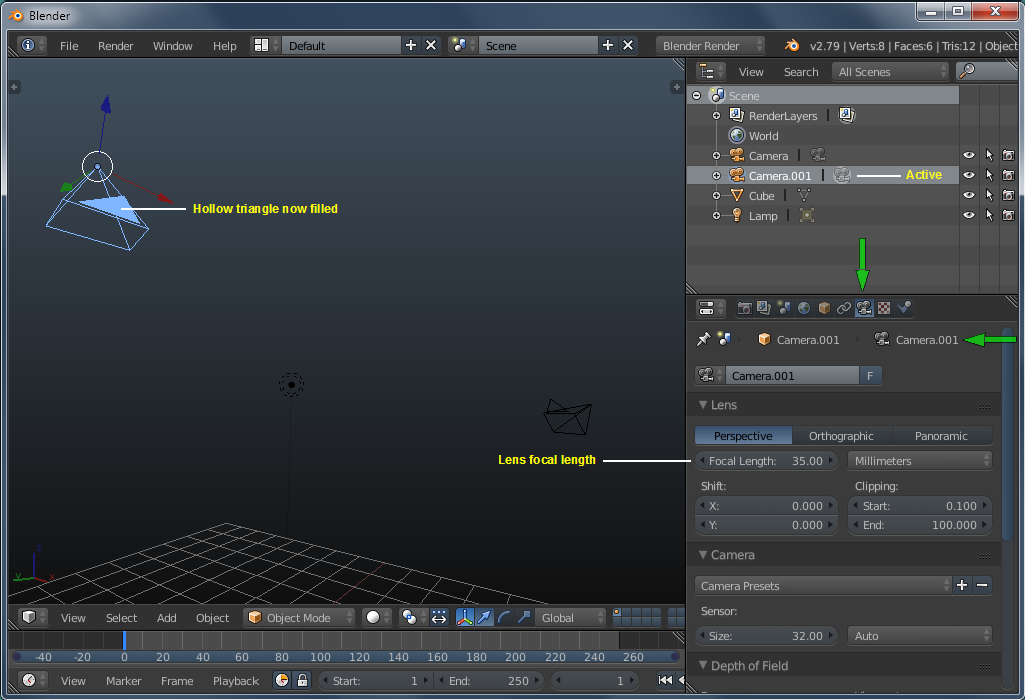
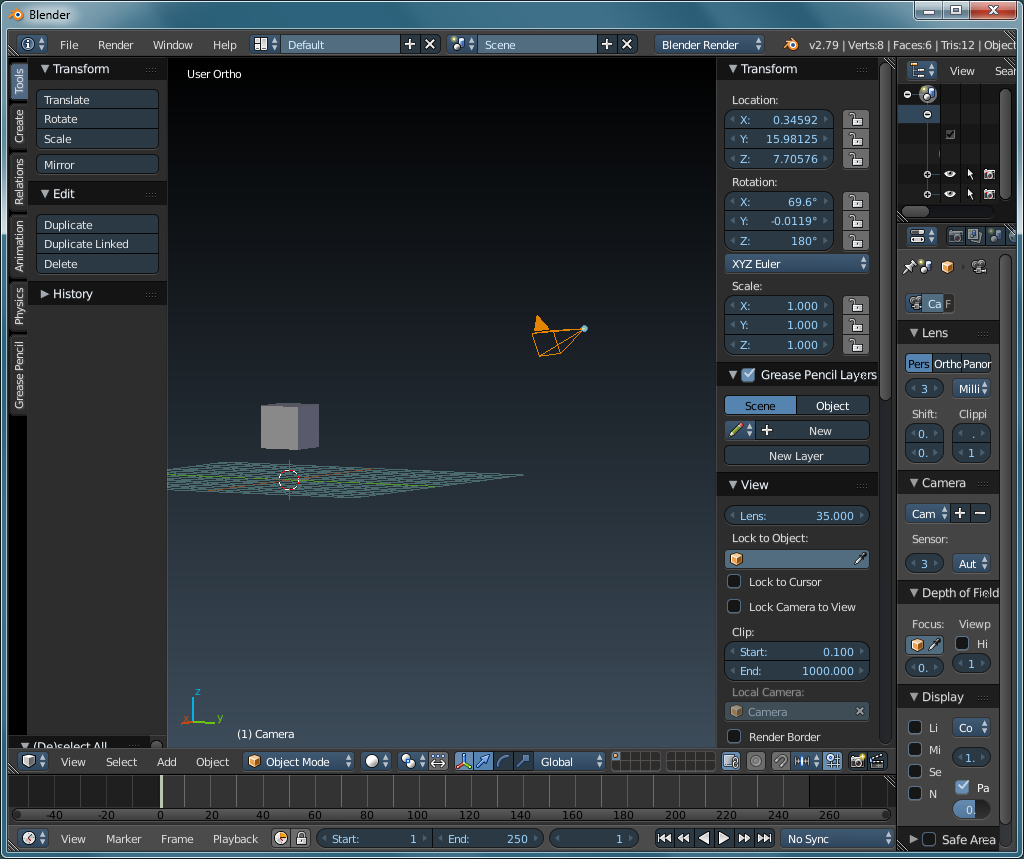
Multiple cameras were mentioned above. The following images show some of what you need to know about having multiple cameras.

The 'focal length' is important. A 'wide angle' lens covers a much wider area at any given distance. A 'normal' lens (35mm film equivalent) is a 50mm lens. A lower number (i.e. 28mm) is a wider angle and shows more. Lenses 90mm and greater could be considered telephoto lenses and 'zoom in' on a scene. For basic scenes, there are adjustments that you can make to compensate for the wrong focal length. When the focal length becomes important is when you want a limited depth of field (area in sharp focus, near to far). That's for more advanced users (not me).

With this software, there is virtually nothing that it can't do but, like the right-clicking that it uses (by default, can be changed), it does them in a different way. One example is grouping. In most software, you select multiple objects and then click 'group' or CTRL-G. Here, if you do that, it does very little. To connect objects (in a way that doesn't cement them together) so that they can be moved as a group, you give them a 'parent/child' relationship. The simplest way to do this is to use CTRL-P. You select multiple objects, with the parent selected last (very important, parent LAST). Then click CTRL-P and select 'object' from the top of the list in the pop-up dialog box.
If you've downloaded the software, open it and select the cube (right-click if you haven't switched it to left-click in the user preferences). Click CTRL-C and select 'copy selection to buffer'. This will copy the item to a memory buffer (you should see a message just above the top of the workspace). Move the object/cube (preferably with the widget arrows) and click CTRL-V. This will place a second cube where the original was when you copied it. These copy and paste commands must be done with your mouse cursor somewhere inside the workspace. Otherwise, the software will assume that you're trying to copy and paste something in one of the various panels/menus. This will give you the two objects you need for the next section.
To group this way, you select the items to be grouped, selecting the parent last (that's very important). Then CTRL-P and select 'object' from the menu. From that point on, you move the parent to move all of the items. Like in (ideal) life, the children can move around independently but when the parent moves, the children follow. Using the two objects, select one then while holding the SHIFT key down, select the other. Using CTRL-P as previously mentioned, select 'object' from the menu that popped up when you clicked ctrl-p.
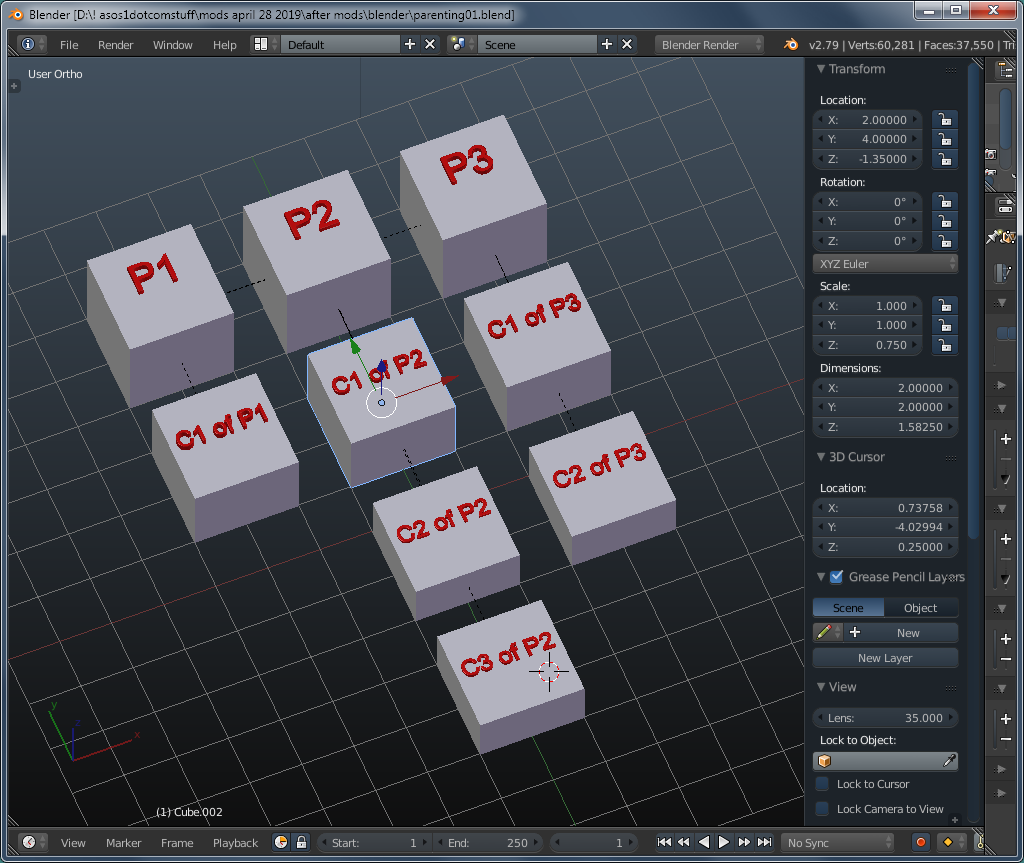
Now, if you move the child (or one of the children, if there are multiples), it is the only one to move. If you move the parent, all move. This can be done, no matter how the objects are positions in the 3D workspace. THIS is a Blender file (used to produce the graphic below) that allows you to see how the parent child relationship works. Here, there are three parents but P1 is dominant. It controls the other parents. Since the dominant parent controls the other parents, it controls all. Parents P2 and P 3 control their children only.

It's sometimes annoying to move objects with parenting because you have to grab/select the right object. This can be made easier if the larger piece is the parent. That may not always be the case. 'Joining' is another option but it merges the two objects together. In some instances, the actions are not intuitive. One time, it combined objects and all took on the material (color) of the larger object. In the parenting .blend file above, it did not when the cubes were joined with the text. They didn't exhibit the materials (color) change as before. The keyboard shortcut for joining is CTRL-J. Alt-J will undo the join but I think it's only just after the joining operation.
To give a bit more information on joining... It was stated that the text was joined with the cubes. It wasn't as simple as just clicking ctrl-j. To use the join feature, you have to be combining meshes. The objects in Blender are a wrapped mesh wire frame. The text is a whole different animal and you can't simply combine it with the primatives. To convert the text to a mesh (it will no longer be editable in the text dialog area), do the following. After doing this, you can combine the objects.
-
create and format text
-
ALT-C to convert text to mesh. You could stop here but the following is generally recommended.
-
Go to EDIT mode and use CTRL-V and select REMOVE DOUBLES (this removes vertices that are at precisely the same location which is better for various aspects of rendering and animation)
-
Switch back to OBJECT mode.
-
Now, you can use CTRL-J to join the two objects.
CTRL-V was used above. That's the VERTICES menu. There are menus for the edges (CTRL-E) and for the faces (CTRL-F). These are only available in EDIT mode because the vertices, edges and faces are only accessible in EDIT mode.
-
-
There is a feature of this software that allows you to enter a command (to move, to extrude, to rotate...) and then enter a value. For example, you could enter the command to rotate an object (using the 'R' key). After clicking R, you could rotate the object freehand. For a more controlled rotation, you could enter the letter of the axis that you want the object to rotate around. This would constrain the rotation to the X, Y or Z axis. If you wanted even more precision, you could enter the value of the the desired rotation (in degrees, by default). For example RX90 or RX22. In some instances, the rotation may need to be a negative number. When you enter the number (let's use 90, here), when you enter 9, you may see that the rotation is the wrong direction. You can backspace and enter the value as -90. You would hit the enter key or press the LMB to confirm the operation. For moving, you can highlight an object, hit GX2 and the object will move 2 units on the X-axis.
-
When selecting an object in EDIT mode, you have to select everything that you want to move. If you use one of the select tools like box select, circle select or lasso select, you can only select what's visible. To select all with those tools, you either have to rotate around and select them or switch to wireframe mode.
-
When you want to manipulate an object, you can use the various text fields. There are multiple ways to change the values in those fields. The simplest (not the most precise) is moving the object freehand. As it's moved, the various values will update. The next is good to give you an idea of what the rough value should be. This involves clicking on the areas indicated by the cross. You click and hold (don't release) and move the mouse slightly left or right. When you get the object close to where you want, you can look at the value and then use the third option, to enter the values manually. If the value you go with either of the previous options gives you something like 2.341 and you want to clean that up a bit, you can enter something like 2.25 or 2.5. To enter the value, click and release. The old value will be highlighted and ready to be overwritten. If you inadvertently click twice, you will de-select the text and you'll have to erase the values or click somewhere else to allow the text field to reset. Then click and release (one click) again to enter the value.

THIS is a video clip that's a bit too large but that's how it came out. It crashes VLC Media Player but works fine in Windows Media Player. It shows the changing of values through dragging your mouse cursor on the text-field area. The mouse is replaced with a circle in the video (you will click and hold your mouse button down and move it as the circle moves). The mouse is released each time it's moved to another field. At the end (0:16), you can see what happens when you click and release. The value becomes highlighted and allows you to enter a new value. if you inadvertently do this, click out and start over (click and hold).
The following are pages that grew to be a bit too long for the main page.
Click
HERE for the page on selecting objects.
Click
HERE for the page on moving objects.
Click
HERE for the page on the 5 light sources and their effects.
Click
HERE for the page on moving objects.
Click
HERE for the page for adding text.
Click
HERE for the page regarding the EXTRUDE feature. This tool is used for duplicating or extending objects.
Click
HERE for the page regarding the what the ORIGIN of an object and why it's important.
Click
HERE for the page regarding the BOOLEAN modifier. This tool is used for duplicating or extending objects.
Back to the Top


 that you can use with this feature.

